Close Menu
  • Home
  • About
  • Wearables
  • Earbuds
  • Computer Accessories
    • Routers
    • Remotes
  • Embedded
    • Single Board Computers
    • Addon Boards
    • Raspberry Pi
  • Wireless Routers
  • Contact
Facebook X (Twitter) Instagram
Trending News
  • CamThink NE301—Seamless Low-Power Edge AI Camera Module for Local Models
  • Orange Pi 6 Plus Review: A 12-Core SBC Powerhouse (Benchmarks, Specs, and Pricing)
  • Orange Pi 6 Unveiled: The Affordable, Slimmed-Down SBC Alternative to the 6 Plus
  • Ugoos SK4 Review (2025): The Best Mid-Range Android TV Box for Value & Features
  • AliExpress Black Friday 2025: 🚨 LATEST Deals & ALL Exclusive Country Promo Codes (Save 90%!)
  • LattePanda IOTA Review: 4 Reasons It Beats Raspberry Pi 5
  • POCO F8 Ultra/Pro global release date unveiled, showcasing flagship-level specs
  • Ugoos GaN Chargers 2025: 35W, 65W, 140W – Fast, Compact & Universal
AndroidPIMP
Facebook X (Twitter) Instagram
  • Home
  • About
  • Wearables
  • Earbuds
  • Computer Accessories
    • Routers
    • Remotes
  • Embedded
    • Single Board Computers
    • Addon Boards
    • Raspberry Pi
  • Wireless Routers
  • Contact
AndroidPIMP
Edge AI Hardware

HUSKYLENS 2: DFRobot’s New AI Machine Vision Sensor Unveiled

By androidpimpNovember 5, 2025Updated:December 2, 2025No Comments16 Mins Read
Facebook Twitter Pinterest LinkedIn Tumblr Email
Follow Us
Google News Flipboard
HuskyLens 2 AI Machine Vision sensor
Table of contents
  1. HUSKYLENS 2: An advanced AI-powered machine vision camera perfect for AI and robotics applications.
  2. Part I: Introducing the Product
  3. A full up-close view of the product
  4. Key Features
  5. Model Context Protocol (MCP) support and large language models (LLMs)
    1. 🧠 MCP (Model Context Protocol)
    2. 🤖 Leveraging the LLM
    3. 🚀 Why It Matters
    4. 🧠 What is LLM all about?
    5. 📚 How It Works
  6. Specifications
  7. With over 20 built-in algorithms ready to use
  8. Applications in education and AI project development.
  9. Broad compatibility with popular controllers and SBCs
    1. Wide Controller Support
  10. What’s included in the package?
  11. Additional accessories
  12. Part II: HUSKYLENS 2 Review (Currently being updated)
    1. The Product Package
  13. Unboxing all Items
    1. Package Contents
  14. The Main Module/Unit
  15. The camera module
  16. Interfaces
    1. HUSKYLENS 2 Power Board
      1. The advantages of the Power Board
      2. So, when would you need to use it?
  17. Operation
    1. Standalone mode
    2. Self-Learning Capabilities (A partial list)
  18. YOLO-Style Workflow
    1. How It Works on HuskyLens 2
  19. Connecting with external hardware
    1. Interfacing with the Orange Pi RV2
      1. Orange Pi RV2 to HuskyLens 2 Wiring (I2C Mode)
      2. Orange Pi RV2 to HuskyLens 2 Wiring (UART Mode)
  20. Connecting the Orange Pi RV2 to the HuskyLens 2 in I2C mode.
  21. Software Setup
    1. 1. Enabling the I2C3 interface
    2. 2. Installing I2C Tools
    3. 3. Installing the HuskYLENS Python library
    4. 4. Checking for available I2C devices connected to the HUSKYLENS 2
  22. Price and availability

Operation

This hardware can be operated in two main ways: either as a standalone device without connecting to external hardware like an SBC (Single Board Computer) or controller, or by using I2C or UART interfaces and connecting them through the provided cables included in the kit.

Standalone mode

In this mode, without any assistance of a PC or integration of external hardware, users access over 20 AI models built into the device firmware, all available through an intuitive easy to operate display. There’s also an option to import additional models, and the company frequently introduces new ones, broadening the range of applications. Since the AI algorithms are stored locally, there are some limitations without server access. Occasionally, the device might struggle to recognize simple objects during object recognition.

On the bright side, it includes a self-learning classifier that allows you to teach it to recognize new objects by showing them to the camera and assigning labels. For more advanced scenarios and improved accuracy in recognition, you can pair it with local or cloud-based LLMs, ensuring you’re covered with both options.

Self-Learning Capabilities (A partial list)

  • Learn Any Object: HuskyLens 2 features a self-learning classifier that allows you to teach it to recognize new objects simply by showing them to the camera and assigning labels.
  • Assign IDs and Names: When an object is learned, it’s saved with an ID and an optional name, enabling the device to identify it later and provide relevant information.
  • No Coding Required: You can train objects right on the device using its touchscreen interface—no coding or external tools required.

YOLO-Style Workflow

Developed by DFrobot, the YOLO-style workflow on HuskyLens 2 lets you train and deploy custom object detection models using the popular YOLO (You Only Look Once) architecture, allowing recognition of objects beyond the built-in AI models.

How It Works on HuskyLens 2

  1. Collect Training Data:
    • Capture or gather images of the objects you want to detect.
    • Annotate them using tools like LabelImg or Roboflow to create bounding boxes and labels.
  2. Train the Model:
    • Use a YOLO-compatible framework (e.g., YOLOv5 or YOLOv8) to train your model on a computer.
    • Export the trained model in a format compatible with HuskyLens 2 (usually ONNX or a converted binary format).
  3. Deploy to HuskyLens 2:
    • Transfer the model to the device via USB or SD card.
    • Use the touchscreen interface to load and activate the model.
  4. Real-Time Detection:
    • Once deployed, HuskyLens 2 can detect and classify objects in real time using your custom model.
    • It outputs object ID, position, size, and confidence score, which can be used to trigger actions via microcontrollers.

Connecting with external hardware

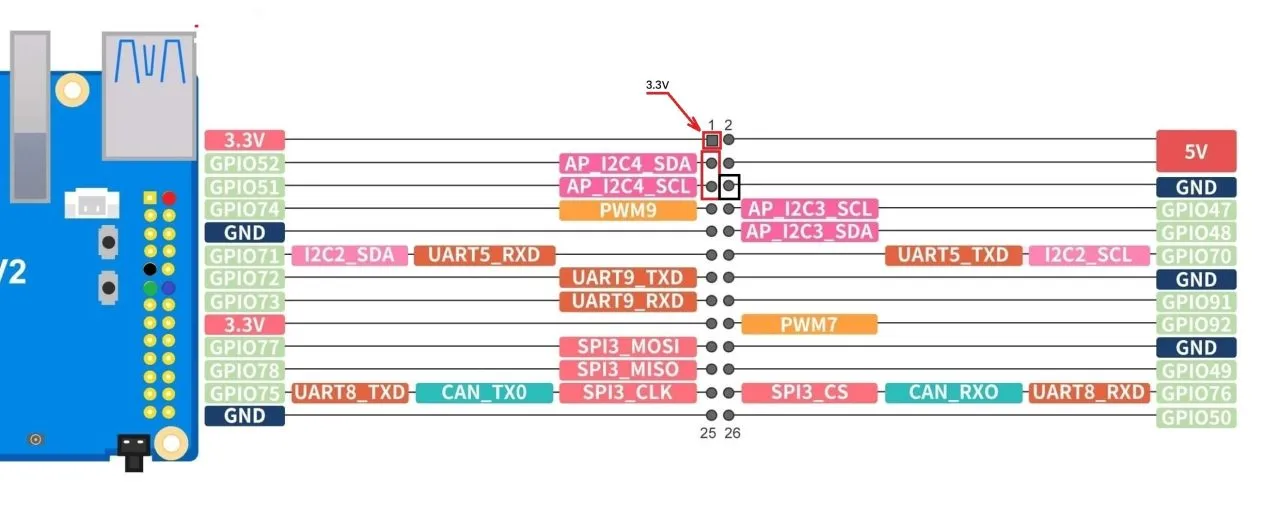
The HuskyLens 2 connects easily to controllers and single-board computers through standard protocols like UART and I2C. During our test, we paired it with the Orange Pi RV2 SBC and chose the GPIO interface for the connection, as it seemed like the simplest option.

Interfacing with the Orange Pi RV2

Orange Pi RV2 to HuskyLens 2 Wiring (I2C Mode)

HuskyLens 2 uses a 4-pin connector labeled:

HuskyLens PinWire ColorFunctionOrange Pi RV2 GPIO Pin
–BlackGround (GND)Pin 9 (GND)
+RedPower (VCC)Pin 1 (3.3V) or Pin 2 (5V)
TDoesn’t matterI2C Data (SDA) Pin 3 (SDA)
RDoesn’t matterI2C Clock (SCL)Pin 5 (SCL)

Connecting to the Orange Pi RV2 board through the GPIO header pins.

Interfacing Orange Pi RV2

Orange Pi RV2 to HuskyLens 2 Wiring (UART Mode)

Use the 4-pin connector on HuskyLens labeled T (TX), R (RX), –, +:

HuskyLens PinWire ColorFunctionOrange Pi RV2 UART Pin
–BlackGND →Orange Pi GND
+RedVCC →Orange Pi 5V or 3.3V
TGreenTX →Orange Pi RX
RBlueRX →Orange Pi TX

⚠️Notes!

  • Please check voltage compatibility: HuskyLens 2 works with both 3.3V and 5V, but the Orange Pi RV2 GPIO may vary based on your OS and settings.
  • HuskYLENS 2 needs a stable 5V power supply and can draw up to 230 mA or more. Make sure to connect VCC to one of the 5V GPIO pins.
  • If you choose the UART option, because the Orange Pi RV2 uses a 3-pin header for UART without VCC, you will likely need to use one of the RV2 GPIO pins.

Since the Orange Pi RV2’s UART header only includes TX, RX, and GND pins without a VCC (power output) pin, you can try a workaround by interfacing with the RV2 GPIO pins.


Connecting the Orange Pi RV2 to the HuskyLens 2 in I2C mode.

After identifying the I2C pins on the Orange Pi RV2 GPIO header and connecting them, we installed the latest Ubuntu image from the Orange Pi website and resolved a few issues.

Switching the repositories from China to a U.S.-based server for faster download speeds.

mv /etc/apt/sources.list.d/docker.list /etc/apt
mv /etc/apt/sources.list /etc/apt/sources.list.backup
truncate -s 0 /etc/apt/sources.list

Next, we modified the file /etc/apt/sources.list.d/ubuntu.sources and set it up to:

Types: deb
URIs: http://ports.ubuntu.com/ubuntu-ports
Suites: noble noble-updates noble-backports
Components: main universe restricted multiverse
Signed-By: /usr/share/keyrings/ubuntu-archive-keyring.gpg

## Ubuntu security updates. Aside from URIs and Suites,
## this should mirror your choices in the previous section.
Types: deb
URIs: http://ports.ubuntu.com/ubuntu-ports
Suites: noble-security
Components: main universe restricted multiverse
Signed-By: /usr/share/keyrings/ubuntu-archive-keyring.gpg

Disabling services that fail

systemctl disable dnsmasq
systemctl disable orangepi-zram-config
systemctl disable smartmontools

Software Setup

1. Enabling the I2C3 interface

Enabling the interface under OrangePi config –> system –>Hardware And rebooting the RV2 board for the setting to take effect.

2. Installing I2C Tools

sudo apt update
sudo apt install i2c-tools
sudo apt install pipx
pipx install smbus2

3. Installing the HuskYLENS Python library

Installing the Python file that contains the HuskyLensLibrary class and all the code needed to communicate with your HuskYLENS device.

# Cloning the GitHub repository
git clone https://github.com/HuskyLens/HUSKYLENSPython.git

Note: The HuskyLensPython library is compatible with HuskyLens 2.

4. Checking for available I2C devices connected to the HUSKYLENS 2

# Checking for a connection by scanning for I2C devices.

i2cdetect -y 3

You should see the HuskyLens address (default is 0x32).
1 2 3 4 5 6
AI Machine Vision Sensor HUSKYLENS 2
Share. Facebook Twitter Pinterest LinkedIn Tumblr Email
Previous ArticleOrange Pi 4 Pro RISC-V SBC Debuts with Allwinner SoC and WiFi 6 Support
Next Article Orange Pi RG: A retro handheld gaming console powered by RISC-V is currently in dev.
androidpimp
  • Website

Related Posts

NE300 MB01 AI Camera

CamThink NE301—Seamless Low-Power Edge AI Camera Module for Local Models

December 2, 2025
0 0 votes
Article Rating
Subscribe
Notify of
0 Comments
Oldest
Newest Most Voted
Inline Feedbacks
View all comments
Categories
PureVPN
PureVPN Ad Banner
VyprVPN – No. 1 in Anonymity
Vyprvpn 350x260
PrivadoVPN – No. 1 in Parental Control
PrivadoVPN 350x437
Recent Posts
  • CamThink NE301—Seamless Low-Power Edge AI Camera Module for Local Models
  • Orange Pi 6 Plus Review: A 12-Core SBC Powerhouse (Benchmarks, Specs, and Pricing)
  • Orange Pi 6 Unveiled: The Affordable, Slimmed-Down SBC Alternative to the 6 Plus
  • Ugoos SK4 Review (2025): The Best Mid-Range Android TV Box for Value & Features
  • AliExpress Black Friday 2025: 🚨 LATEST Deals & ALL Exclusive Country Promo Codes (Save 90%!)
  • LattePanda IOTA Review: 4 Reasons It Beats Raspberry Pi 5
  • POCO F8 Ultra/Pro global release date unveiled, showcasing flagship-level specs
  • Ugoos GaN Chargers 2025: 35W, 65W, 140W – Fast, Compact & Universal
  • Orange Pi RG: A retro handheld gaming console powered by RISC-V is currently in dev.
  • HUSKYLENS 2: DFRobot’s New AI Machine Vision Sensor Unveiled
  • Orange Pi 4 Pro RISC-V SBC Debuts with Allwinner SoC and WiFi 6 Support
  • Orange Pi RV2 Plus with Integrated Wi-Fi 6 Chip Confirmed!
  • Banana Pi BPI-R4 Pro (8X): Wi-Fi 7 Router with 10G SFP+ Ports Released
  • Youyeetoo K1 CoM Packs an Intel N100 processor and X2 Gigabit Ethernet ports
  • Youyeetoo YY3588 Review: Ultimate RK3588 COM for AI, 8K Video & Edge Computing in 2025
  • Xiaomi 17 Pro Max vs iPhone 17 Pro Max: Specs, Price & Honest Review
  • Premium Budget RGB Gaming Keyboard 2025? Rii RK805 Full Review
  • Orange Pi AI Studio / Pro launched Globally, Rivaling Nvidia Jetson Orin Nano
  • Redmi Pad 2 Review (2025): The Best Budget Tablet Value? Full Review
RSS Recent RSS Feed
  • CamThink NE301—Seamless Low-Power Edge AI Camera Module for Local Models December 2, 2025
  • Orange Pi 6 Plus Review: A 12-Core SBC Powerhouse (Benchmarks, Specs, and Pricing) December 1, 2025
  • Orange Pi 6 Unveiled: The Affordable, Slimmed-Down SBC Alternative to the 6 Plus November 30, 2025
  • Ugoos SK4 Review (2025): The Best Mid-Range Android TV Box for Value & Features November 26, 2025
  • AliExpress Black Friday 2025: 🚨 LATEST Deals & ALL Exclusive Country Promo Codes (Save 90%!) November 24, 2025
Facebook X (Twitter) Instagram Pinterest
@2025 - All Right Reserved. Designed by AndroidPIMP

Type above and press Enter to search. Press Esc to cancel.

Accessibility
Accessibility modes
Epilepsy Safe Mode
Dampens color and removes blinks
This mode enables people with epilepsy to use the website safely by eliminating the risk of seizures that result from flashing or blinking animations and risky color combinations.
Visually Impaired Mode
Improves website's visuals
This mode adjusts the website for the convenience of users with visual impairments such as Degrading Eyesight, Tunnel Vision, Cataract, Glaucoma, and others.
Cognitive Disability Mode
Helps to focus on specific content
This mode provides different assistive options to help users with cognitive impairments such as Dyslexia, Autism, CVA, and others, to focus on the essential elements of the website more easily.
ADHD Friendly Mode
Reduces distractions and improve focus
This mode helps users with ADHD and Neurodevelopmental disorders to read, browse, and focus on the main website elements more easily while significantly reducing distractions.
Blindness Mode
Allows using the site with your screen-reader
This mode configures the website to be compatible with screen-readers such as JAWS, NVDA, VoiceOver, and TalkBack. A screen-reader is software for blind users that is installed on a computer and smartphone, and websites must be compatible with it.
Readable Experience
Content Scaling
Default
Text Magnifier
Readable Font
Dyslexia Friendly
Highlight Titles
Highlight Links
Font Sizing
Default
Letter Spacing
Default
Left Aligned
Center Aligned
Right Aligned
Visually Pleasing Experience
Dark Contrast
Light Contrast
Monochrome
High Contrast
High Saturation
Low Saturation
Adjust Text Colors
Adjust Title Colors
Adjust Background Colors
Easy Orientation
Mute Sounds
Hide Images
Hide Emoji
Reading Guide
Stop Animations
Reading Mask
Highlight Hover
Highlight Focus
Big Dark Cursor
Big Light Cursor
Cognitive Reading
Virtual Keyboard
Navigation Keys
Voice Navigation

AndroidPIMP

Accessibility Statement

  • AndroidPIMP.com
  • 10/18/2025

Compliance status

We firmly believe that the internet should be available and accessible to anyone, and are committed to providing a website that is accessible to the widest possible audience, regardless of circumstance and ability.

To fulfill this, we aim to adhere as strictly as possible to the World Wide Web Consortium’s (W3C) Web Content Accessibility Guidelines 2.1 (WCAG 2.1) at the AA level. These guidelines explain how to make web content accessible to people with a wide array of disabilities. Complying with those guidelines helps us ensure that the website is accessible to all people: blind people, people with motor impairments, visual impairment, cognitive disabilities, and more.

This website utilizes various technologies that are meant to make it as accessible as possible at all times. We utilize an accessibility interface that allows persons with specific disabilities to adjust the website’s UI (user interface) and design it to their personal needs.

Additionally, the website utilizes an AI-based application that runs in the background and optimizes its accessibility level constantly. This application remediates the website’s HTML, adapts Its functionality and behavior for screen-readers used by the blind users, and for keyboard functions used by individuals with motor impairments.

If you’ve found a malfunction or have ideas for improvement, we’ll be happy to hear from you. You can reach out to the website’s operators by using the following email

Screen-reader and keyboard navigation

Our website implements the ARIA attributes (Accessible Rich Internet Applications) technique, alongside various different behavioral changes, to ensure blind users visiting with screen-readers are able to read, comprehend, and enjoy the website’s functions. As soon as a user with a screen-reader enters your site, they immediately receive a prompt to enter the Screen-Reader Profile so they can browse and operate your site effectively. Here’s how our website covers some of the most important screen-reader requirements, alongside console screenshots of code examples:

  1. Screen-reader optimization: we run a background process that learns the website’s components from top to bottom, to ensure ongoing compliance even when updating the website. In this process, we provide screen-readers with meaningful data using the ARIA set of attributes. For example, we provide accurate form labels; descriptions for actionable icons (social media icons, search icons, cart icons, etc.); validation guidance for form inputs; element roles such as buttons, menus, modal dialogues (popups), and others. Additionally, the background process scans all the website’s images and provides an accurate and meaningful image-object-recognition-based description as an ALT (alternate text) tag for images that are not described. It will also extract texts that are embedded within the image, using an OCR (optical character recognition) technology. To turn on screen-reader adjustments at any time, users need only to press the Alt+1 keyboard combination. Screen-reader users also get automatic announcements to turn the Screen-reader mode on as soon as they enter the website.

    These adjustments are compatible with all popular screen readers, including JAWS and NVDA.

  2. Keyboard navigation optimization: The background process also adjusts the website’s HTML, and adds various behaviors using JavaScript code to make the website operable by the keyboard. This includes the ability to navigate the website using the Tab and Shift+Tab keys, operate dropdowns with the arrow keys, close them with Esc, trigger buttons and links using the Enter key, navigate between radio and checkbox elements using the arrow keys, and fill them in with the Spacebar or Enter key.Additionally, keyboard users will find quick-navigation and content-skip menus, available at any time by clicking Alt+1, or as the first elements of the site while navigating with the keyboard. The background process also handles triggered popups by moving the keyboard focus towards them as soon as they appear, and not allow the focus drift outside it.

    Users can also use shortcuts such as “M” (menus), “H” (headings), “F” (forms), “B” (buttons), and “G” (graphics) to jump to specific elements.

Disability profiles supported in our website

  • Epilepsy Safe Mode: this profile enables people with epilepsy to use the website safely by eliminating the risk of seizures that result from flashing or blinking animations and risky color combinations.
  • Visually Impaired Mode: this mode adjusts the website for the convenience of users with visual impairments such as Degrading Eyesight, Tunnel Vision, Cataract, Glaucoma, and others.
  • Cognitive Disability Mode: this mode provides different assistive options to help users with cognitive impairments such as Dyslexia, Autism, CVA, and others, to focus on the essential elements of the website more easily.
  • ADHD Friendly Mode: this mode helps users with ADHD and Neurodevelopmental disorders to read, browse, and focus on the main website elements more easily while significantly reducing distractions.
  • Blindness Mode: this mode configures the website to be compatible with screen-readers such as JAWS, NVDA, VoiceOver, and TalkBack. A screen-reader is software for blind users that is installed on a computer and smartphone, and websites must be compatible with it.
  • Keyboard Navigation Profile (Motor-Impaired): this profile enables motor-impaired persons to operate the website using the keyboard Tab, Shift+Tab, and the Enter keys. Users can also use shortcuts such as “M” (menus), “H” (headings), “F” (forms), “B” (buttons), and “G” (graphics) to jump to specific elements.

Additional UI, design, and readability adjustments

  1. Font adjustments – users, can increase and decrease its size, change its family (type), adjust the spacing, alignment, line height, and more.
  2. Color adjustments – users can select various color contrast profiles such as light, dark, inverted, and monochrome. Additionally, users can swap color schemes of titles, texts, and backgrounds, with over seven different coloring options.
  3. Animations – person with epilepsy can stop all running animations with the click of a button. Animations controlled by the interface include videos, GIFs, and CSS flashing transitions.
  4. Content highlighting – users can choose to emphasize important elements such as links and titles. They can also choose to highlight focused or hovered elements only.
  5. Audio muting – users with hearing devices may experience headaches or other issues due to automatic audio playing. This option lets users mute the entire website instantly.
  6. Cognitive disorders – we utilize a search engine that is linked to Wikipedia and Wiktionary, allowing people with cognitive disorders to decipher meanings of phrases, initials, slang, and others.
  7. Additional functions – we provide users the option to change cursor color and size, use a printing mode, enable a virtual keyboard, and many other functions.

Browser and assistive technology compatibility

We aim to support the widest array of browsers and assistive technologies as possible, so our users can choose the best fitting tools for them, with as few limitations as possible. Therefore, we have worked very hard to be able to support all major systems that comprise over 95% of the user market share including Google Chrome, Mozilla Firefox, Apple Safari, Opera and Microsoft Edge, JAWS and NVDA (screen readers).

Notes, comments, and feedback

Despite our very best efforts to allow anybody to adjust the website to their needs. There may still be pages or sections that are not fully accessible, are in the process of becoming accessible, or are lacking an adequate technological solution to make them accessible. Still, we are continually improving our accessibility, adding, updating and improving its options and features, and developing and adopting new technologies. All this is meant to reach the optimal level of accessibility, following technological advancements. For any assistance, please reach out to

wpDiscuz