
- Maybe you missed it? Nanopi R6S Review.
- NanoPi R5S Review, Specs, and Features.
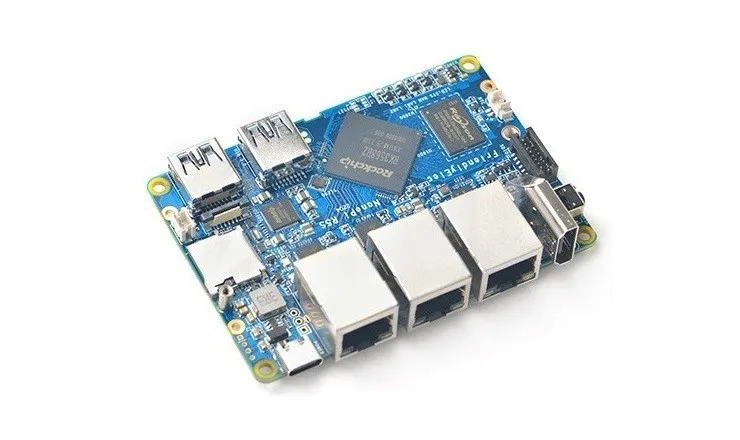
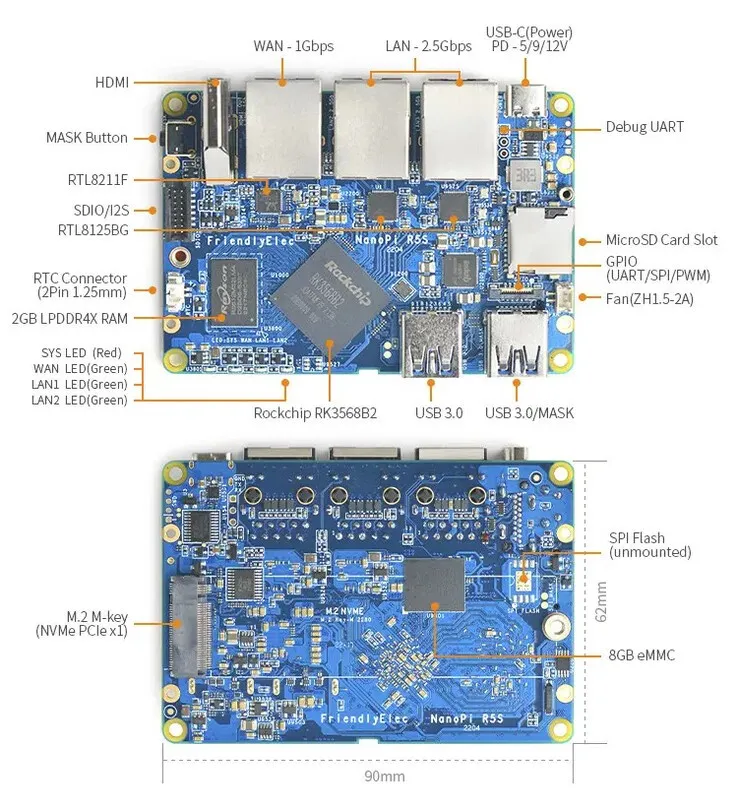
NanoPi R5S
FriendlyELEC’s new NanoPi R5S single-board computer features a few exciting improvements over current competitors in the single-board industry. This latest single-board computer has a Rockchip RK3568B2 and an M.2 2280 slot for NVMe SSDs. You can upgrade your NanoPi R5S board to WiFi 6 by using an M.2 Key E to M.2 Key M Adapter with the M.2 2280 socket.
Small Form Factor
FriendlyELEC NanoPi R5S single-board computer (SBC) measures 90 x 62mm, slightly larger than the Raspberry Pi 4 Model B, which measures 3.6 x 2.4 Inches (92x60mm).
Specifications
- SoC: Rockchip RK3568B2 processor
- CPU: Quad-core ARM Cortex-A55 CPU, up to 2.0GHz
- VPU: 4KP60 H.265/H.264/VP9 video decoder, 1080P60 H.264/H.265 video encoder
- 0.8 TOPs Neural Processing Unit
- Mali-G52 1-Core-2EE graphics: Supports OpenGL ES 1.1, 2.0, and 3.2, Vulkan 1.0 and 1.1, OpenCL 2.0 Full
- RAM: 4GB / 2GB LPDDR4X memory
- Flash: 4GB / 8GB eMMC storage
- Ethernet: 2 x 2.5 Gbps Ethernet ports, 1 x Gigabit Ethernet port.
- PCIe: M.2 Key M, PCIe2.0 x1, support NVME, PCIe WiFi etc
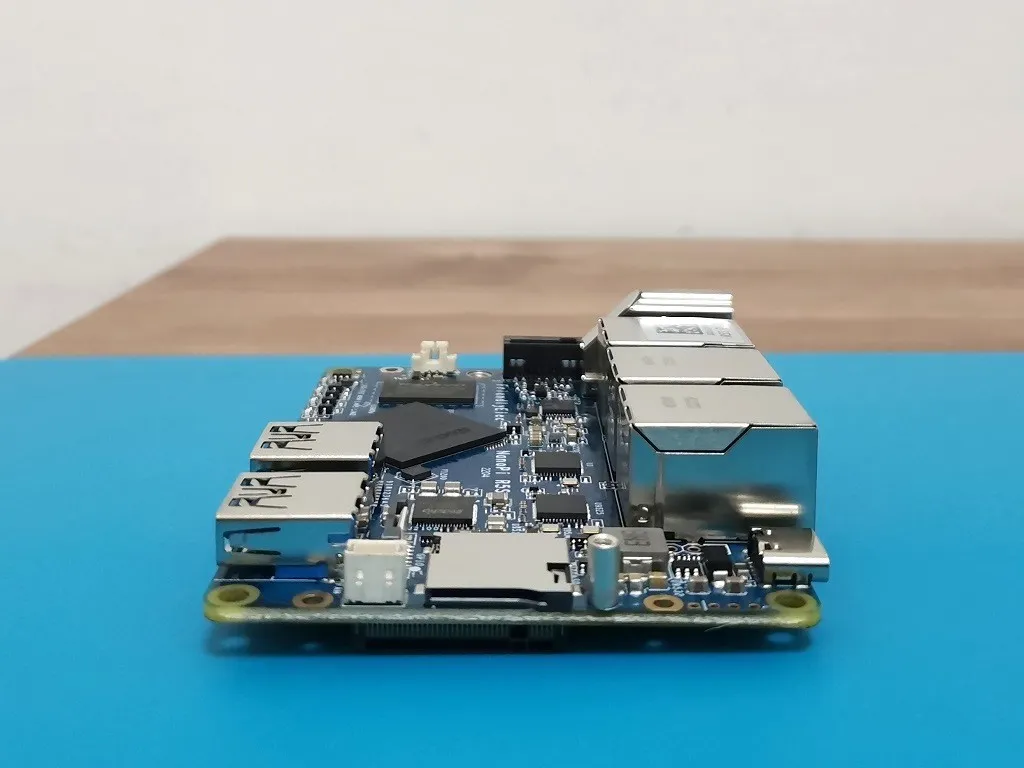
- 1 x HDMI 2.0 port support HDMI1.4 and HDMI2.0 ( 1080p@120Hz and 4096×2304@60Hz).
- M.2 2280 socket for optional SSD
- microSD card reader
Other Interfaces:
- 2 Pin 1.27/1.25mm RTC battery input connector for low power RTC IC HYM8563TS
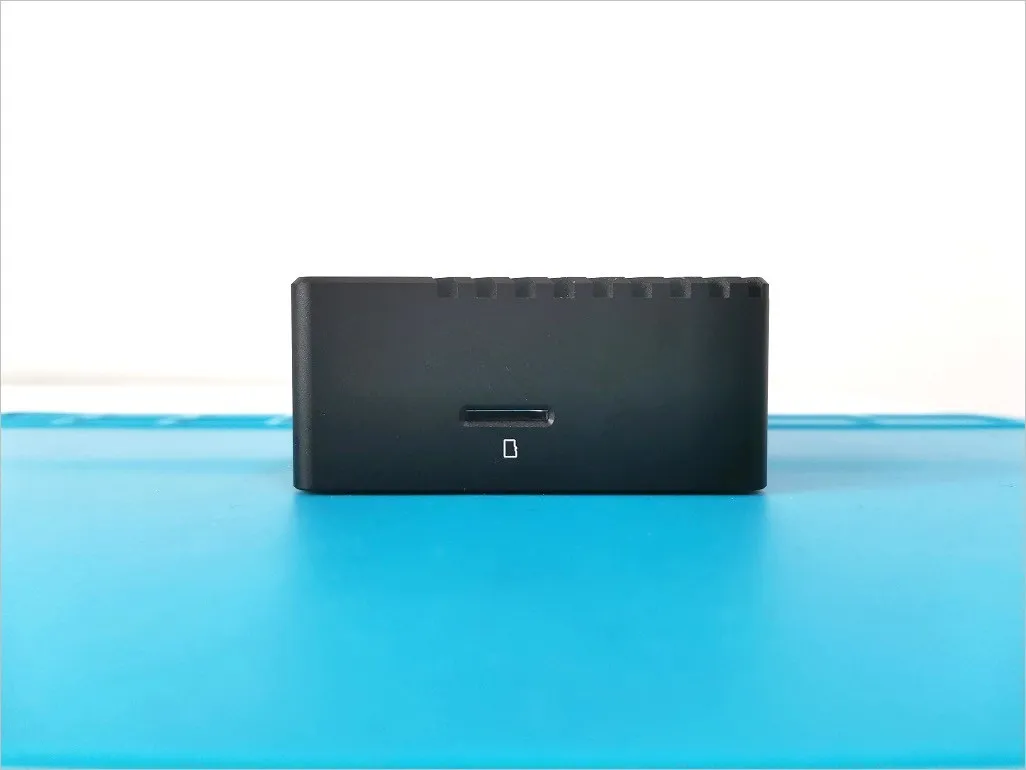
- MicroSD: support UHS-I
- USB: two USB 3.0 Type-A ports
- USB-C port (for power)
- On-Board 5V Fan connector.
- Power supply: USB-C, support PD, 5V/9V/12V input
- LEDs: 4 x GPIO Controlled LED (SYS, WAN, LAN1, LAN2)
- Debug: one Debug UART, 3 Pin 2.54mm header, 3.3V level, 1500000bps
- SD/MMC/SDIO/I2S: 2×8-pin 1.27mm connector
- GPIO: 12-pin 0.5mm FPC connector up to 1x SPI, up to 3x UARTs, up to 4x PWMs, up to 8x GPIOs
Misc:
- PCB: 8 Layer, 62x90x1.6mm
- Ambient Operating Temperature: 0℃ to 70℃
Hardware
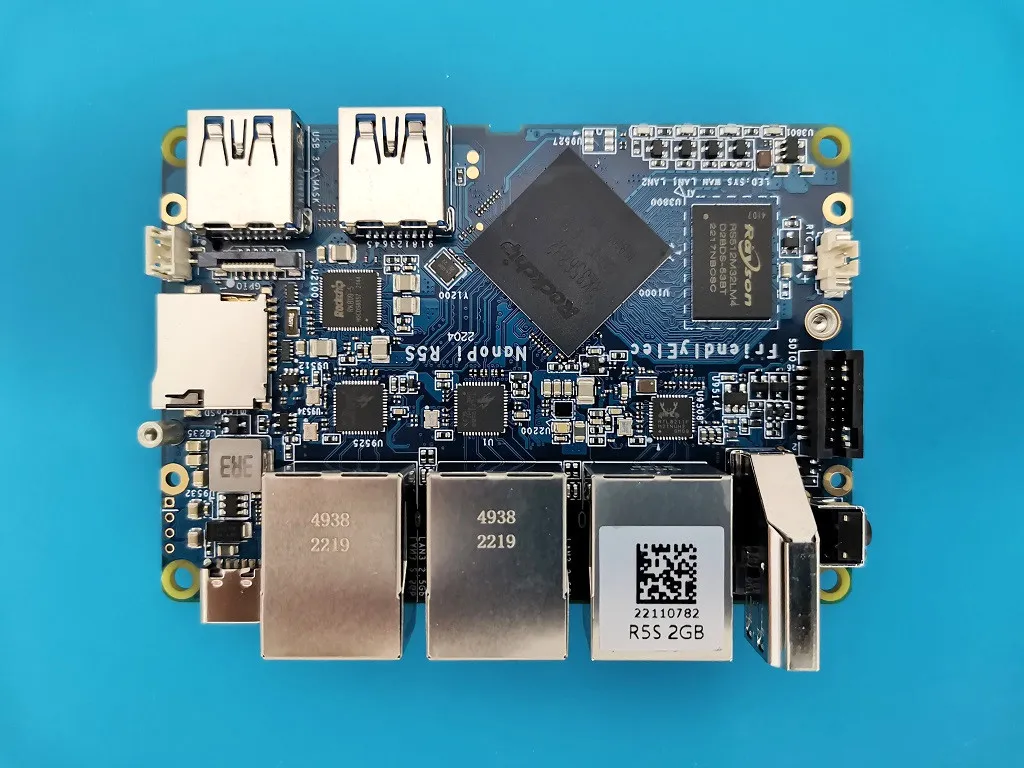
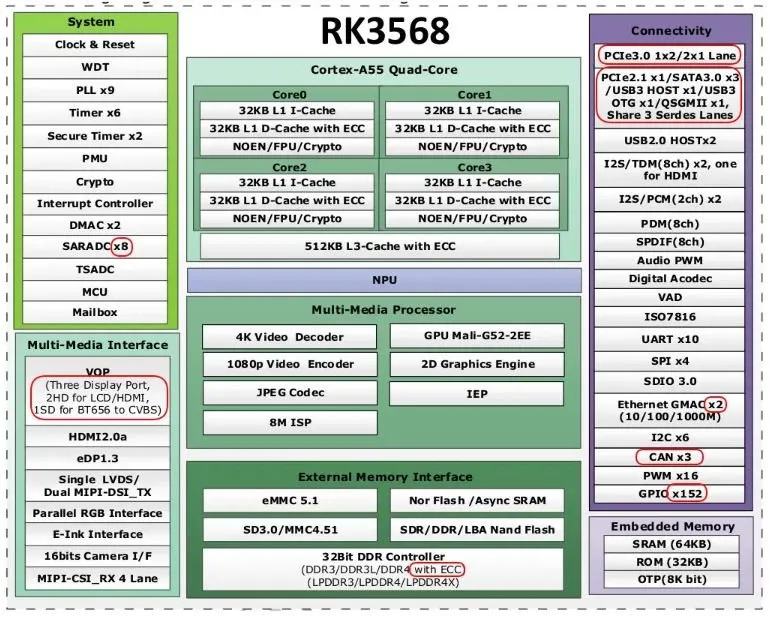
Under the NanoPi R5S SBC Hood, you got a Rockchip RK3568B2 chip. A low-power SoC with four ARM Cortex-A55 CPU cores at 2 GHz. Additionally, the RK3568B2 has a Mali-G52 GPU with a Neural Processing Unit (NPU) that delivers up to 0.8 TOPs of performance and the ability to encode H.264 or H.265 videos at 1080p and 60 Hz.
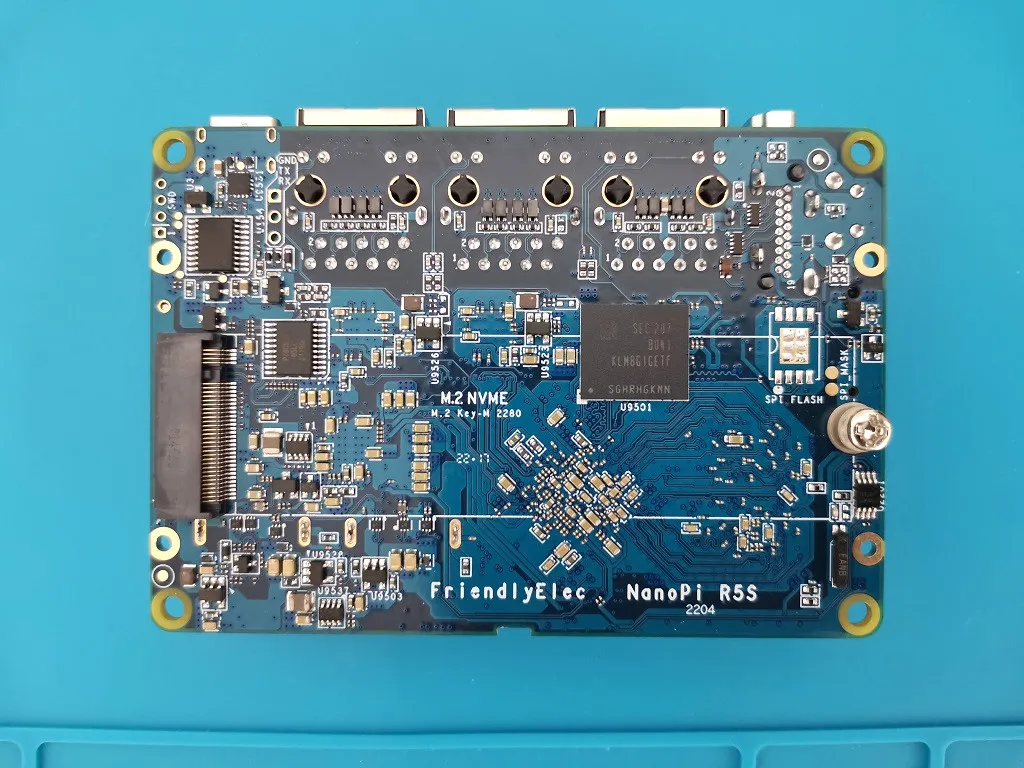
FriendlyELEC has equipped the NanoPi R5S with 2 GB LPDR4x RAM, 8 GB eMMC flash memory, a microSD card slot, and an M.2 2280 for NVMe SSD. FriendlyELEC company included:
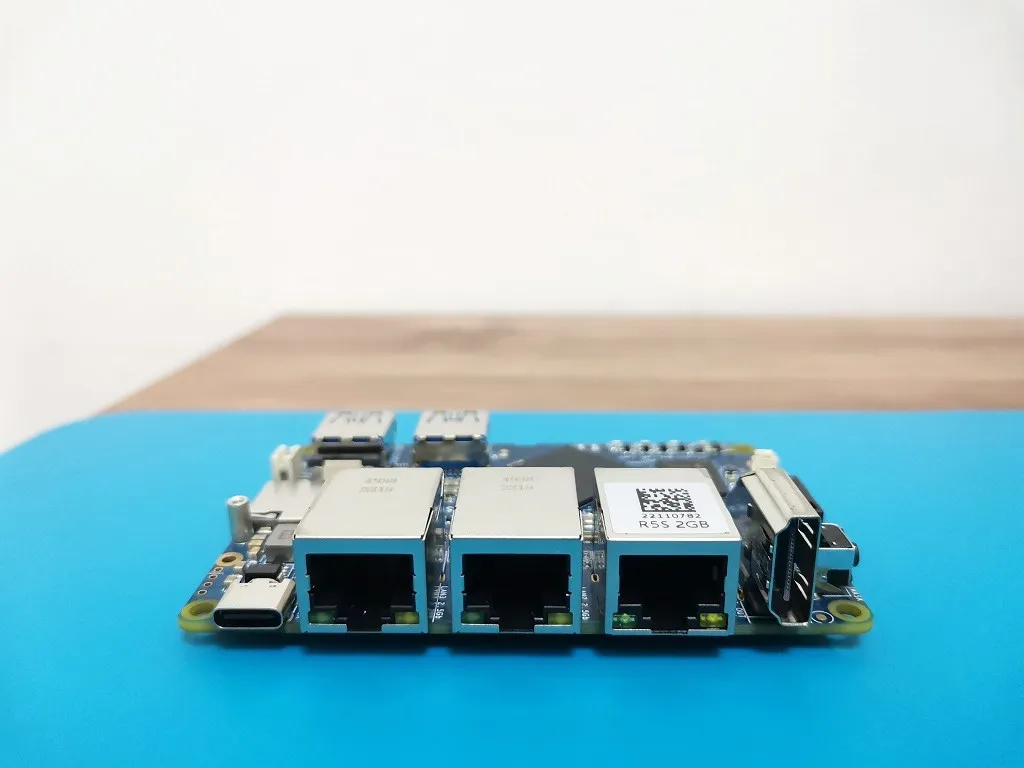
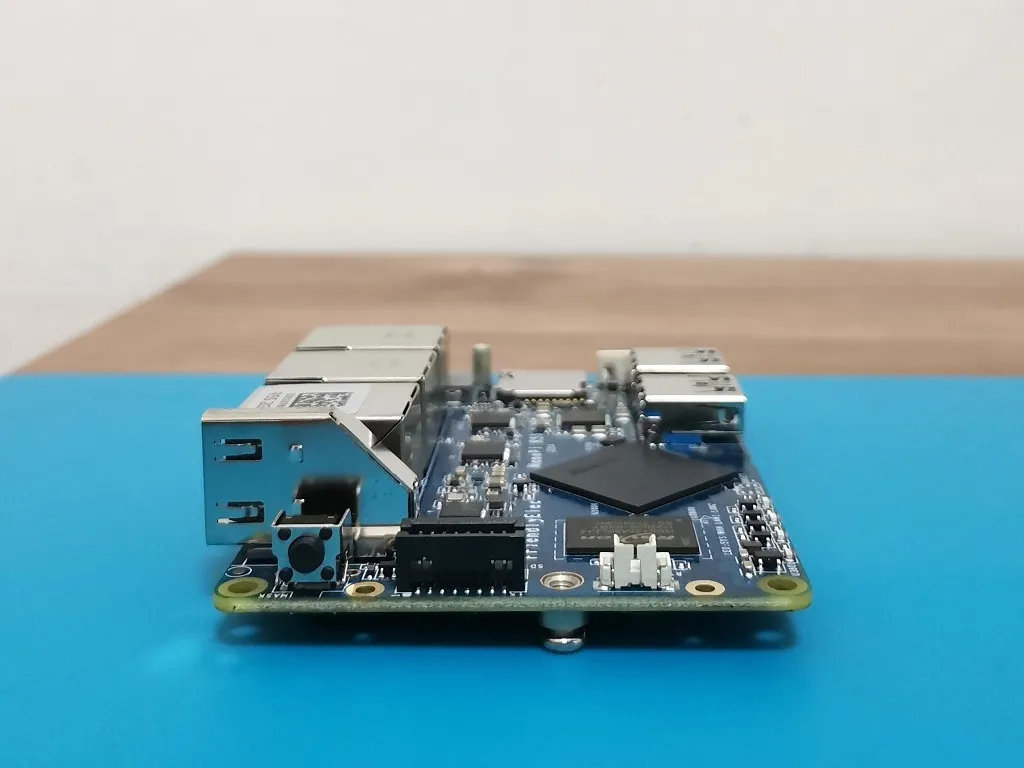
- Three Ethernet ports.
- Two ports are capable of reaching a throughput of up to 2.5 Gbps.
- A third WAN port that can reach up to 1 Gbps.
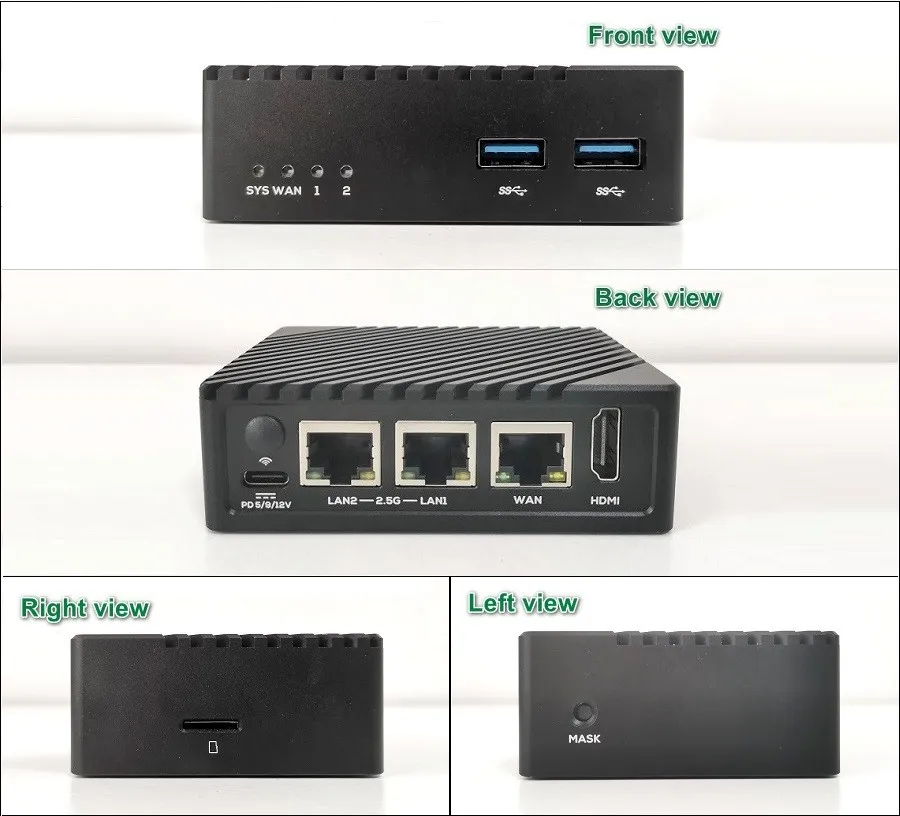
Furthermore, the NanoPi R5S has an HDMI 2.0 port, two USB 3.0 Type-A ports, and a 16-pin header.
Friend;yElec NanoPi R5S SBC
RK3568 Hardware Platform Datasheet
NanoPi R5S Board Layout
Software
Unfortunately, FriendlyELEC didn’t yet provide information regarding supported software. Still, most likely, it will support OPNSense or OpenWrt or perhaps because this board is ideal for working as a gateway protection firewall device to help protect local networks from cyber-attacks.
Fiber internet users would also find this product helpful. It supports 2.5GbE Ethernet ports, so it’s a big plus for people subscribed to more extensive bandwidth fiber plans above the 1GbE limit to max their bandwidth.
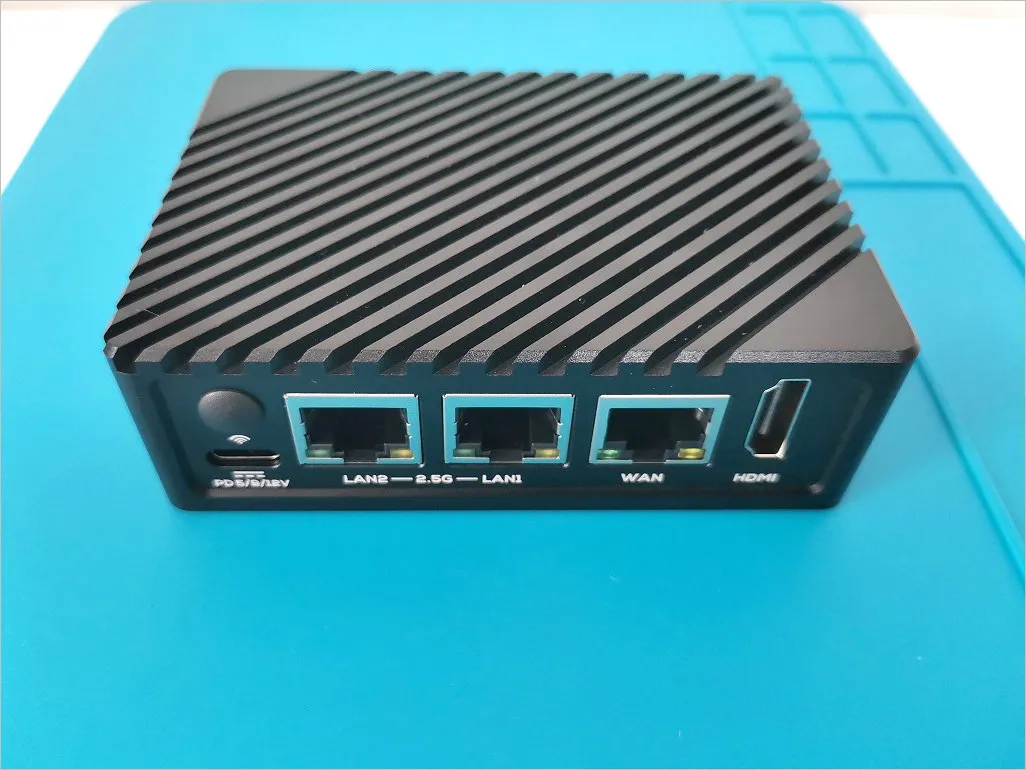
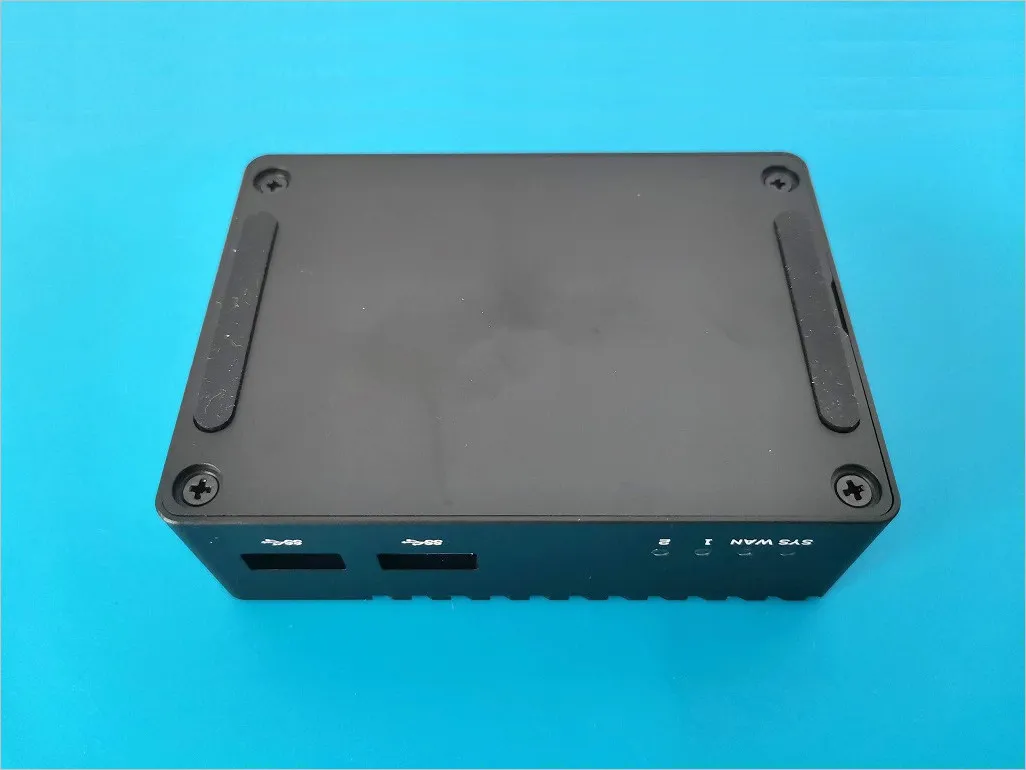
Metal Enclosure
An optional item you can buy and is most likely needed for cooling the NanoPi R5S board. This well-crafted case is made from metal, not plastic, most likely manufactured with a CNC machining process. According to AliExpress Electric Robot Store, the price range is about $90-100, making this item not very cheap but very needed.
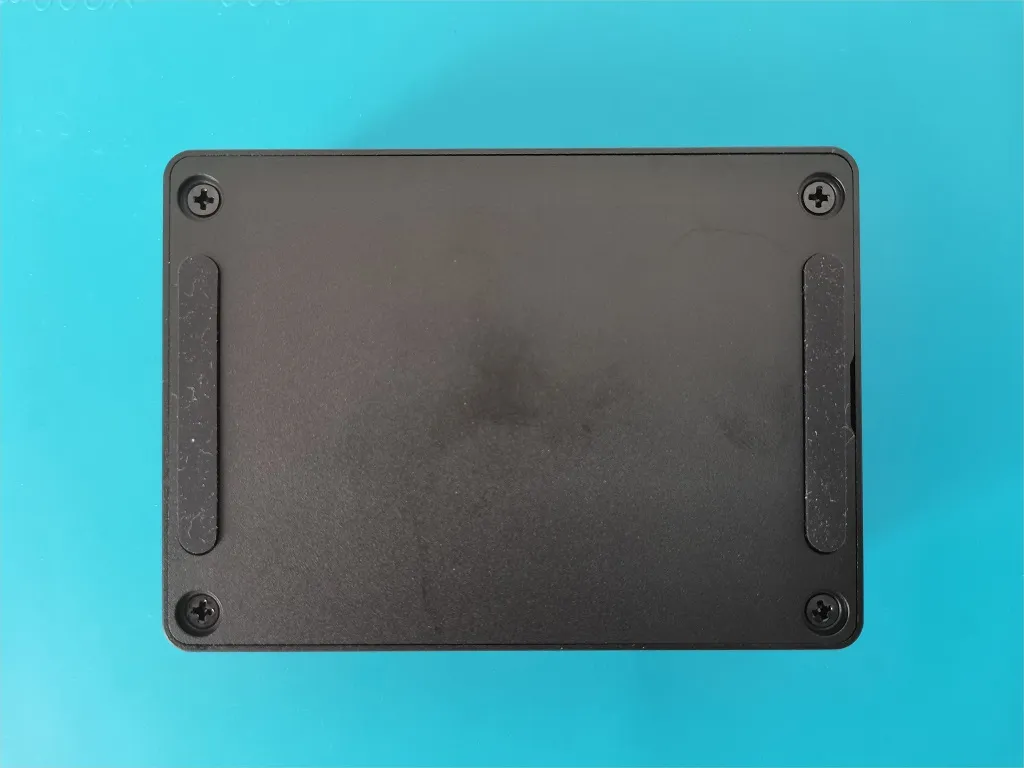
The metal case is composed of two CNC-machined parts. The back cover and the main body milled a step in the material left for the CPU and thermal pad, designed to transfer heat from the CPU through the Case body. If you want to cool the 2GB RAM chip, you will most likely need to buy a thermal pad according to the required width (Hight) to ensure good contact with the case.
 NanoPi R5S Metal Enclosure - PIC 1 of 6


NanoPi R5S assembled within the metal enclosure.
The NanoPi R5S metal enclosure is made solely from two main housing parts. The main body or envelope and the bottom cover. All components are fabricated through CNC machining. Our impression is that both design and quality are top-notch, like most FriendlyElec enclosures.

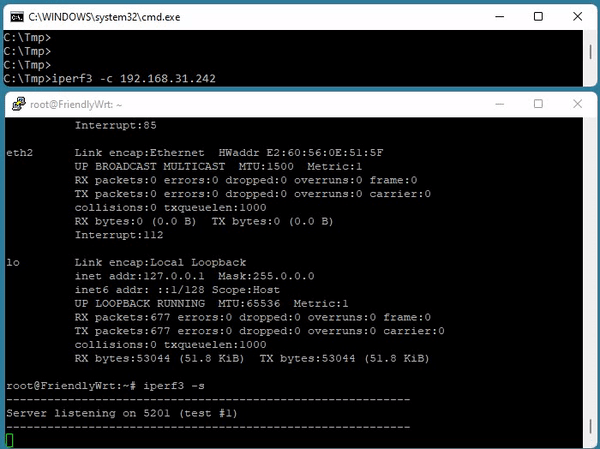
Network Throughput Test – WAN Port
We Conduct a throughput speed test between a PC running Windows 11 and the NanoPi R5S board. For the testing tool, we used iPerf to check the maximum achievable bandwidth. Our maximum peak bandwidth was 946Mbps (Transmit & Receive),which correlates with FriendlyElec’s product advertisement showing an attainable bandwidth of 941Mbps.
Checking Temperatures
Finding thermal zone devices (sensors)
root@FriendlyWrt:~# sensors
gpu_thermal-virtual-0
Adapter: Virtual device
temp1:        +43.1°C

test_battery-virtual-0
Adapter: Virtual device
in0:           4.00 mV
temp:         +26.0°C
curr1:        -2.00 mA (avg =  -0.00 A)

soc_thermal-virtual-0
Adapter: Virtual device
temp1:        +45.0°C  (crit = +115.0°C)

test_battery-virtual-0
Adapter: Virtual device
ERROR: Can't get value of subfeature in0_input: Kernel interface error
in0:              N/A
temp1:        +26.0°C
ERROR: Can't get value of subfeature curr1_input: Kernel interface error
ERROR: Can't get value of subfeature curr1_average: Kernel interface error
curr1: N/A (avg = +0.00 A)| Zones | Description | Temperature (Idle) | |
| /sys/devices/virtual/thermal/thermal_zone0/temp | zone 0 | Battery | +26.0°C |
| /sys/devices/virtual/thermal/thermal_zone1/temp | zone 1 | Represents the temperature of the GPU | +43.1°C |
| /sys/devices/virtual/thermal/thermal_zone2/temp | zone 2 | Represents the temperature of SoC (Including CPU) | +45.0°C |
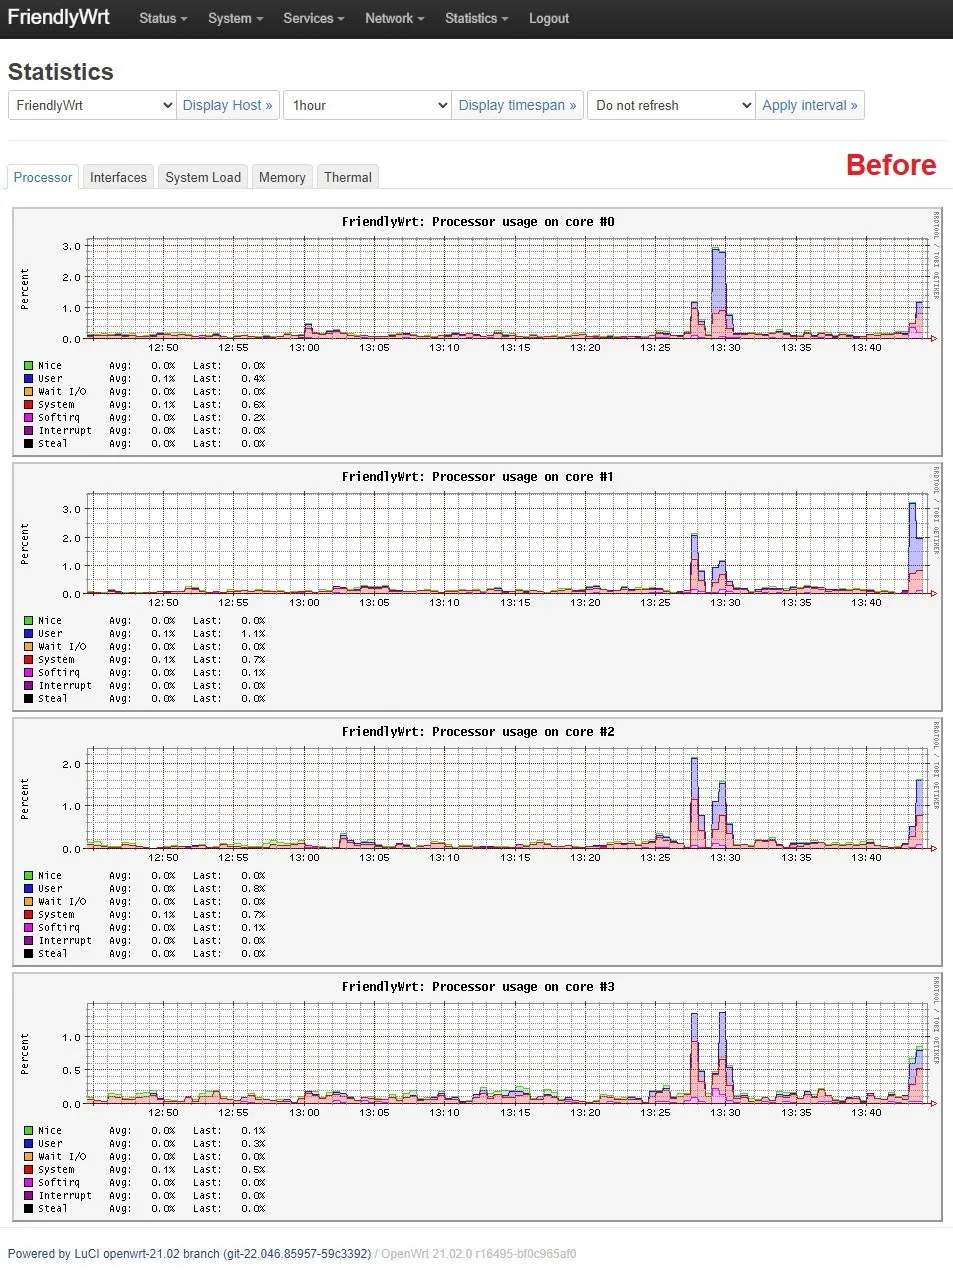
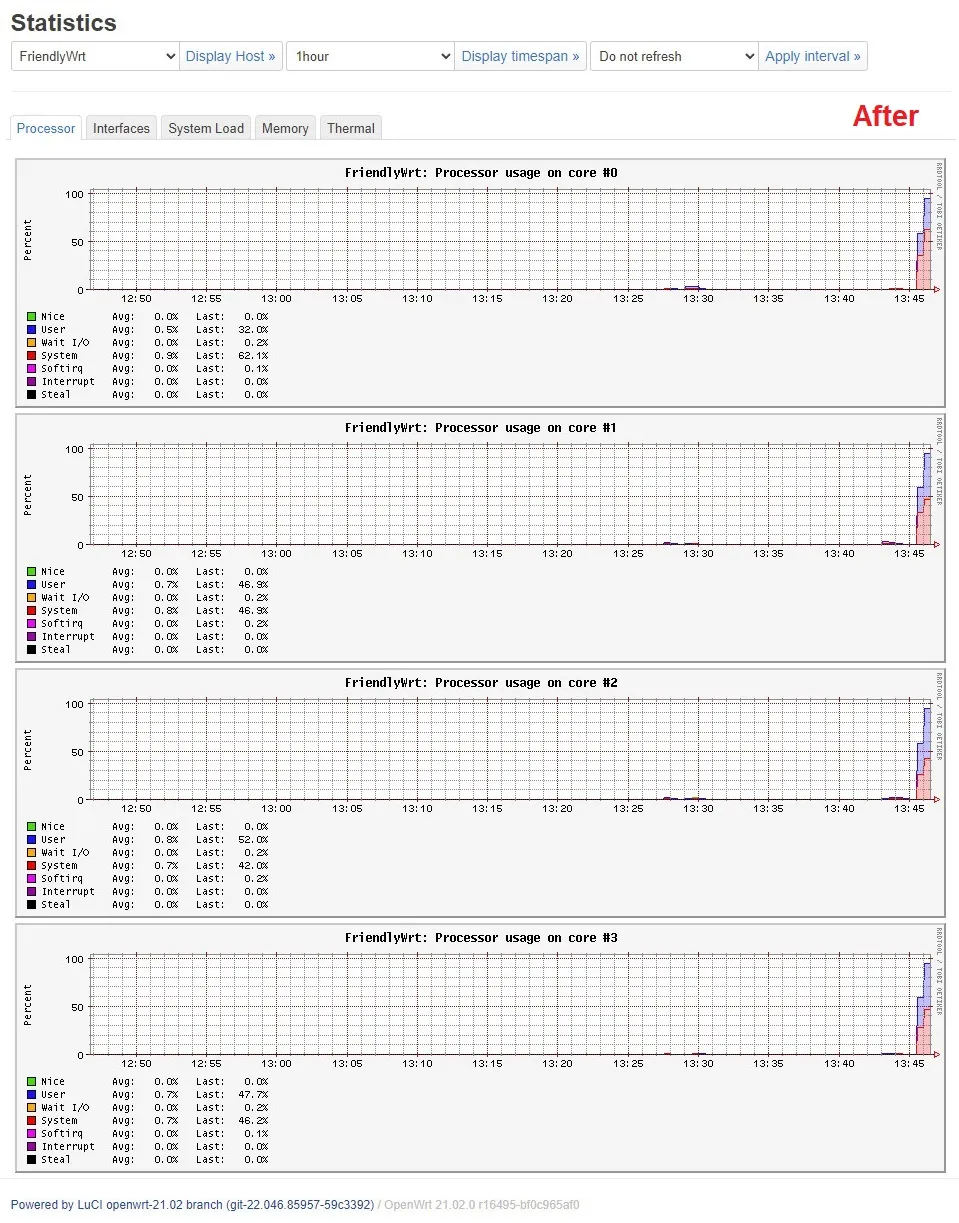
Stress Test
In this test, we Impose a High CPU Load and Stress to check the temperature change. 4 CPU cores were stressed for a time of 60 seconds and allocated memory of 256MB per VM worker:
root@FriendlyWrt:~# stress --cpu 4 --io 3 --vm 2 --vm-bytes 256M --timeout 60s
stress: info: [25754] dispatching hogs: 4 cpu, 3 io, 2 vm, 0 hdd
stress: info: [25754] successful run completed in 60s- Before (Idle Mode): Initial CPU Temperature ~45 °C
- After: Peak CPU Temperature 50 °C
NanoPi R5S – CPU Stress Test Comparison
Interfaces
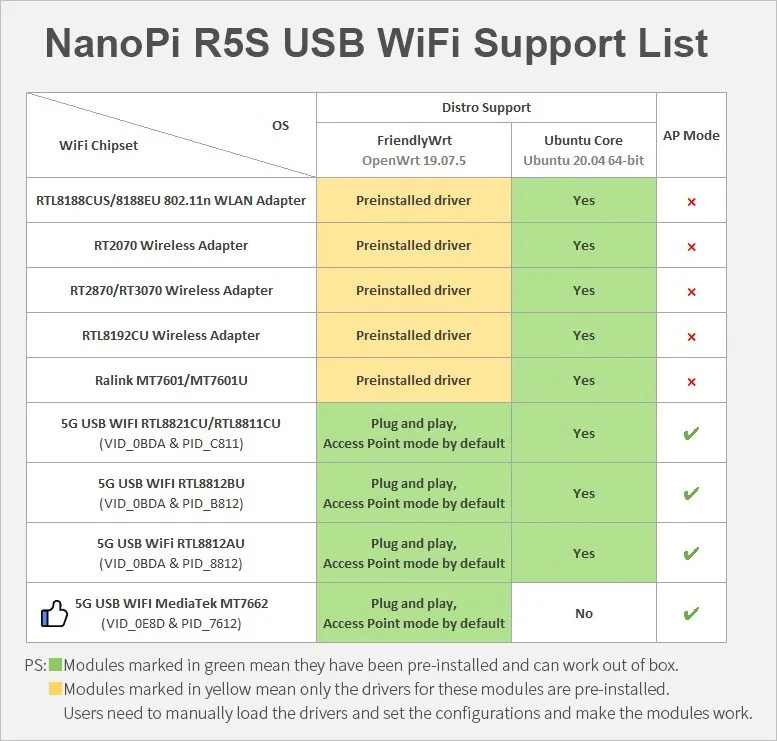
As mentioned previously, the NanoPi R5S comes with a pair of 2.5Gb Ethernet LAN ports and a single 1Gb WAN port. The board doesn’t have built-in WiFi support, so you will have to use it with Ethernet network cables. If you still need WiFi support, you can buy a WiFi Dongle and hook it to one of the USB V3.0 Ports on the front of the enclosure. You can check FriendlyElec compatible drivers list for a list of compatible dongles.
On the front side of the enclosure, four operation status LED lights, including for all three Ethernet ports. The NanoPi 5RS doesn’t have a power button, but there is a simple solution if you need one. You can buy a USB-C Power On/Off Switch Cable to solve this problem. You can find a suitable cable in the A+ Phone Accessory Store.
HDMI Port
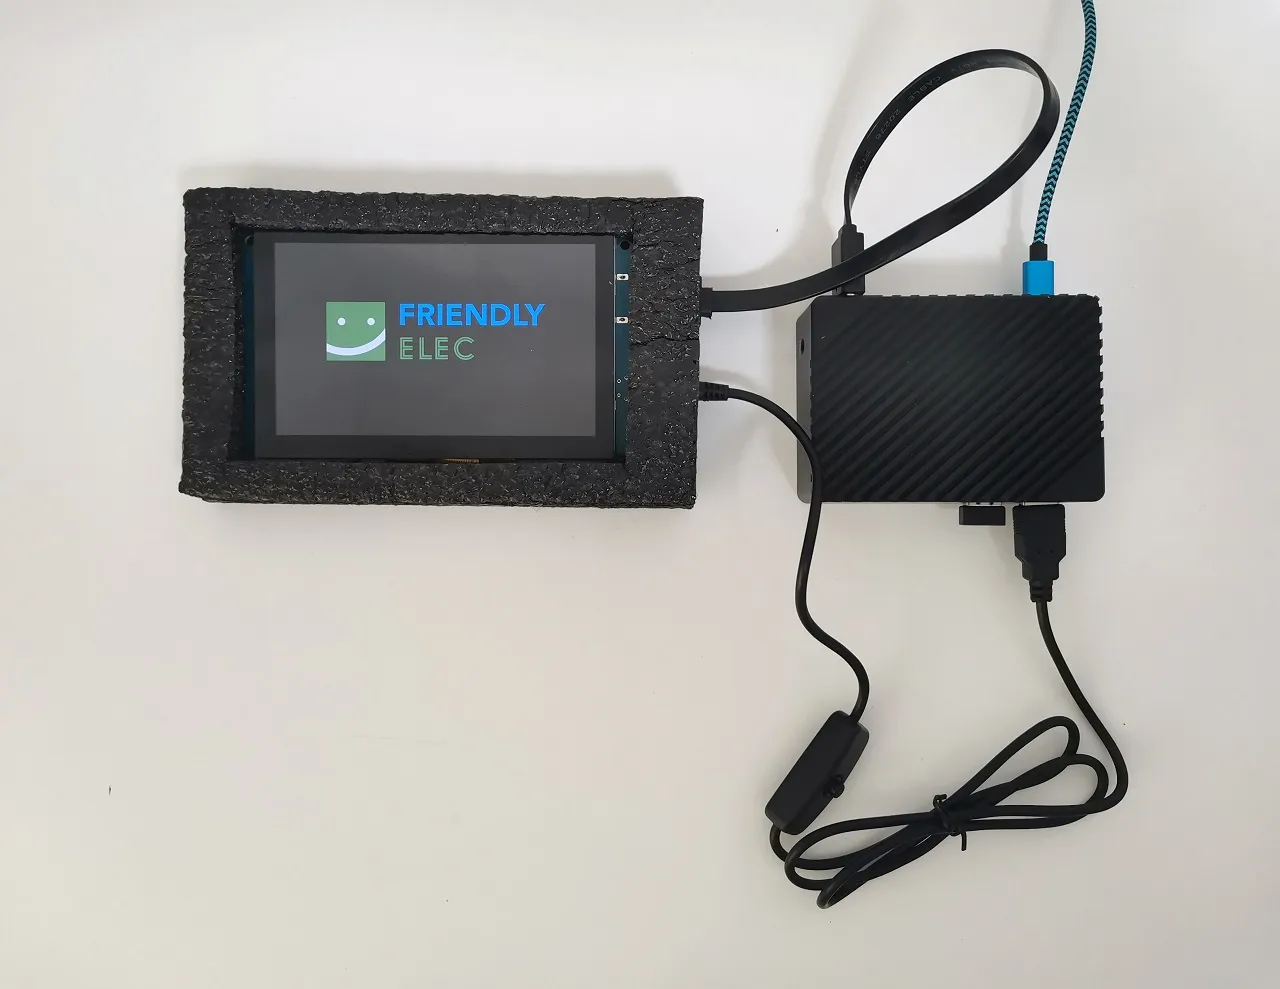
In our arrangement in the photo below, we used a USB port for the power supply and an HDMI cable hooked to an external display panel. So that’s another practical option to connect this board with a small 5–10 Inch external display, which is relatively cheap and worth the buck.
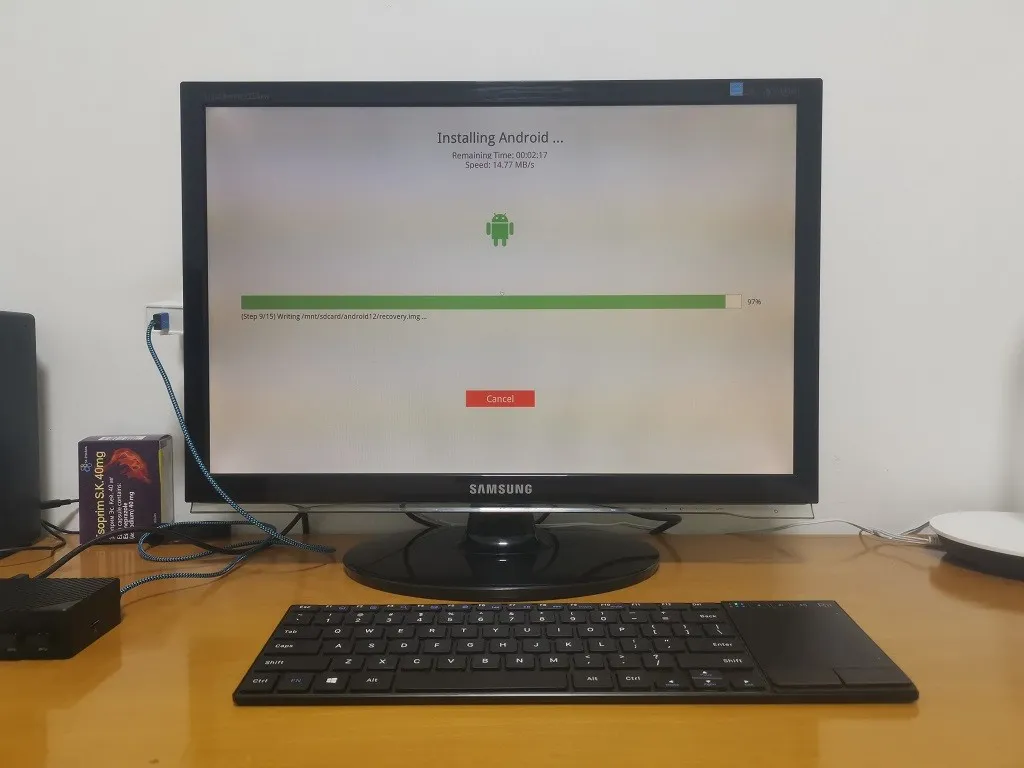
A fresh Android 12.0 image with Google Play pre-installed for Android fans also worked well for us. You can use the device to run games/apps but don’t expect a smooth user experience with only 2GB of RAM. For Android usage, we recommend buying the 4GB RAM edition. It’s slightly more expensive and roughly costs $10 more than the basic model, but we think it would be worth the investment.
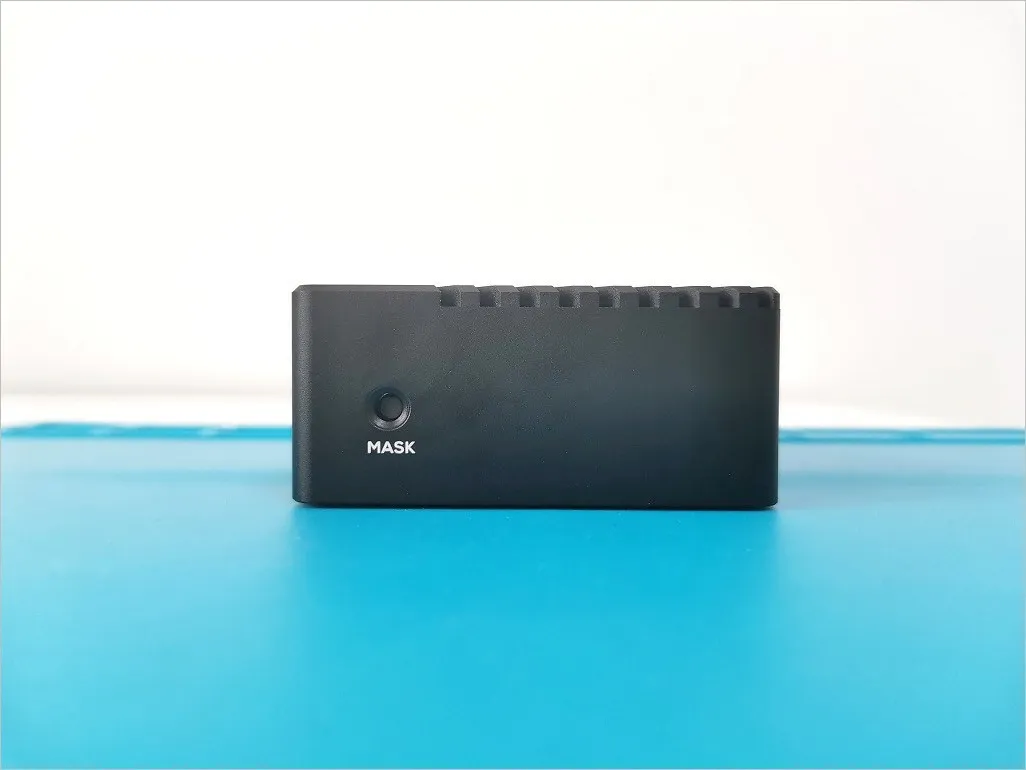
Mask Button
The mask button is located on the left side of the metal enclosure. FriendlyElec placed it in a reasonably comfortable location in terms of accessibility. You can use it for firmware updates via Rockchip Software Tool running under Windows/Linux PC plugged into a standard USB Port.
That’s another method to flash the NanoPi R5S eMMC flash memory, but in most everyday situations, the SD Card method using the eFlasher tool works just as well and is more user-friendly.
The NanoPi R5S: Connected to a 5.5-inch display
Software Support
There are two ways or methods to burn the operating system files to the NanoPi R5S board. The first one is using a microSD memory card, or the preferred option is to burn the necessary files to the eMMC chip, which gives you the speed advantage of getting higher read/write throughput.
FriendlyElec team made it super easy to use both methods. To flash the system files to the eMMC Chip, you need to use the eFlasher (eMMC-flasher) utility and burn the data to the microSD card image. The process is almost fully automatic.
When you boot with the microSD, a simple GUI will pop up, designed by FriendlyElec company, making this task super easy and fast, even for no tech geeks with previous experience. After the installation is over, you can boot the board without it.
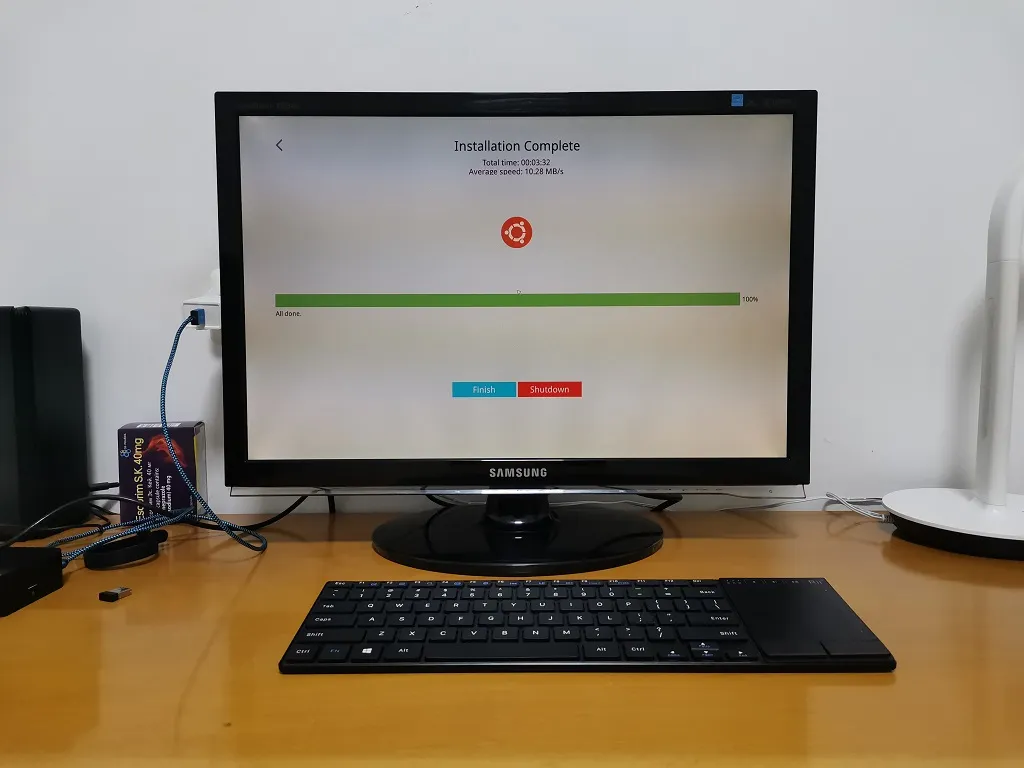
eFlasher utility (Installing Android & Ubuntu Core)
What operating systems are supported? Here’s a list of images you can use with the NanoPi R5S board.
| Image File | OS | Boot Media |
| rk3568-eflasher-friendlywrt-YYYYMMDD.img.gz | FriendlyWrt Based on OpenWrt 22.03 Kernel version 5.10.y | microSD |
| rk3568-eflasher-friendlywrt-YYYYMMDD.img.gz | FriendlyWrt lite Based on OpenWrt 22.03 Kernel version 5.10.y | eMMC |
| rk3568-eflasher-friendlywrt-docker-YYYYMMDD.img.gz | FriendlyWrt with Docker Based on OpenWrt 22.03 kernel version 5.10.y | eMMC |
| rk3568-eflasher-android12-YYYYMMDD.img.zip | Android 12 | eMMC |
| rk3568-eflasher-friendlycore-lite-focal-5.10-arm64-YYYYMMDD.img.gz | Friendlycore lite focal 5.10 | eMMC |
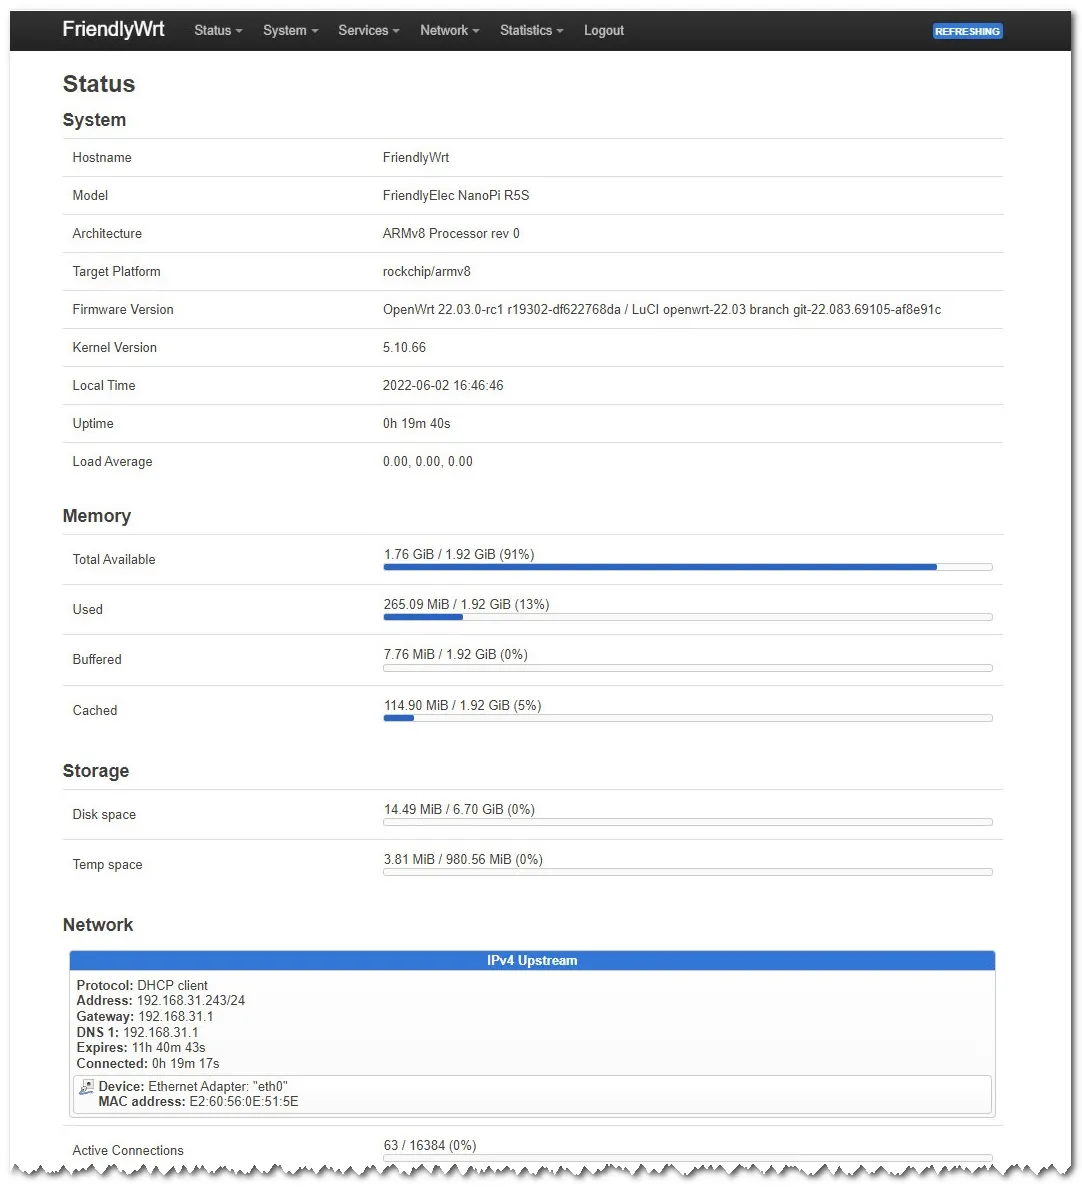
Running FriendlyWrt (OpenWrt)
You were playing with FriendlyWrt, a customized version of OpenWrt developed by the FriendlyElec team. According to system information, only 9% of 2GB RAM is utilized, maintaining low system resources in idle operation mode. Also, using the maximum bandwidth provided by your ISP is achievable and highly recommended by connecting the board to 2.5G LAN or WAN ports in your router.
Adding Storage Space
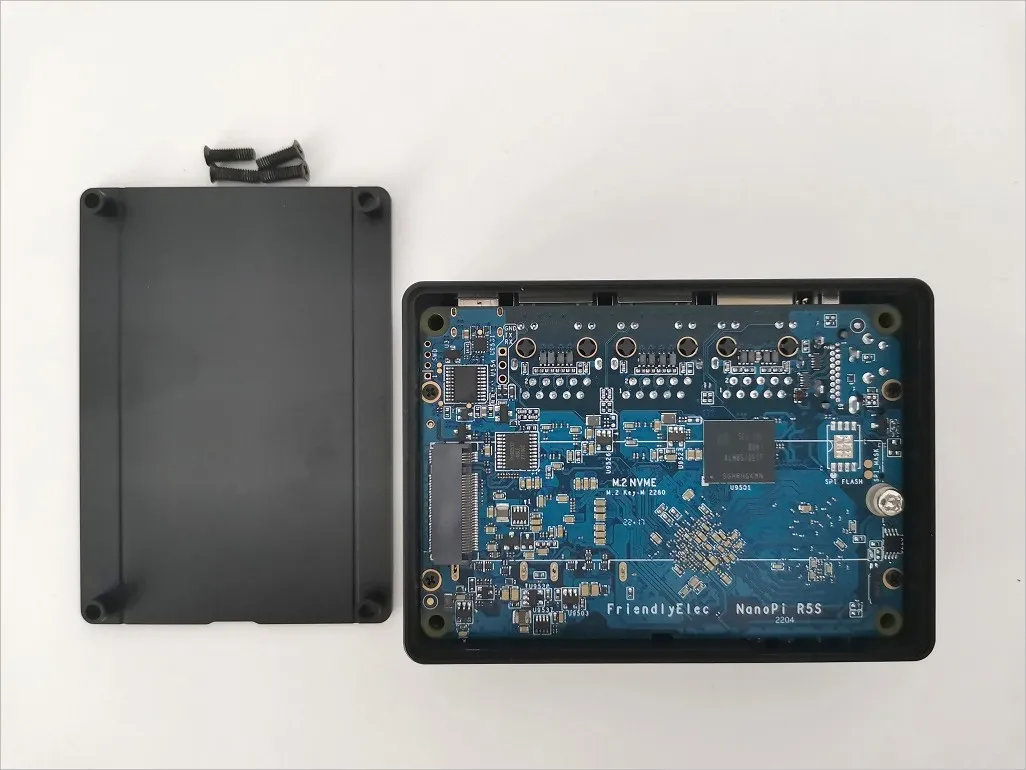
Maybe one of the top features of this board. FriendlyElec added an M.2 NVME interface on the back of the NanoPi R5S board. Using this interface, you can connect SSD drives up to 4TB in size.
Unfortunately, we didn’t have time to check this option, but we wanted to explain the value of adding a storage card. Combining FriendlyWrt and an internal SSD, you can use the board as a NAS server to back up your local data.
Installation
The M.2 NVME interface is very accessible. To access the interface, you need to unscrew the four Philips cover screws and assemble the SSD Card, as shown in the photo below.
Other Suggestions!
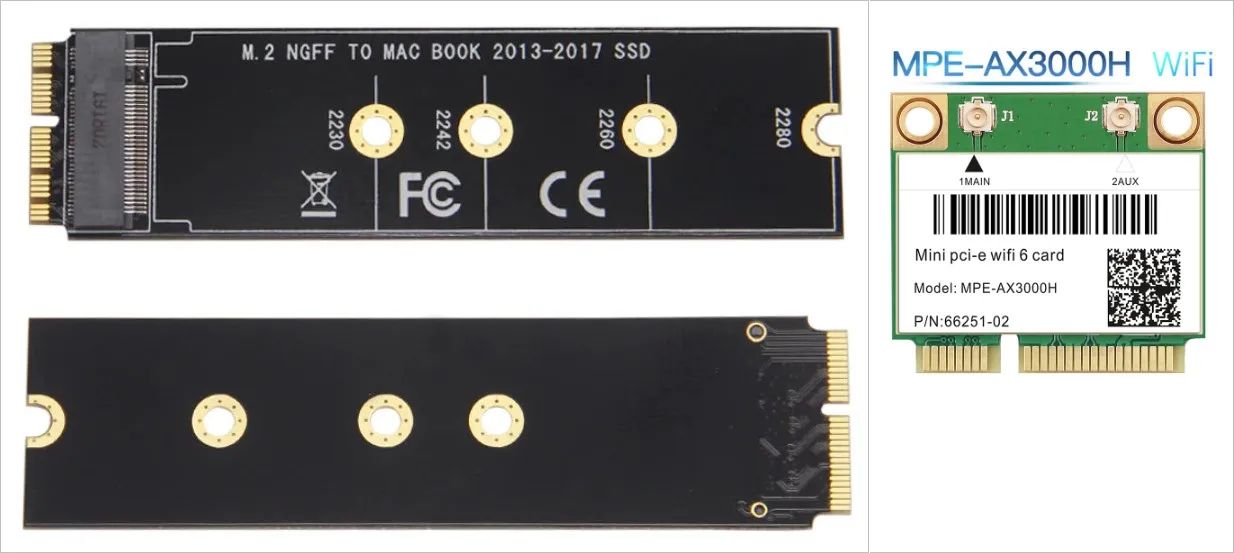
Option #1: Adding WiFi Support (Installing M.2 NVMe Adapter SSD to PCIe Card)
The NanoPi R5S Case has a built-in cork you can pull out. Most likely designed for future board design with built-in WiFi support included. It’s possible to pull it out and install an external antenna w/ an SMA Male Connector plug. After installing the adapter, you can install a WiFi 6 PCIe Card.
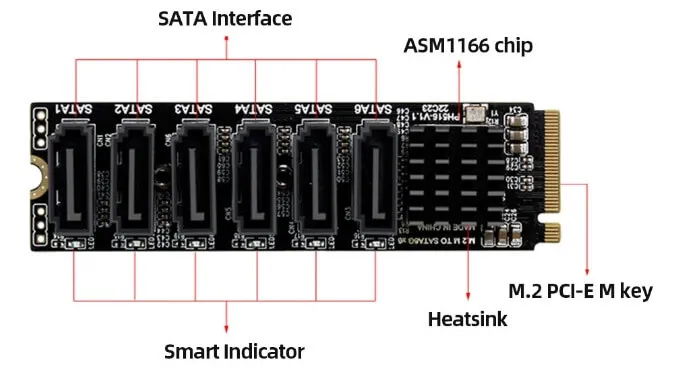
Option #2: Adding external SATA3 ports
This option is ideal if you want to build a NAS Server and connect a few external hard drives. Just keep in mind that it is most likely that the metal case lower cover might not close correctly if you plan to add this expansion card.
Price and Availability
The NanoPi R5S board comes in two main variations equipped with 4GB RAM and 2GB RAM configurations with few changes to the eMMC flash storage capacity.
The 2GB eMMC storage edition with a metal case is currently sold in ChipBoard Home Store for $94.00. You can purchase the basic board equipped with 4GB RAM for $65.00 (Excluding shipping) on FriendlyElec’s Official website. For an additional $13, you can acquire a board with a metal enclosure kit, which comes highly recommended.
Final verdict
This article is a quick first impression review, but everything we tested with the NanoPi R5S worked well for us. We recommend improving software support from additional Linux distributions such as OPNsense, including adding an Ubuntu/Debian desktop image.
FirendlyElec company maintains a good reputation in high-quality board design and metal enclosures. Still, it’s a fantastic product that provides excellent value for the buck, especially with the pair of 2.5Gbps Ethernet ports, and the price is not too bad.
NanoPi R5S Review Summary
- Quality
- Design
- Low price
- Two 2.5GbE ports
- Software support could be better with more OS images.


I have an H68K board with near identical specs (same chipset, NICs) which has absolutely atrocious software support. Hope FE gets their software done right.
As for distros, Armbian should also be easy to get working on this board.
I wonder why they even bother with Ubuntu Core given it’s slow snap- based architecture…
Armbian should be just fine if you typically don’t use or switch between three or more different distros.
Providing support for software can be quite complex, especially from China. It depends on how much the company is willing to invest. It’s a big problem,
But they are improving.