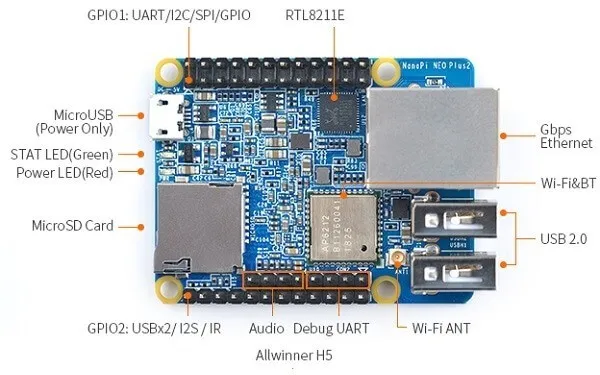
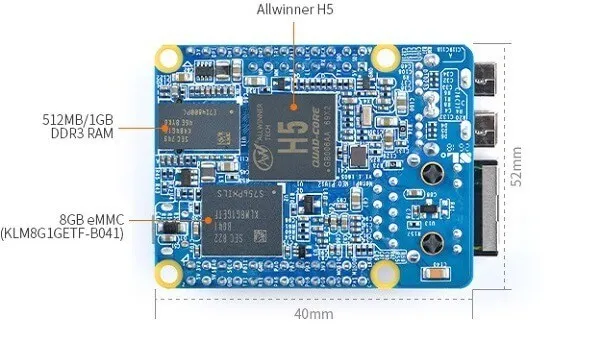
Close Menu
  • Home
  • About
  • Wearables
  • Earbuds
  • Computer Accessories
    • Routers
    • Remotes
  • Embedded
    • Single Board Computers
    • Addon Boards
    • Raspberry Pi
  • Wireless Routers
  • Contact
Facebook X (Twitter) Instagram
Trending News
  • LattePanda IOTA Review: 4 Reasons This Tiny Intel SBC Outperforms RPi 5
  • Up to 60% Off AliExpress Mega Promo Codes List | October 2025 Deals
  • Xiaomi 17 Pro Max vs iPhone 17 Pro Max: Specs, Price & Honest Review
  • Premium Budget RGB Gaming Keyboard 2025? Rii RK805 Full Review
  • Orange Pi AI Studio / Pro launched Globally, Rivaling Nvidia Jetson Orin Nano
  • Banana Pi BPI-R4 Pro: Wi-Fi 7 Router with 10G SFP+ Ports Released
  • Orange Pi 4 Pro RISC-V SBC Debuts with Allwinner SoC and WiFi 6 Support
  • Orange Pi 6 Plus 12-core ARM board Official Details & Prices released
AndroidPIMP
Facebook X (Twitter) Instagram
  • Home
  • About
  • Wearables
  • Earbuds
  • Computer Accessories
    • Routers
    • Remotes
  • Embedded
    • Single Board Computers
    • Addon Boards
    • Raspberry Pi
  • Wireless Routers
  • Contact
AndroidPIMP
Embedded Computers

NanoPi NEO Plus2: A Tiny Raspberry Pi Challenger

By androidpimpMarch 24, 2018Updated:April 13, 2023No Comments9 Mins Read
Facebook Twitter Pinterest LinkedIn Tumblr Email
Follow Us
Google News Flipboard
NanoPi NEO Plus2
NanoPi NEO Plus2
Table of contents
  1. NanoPi NEO Plus2
  2. NanoPi NEO Plus2: Unboxing & First Look
  3. Hardware Spec
  4. Conclusion

NanoPi NEO Plus2

The NanoPi NEO Plus2 is another Allwinner ARM board developed by FriendlyElec. It uses a 6-layers PCB layout featuring an Allwinner 64-bit quad-core A53 SoC with Hexa-core Mali 450 GPU and features 512MB – 1GB  DDR3 RAM and 8GB EMMC. With a small form factor of only 40 x 52 mm the NanoPi NEO Plus2 has rich onboard resources that include: AP6212 WiFi & Bluetooth module, Gbps Ethernet and two USB hosts.

It supports the system to boot from both the Micro-SD card and the eMMC chip. There are few configuration possibilities for this board, you can use this board independently and assembled it in a compact semi-open Acrylic plastic case made from plastic or buy the metal type with better heat distribution. Similar to previous NanoPi NEO&NEO2 board series, based on the “older” generation 32-bit quad-core processor this board can also be used with the 1-bay NAS Kit to build a low-cost home NAS (Network-attached storage) server to backup data on a 2.5 inch hard drive, Having said that, you are welcome to check more information about the product features in the following links posted below:

NanoPi NEO Plus2 Board

NanoPi NEO Plus2

NanoPi NEO Plus Metal Case


NanoPi NEO Plus2: Unboxing & First Look


Buying Advice and Prices

The board can be purchased at a starting price of 34$ for the 512MB RAM edition. The 1GB RAM is priced for a higher price of $42. Extra accessories including power supply and case are not included in the default package. Personally, I liked the metal case and I think its also worth the price. It can be used in high dirt industrial investments. As for the power adapter, it’s not a must-have item, if you have a tablet P.C 2A/3A power adapter with a micro USB plug it should be fine.

Main Items:

  • NanoPi NEO Plus2 ($34 / $42)
  • Metal Case Kit ($9.99)
  • 5V 3A Universal USB Port Power Adapter (+$8.97) ($20) 

(Note: For additional accessories please check FriendlyElec website).

NanoPi NEO Plus | Layout

NanoPi NEO Plus (With Heat-sink)

NanoPi NEO Plus2 Single board computer

Hardware Spec

  • CPU: Allwinner H5,Quad-core 64-bit high-performance Cortex A53
  • DDR3 RAM: 1GB / 512MB
  • Storage: 8GB eMMC
  • Network: Gbps Ethernet
  • WiFi: 802.11 b/g/n
  • Bluetooth: 4.0 dual-mode
  • USB Host: 2 x Independent USB Host
  • Micro-SD Slot: 1 x Slot. It supports system booting or is used to hold a storage card
  • Audio Input/Output: 4-Pin, 2.54 mm pitch pin-header
  • Micro-USB power input
  • Debug Serial: 4 Pin, 2.54 mm pitch pin-header
  • GPIO1: 24Pin, 2.54 mm pitch double-row pin-header containing UART, SPI, I2C and IO
  • GPIO2: 12Pin, 2.54 mm pitch pin-header containing USB, IR receiver, I2S and IO
  • Power Supply: DC 5V/2A
  • PCB Dimension: 40 x 52 mm
  • PCB Layer: 6-Layer
  • Software:
  1. Kernel 4.14
  2. U-boot 2017.11
  3. Armbian
  4.  DietPi
  5. FrienlyCore (Based on UbuntuCore-16.04)

NEO Plus2 Board | Package

  • NEO Plus2 Package 03
    NEO Plus2 Package 03
  • NEO Plus2 Package 04
    NEO Plus2 Package 04
  • NEO Plus2 Package 05
    NEO Plus2 Package 05
  • NEO Plus2 Package 06
    NEO Plus2 Package 06
  • NEO Plus2 Package 01
    NEO Plus2 Package 01
  • NEO Plus2 Package 02
    NEO Plus2 Package 02

NEO Plus2 Board | Unboxing

  • NEO Plus2 Unboxing 02
    NEO Plus2 Unboxing 02
  • NEO Plus2 Unboxing 01
    NEO Plus2 Unboxing 01
  • NEO Plus2 Unboxing 03
    NEO Plus2 Unboxing 03

NEO Plus2 Metal Case Package

  • NEO Plus2 Case Unbox 1
    NEO Plus2 Case Unbox 1
  • NEO Plus2 Case Unbox 2
    NEO Plus2 Case Unbox 2
  • NEO Plus2 Case Unbox 3
    NEO Plus2 Case Unbox 3

NEO Plus2 + Metal Case Kit | Unboxing

  • NEO Plus2 Case 00
    NEO Plus2 Case 00
  • NEO Plus2 Case 01
    NEO Plus2 Case 01
  • NEO Plus2 Case 02
    NEO Plus2 Case 02
  • NEO Plus2 Case 03
    NEO Plus2 Case 03
  • NEO Plus2 Case 04
    NEO Plus2 Case 04
  • NEO Plus2 Case 05
    NEO Plus2 Case 05
  • NEO Plus2 Case 06
    NEO Plus2 Case 06
  • NEO Plus2 Case 07
    NEO Plus2 Case 07

First-time operation

  1. Download the DietPi Image
  2. Write the image to the SD card using Win32DiskImager / balenaEtcher Tool
  3. Boot the NanoPi NEO Plus2 from the card
  4. Finding the board IP address:

Method 1: Some advanced routers have LAN discover a feature that makes life easier viewing all connected devices across a local network.

Method 2: Use an IP network scanner
A network scanner is a useful tool for a network administrator. You can also use it to find your devices on your network. for this purpose, you can use Angry IP Scanner as it is simple and easy to use.

5. Download and install PuTTY software. Enter the IP address and run SSH

Flashing OS to 8GB eMMC Chip

Method #1: Flashing the image using dd

  • After acquiring the DHCP / static IP address of the board.
  • Install PuTTY software and select SSH protocol, enter your IP with port 22
  • login with root / dietpi
  • After runing fdisk -l to display storage devices, you would see the following line:

“/dev/mmcblk0p2 133120 15269887 15136768 7,2G 83 Linux”

/dev/mmcblk1 -> is your 8GB eMMC.

  • Copy to the original image of DietPi to an NTFS formatted USB flash drive
  • Create mount directory: mkdir /mnt/usb
  • mount the USB flash drive running: mount /dev/sda1 /mnt/usb
  • change path to /mnt/usb
  • Execute the following command:

root@DietPi:/mnt/usb# dd if=dietPi.img of=/dev/mmcblk1 bs=512

  • Wait few minutes until the process is over and run restart cmd
    to boot the board.
  • Now you are ready to configure Service, software, settings:

dietpi-config
dietpi-software

Method #2: Flashing the image with eflasher Utility

The simplest method to burn the image is burning the image on a microSD card using the Win32DiskImager / balenaEtcher Tool. After that step is finished, you just need to boot your device and the rest is done automatically.

NanoPi NEO Plus2

Powered with a quad-core 64bit H5 Allwinner SoC the NanoPi NEO Plus2 board provides decent performance, enough for running popular services like NAS, FTP and more. The H5 CPU frequency operates in the minimum frequency of 120 MHz up to Max frequency of 1248 MHz.

DietPi distribution is the most flexible and easy to use. to change CPU settings you can run ‘dietpi-config‘ that loads with GUI. under ‘Performance Options’ you can control and set Throttle ratio by specifying a nominal percentage value, choose a CPU Governor according to the type of usage. Also set minimum and maximum CPU clock frequency. Settings that directly impact operation including power consumption.

CPU Performance settings (DietPi)

  • NEO Plus2 DietPi CPU1
    NEO Plus2 DietPi CPU1
  • NEO Plus2 DietPi CPU2
    NEO Plus2 DietPi CPU2
  • NEO Plus2 DietPi CPU3
    NEO Plus2 DietPi CPU3
  • NEO Plus2 DietPi CPU4
    NEO Plus2 DietPi CPU4

NanoPi NEO Plus2 | Full view

  • NanoPi NEO Plus2 01
    NanoPi NEO Plus2 01
  • NanoPi NEO Plus2 02
    NanoPi NEO Plus2 02
  • NanoPi NEO Plus2 08
    NanoPi NEO Plus2 08
  • NanoPi NEO Plus2 07
    NanoPi NEO Plus2 07
  • NanoPi NEO Plus2 06
    NanoPi NEO Plus2 06
  • NanoPi NEO Plus2 05
    NanoPi NEO Plus2 05
  • NanoPi NEO Plus2 04
    NanoPi NEO Plus2 04
  • NanoPi NEO Plus2 03
    NanoPi NEO Plus2 03

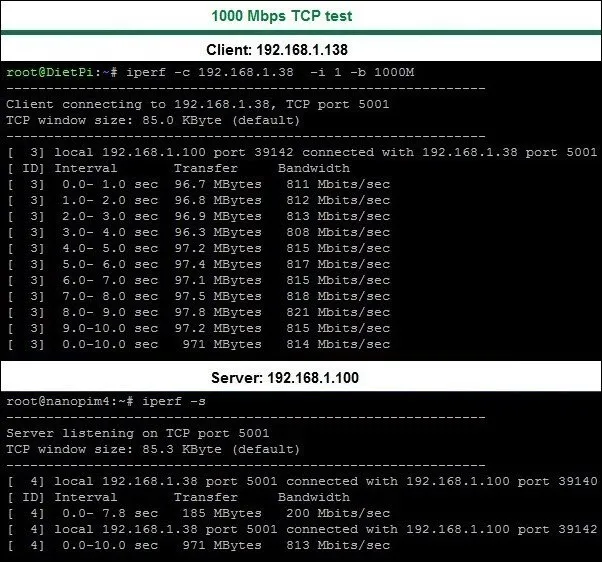
Ethernet Performance Test (throughput)

Testing Environment:

  • Gigabit Network Switch, Transfer Rate: 10/100/1000Mbps.
  • Test Tool: Iperf
  • Test Type: Testing the Network Speed Between Two Machines.
  • Connected devices: NanoPi NEO Plus2 (Client), NanoPi M4 (Server).
  • Test result: 813 Mbits/sec

USB flash drive Performance Test

  • Tested Flash Drive:
  • Brand: Kingston
  • Capacity: 16GB 
  • Interface: USB 3.0
  • File system: NTFS
  • Model: DT50/16GB (Datatraveler)
  • Spec: Speed Up to 100MB/s(Read for USB3.0/1)
# Read Test

# sudo dd if=/dev/sda1 of=/dev/zero bs=1M count=400 iflag=direct
400+0 records in
400+0 records out
419430400 bytes (419 MB, 400 MiB) copied, 12.073 s, 34.7 MB/s

# Write Test

# sudo dd if=/dev/zero of=/dev/sda1 bs=1M count=400 skip=1000 oflag=direct
400+0 records in
400+0 records out
419430400 bytes (419 MB, 400 MiB) copied, 25.963 s, 16.2 MB/s

Resources Usage

The NanoPi NEO Plus2 (1GB) H5 Quad-core CPU is very capable of running and handling multiple services, especially in CLI mode. After executing the Service –status-all command to display all running services (list below). From a total 1GB RAM running those services, the system remained with approximately 607Mb of free available ram.  

[ + ] avahi-daemon
[ – ] console-setup.sh
[ + ] cron
[ + ] dbus
[ + ] dhcpcd
[ + ] dropbear
[ + ] fake-hwclock
[ + ] hostapd
[ – ] hwclock.sh
[ + ] isc-dhcp-server
[ – ] keyboard-setup.sh
[ + ] kmod
[ + ] lighttpd
[ + ] networking
[ – ] nfs-common
[ + ] nfs-kernel-server
[ + ] nmbd
[ + ] php7.0-fpm
[ + ] pihole-FTL
[ + ] procps
[ + ] proftpd
[ + ] redis-server
[ + ] resolvconf
[ + ] rpcbind
[ – ] rsync
[ + ] samba
[ – ] samba-ad-dc
[ + ] smbd
[ + ] tor

Compatibility with 1-bay NAS Dock Board

If you are planning on connecting a high capacity SSD / mechanical hard drive with the NEO Plus2, this combination would be a good pick, just keep in mind that if you decide to buy the 1-bay NAS Dock aluminium case it will not fit with the NanoPi NEO Plus2 because the board length is much longer, about 8-10mm in comparison to the NanoPi NEO/NEO2 board series.

NEO Plus2 With 1-bay NAS Doc & /Case

  • NEO Plus2 With 1 bay NAS Dock P1
    NEO Plus2 With 1 bay NAS Dock P1
  • NEO Plus2 With 1 bay NAS Dock P2
    NEO Plus2 With 1 bay NAS Dock P2
  • NEO Plus2 With 1 bay NAS Dock P3
    NEO Plus2 With 1 bay NAS Dock P3
  • NEO Plus2 With 1 bay NAS Dock P4
    NEO Plus2 With 1 bay NAS Dock P4
  • NEO Plus2 With 1 bay NAS Dock P5
    NEO Plus2 With 1 bay NAS Dock P5

Practical Applications

Although the NEO Plus2 Board doesn’t have any video output interface and accessing it is done mainly through SSH connection, if you are asking what can you do with this board? the answer is simple. there are plenty of services you can run on it such as Print sharing service, NAS, VirtualHere, Samba, FTP, Pi-hole, Tor hotspot, WiFi hotspot and much more.

Metal Case Kit ($9.99)

A must-have accessory if you need a firm case to protect the board. The case kit also comes with a few extra items such as an external 4dB WiFi antenna, a thermal pad, and relatively large-high-quality heatsink to cool the H5 Chip.

The case main envelope is made from a rectangle-shaped profile, with two covers tightened with M2.5 screws on both sides. Because the case is completely closed, the only issue I had was gaining access to the header pins. Cutting a small window just above the pins could be a nice solution to this problem.

NEO Plus2 Metal Case | Full view

  • NEO Plus2 Case 01 1
    NEO Plus2 Case 01 1
  • NEO Plus2 Case 02 1
    NEO Plus2 Case 02 1
  • NEO Plus2 Case 03 1
    NEO Plus2 Case 03 1
  • NEO Plus2 Case 04 1
    NEO Plus2 Case 04 1
  • NEO Plus2 Case 05 1
    NEO Plus2 Case 05 1
  • NEO Plus2 Case 06 1
    NEO Plus2 Case 06 1
  • NEO Plus2 Case 07 1
    NEO Plus2 Case 07 1
  • NEO Plus2 Case 08
    NEO Plus2 Case 08
  • NEO Plus2 Case 09
    NEO Plus2 Case 09

NEO Plus2 Heatsink

Included as part of the metal case kit. The heatsink is mounted against the H5 Chip using four M2.5×4.5mm screws and provided a terminal pad. From my checking, it would be wise buying additional two thermal pads with the same thickness as the H5 chip to also cool the eMMC and memory chips. Having said that, quality and design were both excellent and offer a great cooling solution for the board, as well as dirt protection.

NEO Plus2 + Heatsink

  • NEO Plus2 Heatsink 4
    NEO Plus2 Heatsink 4
  • NEO Plus2 Heatsink 5
    NEO Plus2 Heatsink 5
  • NEO Plus2 Heatsink 1
    NEO Plus2 Heatsink 1
  • NEO Plus2 Heatsink 2
    NEO Plus2 Heatsink 2
  • NEO Plus2 Heatsink 3
    NEO Plus2 Heatsink 3
  • NEO Plus2 Heatsink 5 1
    NEO Plus2 Heatsink 5 1
  • NEO Plus2 Heatsink 6
    NEO Plus2 Heatsink 6
  • NEO Plus2 Heatsink 7
    NEO Plus2 Heatsink 7
  • NEO Plus2 Heatsink 8
    NEO Plus2 Heatsink 8
  • NEO Plus2 Heatsink 9
    NEO Plus2 Heatsink 9
  • NEO Plus2 Heatsink 10
    NEO Plus2 Heatsink 10
  • NEO Plus2 Heatsink 11
    NEO Plus2 Heatsink 11

NEO Plus2 | Putting it all together

  • NEO Plus2 ASM 1
    NEO Plus2 ASM 1
  • NEO Plus2 ASM 2
    NEO Plus2 ASM 2
  • NEO Plus2 ASM 3
    NEO Plus2 ASM 3
  • NEO Plus2 ASM 4
    NEO Plus2 ASM 4
  • NEO Plus2 ASM 5
    NEO Plus2 ASM 5
  • NEO Plus2 ASM 6
    NEO Plus2 ASM 6
  • NEO Plus2 ASM 7
    NEO Plus2 ASM 7
  • NEO Plus2 ASM 8
    NEO Plus2 ASM 8
  • NEO Plus2 ASM 9
    NEO Plus2 ASM 9
  • NEO Plus2 ASM 10
    NEO Plus2 ASM 10
  • NEO Plus2 ASM 11
    NEO Plus2 ASM 11
  • NEO Plus2 ASM 12
    NEO Plus2 ASM 12
  • NEO Plus2 ASM 13
    NEO Plus2 ASM 13
  • NEO Plus2 ASM 14
    NEO Plus2 ASM 14
  • NEO Plus2 ASM 15
    NEO Plus2 ASM 15
  • NEO Plus2 ASM 16
    NEO Plus2 ASM 16
  • NEO Plus2 ASM 17
    NEO Plus2 ASM 17
  • NEO Plus2 ASM 18
    NEO Plus2 ASM 18

Conclusion

Overall, I really liked the quality of the NanoPi NEO Plus2 board including all optional accessories. This small form factor board can best be used for many applications where you might have limited space to place a large size low consumption minicomputer. In my opinion, the retail price is too high and needs to be lower. Bottom line, if you have an extra $32-42 and seeking a small board I definitely recommend buying one with the metal case kit.

Share. Facebook Twitter Pinterest LinkedIn Tumblr Email
Previous ArticleRaspberry Pi Display: Driver Free Touchscreen Display
Next Article Raspberry Pi 3 Model B+ Review – Faster Than Ever
androidpimp
  • Website

Related Posts

LattePanda IOTA X86 SBC (Front View)

LattePanda IOTA Review: 4 Reasons This Tiny Intel SBC Outperforms RPi 5

October 7, 2025
Orange Pi AI Studio Mini PC

Orange Pi AI Studio / Pro launched Globally, Rivaling Nvidia Jetson Orin Nano

October 3, 2025
Banana-bpi-R4-Pro-Board

Banana Pi BPI-R4 Pro: Wi-Fi 7 Router with 10G SFP+ Ports Released

October 1, 2025

Comments are closed.

Categories
PureVPN
PureVPN Ad Banner
VyprVPN – No. 1 in Anonymity
Vyprvpn 350x260
PrivadoVPN – No. 1 in Parental Control
PrivadoVPN 350x437
Recent Posts
  • LattePanda IOTA Review: 4 Reasons This Tiny Intel SBC Outperforms RPi 5
  • Up to 60% Off AliExpress Mega Promo Codes List | October 2025 Deals
  • Xiaomi 17 Pro Max vs iPhone 17 Pro Max: Specs, Price & Honest Review
  • Premium Budget RGB Gaming Keyboard 2025? Rii RK805 Full Review
  • Orange Pi AI Studio / Pro launched Globally, Rivaling Nvidia Jetson Orin Nano
  • Banana Pi BPI-R4 Pro: Wi-Fi 7 Router with 10G SFP+ Ports Released
  • Orange Pi 4 Pro RISC-V SBC Debuts with Allwinner SoC and WiFi 6 Support
  • Orange Pi 6 Plus 12-core ARM board Official Details & Prices released
  • POCO F8 Ultra: First Leaks Reveal Flagship-Beating Specs, Design & Expected 2025 Launch
  • Redmi Pad 2 Review (2025): The Best Budget Tablet Value? Full Review
  • Orange Pi 600 specs revealed: A compact Intel PC built into a keyboard, featuring an Intel N150 processor
  • Xiaomi 17 series debuts: Aiming to rival the iPhone 17?
  • Orange Pi Mini PC featuring Cixin P1 SoC is gearing up for launch.
  • Poco X8 Ultra & Poco X8 Pro Release date Just Around the Corner Following EEC Certification
  • Orange Pi X debuts with Intel N100/N150 processor, offering an affordable x86 SBC.
  • Orange Pi AI Ultra SBC with Qualcomm QC8550 is coming soon
  • ELEBAO B10 Intel Powered NAS Mini PC features X4 NVMe slots with Dual 2.5GbE
  • Banana Pi BPI-R4 Lite: An Affordable R4 Router Board Variant is now available!
  • PrivadoVPN Review 2025: Is It Good for Streaming & Privacy?
RSS Recent RSS Feed
  • LattePanda IOTA Review: 4 Reasons This Tiny Intel SBC Outperforms RPi 5 October 7, 2025
  • Up to 60% Off AliExpress Mega Promo Codes List | October 2025 Deals October 6, 2025
  • Xiaomi 17 Pro Max vs iPhone 17 Pro Max: Specs, Price & Honest Review October 5, 2025
  • Premium Budget RGB Gaming Keyboard 2025? Rii RK805 Full Review October 3, 2025
  • Orange Pi AI Studio / Pro launched Globally, Rivaling Nvidia Jetson Orin Nano October 2, 2025
Facebook X (Twitter) Instagram Pinterest
@2025 - All Right Reserved. Designed by AndroidPIMP

Type above and press Enter to search. Press Esc to cancel.

Accessibility
Accessibility modes
Epilepsy Safe Mode
Dampens color and removes blinks
This mode enables people with epilepsy to use the website safely by eliminating the risk of seizures that result from flashing or blinking animations and risky color combinations.
Visually Impaired Mode
Improves website's visuals
This mode adjusts the website for the convenience of users with visual impairments such as Degrading Eyesight, Tunnel Vision, Cataract, Glaucoma, and others.
Cognitive Disability Mode
Helps to focus on specific content
This mode provides different assistive options to help users with cognitive impairments such as Dyslexia, Autism, CVA, and others, to focus on the essential elements of the website more easily.
ADHD Friendly Mode
Reduces distractions and improve focus
This mode helps users with ADHD and Neurodevelopmental disorders to read, browse, and focus on the main website elements more easily while significantly reducing distractions.
Blindness Mode
Allows using the site with your screen-reader
This mode configures the website to be compatible with screen-readers such as JAWS, NVDA, VoiceOver, and TalkBack. A screen-reader is software for blind users that is installed on a computer and smartphone, and websites must be compatible with it.
Readable Experience
Content Scaling
Default
Text Magnifier
Readable Font
Dyslexia Friendly
Highlight Titles
Highlight Links
Font Sizing
Default
Letter Spacing
Default
Left Aligned
Center Aligned
Right Aligned
Visually Pleasing Experience
Dark Contrast
Light Contrast
Monochrome
High Contrast
High Saturation
Low Saturation
Adjust Text Colors
Adjust Title Colors
Adjust Background Colors
Easy Orientation
Mute Sounds
Hide Images
Hide Emoji
Reading Guide
Stop Animations
Reading Mask
Highlight Hover
Highlight Focus
Big Dark Cursor
Big Light Cursor
Cognitive Reading
Virtual Keyboard
Navigation Keys
Voice Navigation

AndroidPIMP

Accessibility Statement

  • www.androidpimp.com
  • October 7, 2025

Compliance status

We firmly believe that the internet should be available and accessible to anyone, and are committed to providing a website that is accessible to the widest possible audience, regardless of circumstance and ability.

To fulfill this, we aim to adhere as strictly as possible to the World Wide Web Consortium’s (W3C) Web Content Accessibility Guidelines 2.1 (WCAG 2.1) at the AA level. These guidelines explain how to make web content accessible to people with a wide array of disabilities. Complying with those guidelines helps us ensure that the website is accessible to all people: blind people, people with motor impairments, visual impairment, cognitive disabilities, and more.

This website utilizes various technologies that are meant to make it as accessible as possible at all times. We utilize an accessibility interface that allows persons with specific disabilities to adjust the website’s UI (user interface) and design it to their personal needs.

Additionally, the website utilizes an AI-based application that runs in the background and optimizes its accessibility level constantly. This application remediates the website’s HTML, adapts Its functionality and behavior for screen-readers used by the blind users, and for keyboard functions used by individuals with motor impairments.

If you’ve found a malfunction or have ideas for improvement, we’ll be happy to hear from you. You can reach out to the website’s operators by using the following email

Screen-reader and keyboard navigation

Our website implements the ARIA attributes (Accessible Rich Internet Applications) technique, alongside various different behavioral changes, to ensure blind users visiting with screen-readers are able to read, comprehend, and enjoy the website’s functions. As soon as a user with a screen-reader enters your site, they immediately receive a prompt to enter the Screen-Reader Profile so they can browse and operate your site effectively. Here’s how our website covers some of the most important screen-reader requirements, alongside console screenshots of code examples:

  1. Screen-reader optimization: we run a background process that learns the website’s components from top to bottom, to ensure ongoing compliance even when updating the website. In this process, we provide screen-readers with meaningful data using the ARIA set of attributes. For example, we provide accurate form labels; descriptions for actionable icons (social media icons, search icons, cart icons, etc.); validation guidance for form inputs; element roles such as buttons, menus, modal dialogues (popups), and others. Additionally, the background process scans all the website’s images and provides an accurate and meaningful image-object-recognition-based description as an ALT (alternate text) tag for images that are not described. It will also extract texts that are embedded within the image, using an OCR (optical character recognition) technology. To turn on screen-reader adjustments at any time, users need only to press the Alt+1 keyboard combination. Screen-reader users also get automatic announcements to turn the Screen-reader mode on as soon as they enter the website.

    These adjustments are compatible with all popular screen readers, including JAWS and NVDA.

  2. Keyboard navigation optimization: The background process also adjusts the website’s HTML, and adds various behaviors using JavaScript code to make the website operable by the keyboard. This includes the ability to navigate the website using the Tab and Shift+Tab keys, operate dropdowns with the arrow keys, close them with Esc, trigger buttons and links using the Enter key, navigate between radio and checkbox elements using the arrow keys, and fill them in with the Spacebar or Enter key.Additionally, keyboard users will find quick-navigation and content-skip menus, available at any time by clicking Alt+1, or as the first elements of the site while navigating with the keyboard. The background process also handles triggered popups by moving the keyboard focus towards them as soon as they appear, and not allow the focus drift outside it.

    Users can also use shortcuts such as “M” (menus), “H” (headings), “F” (forms), “B” (buttons), and “G” (graphics) to jump to specific elements.

Disability profiles supported in our website

  • Epilepsy Safe Mode: this profile enables people with epilepsy to use the website safely by eliminating the risk of seizures that result from flashing or blinking animations and risky color combinations.
  • Visually Impaired Mode: this mode adjusts the website for the convenience of users with visual impairments such as Degrading Eyesight, Tunnel Vision, Cataract, Glaucoma, and others.
  • Cognitive Disability Mode: this mode provides different assistive options to help users with cognitive impairments such as Dyslexia, Autism, CVA, and others, to focus on the essential elements of the website more easily.
  • ADHD Friendly Mode: this mode helps users with ADHD and Neurodevelopmental disorders to read, browse, and focus on the main website elements more easily while significantly reducing distractions.
  • Blindness Mode: this mode configures the website to be compatible with screen-readers such as JAWS, NVDA, VoiceOver, and TalkBack. A screen-reader is software for blind users that is installed on a computer and smartphone, and websites must be compatible with it.
  • Keyboard Navigation Profile (Motor-Impaired): this profile enables motor-impaired persons to operate the website using the keyboard Tab, Shift+Tab, and the Enter keys. Users can also use shortcuts such as “M” (menus), “H” (headings), “F” (forms), “B” (buttons), and “G” (graphics) to jump to specific elements.

Additional UI, design, and readability adjustments

  1. Font adjustments – users, can increase and decrease its size, change its family (type), adjust the spacing, alignment, line height, and more.
  2. Color adjustments – users can select various color contrast profiles such as light, dark, inverted, and monochrome. Additionally, users can swap color schemes of titles, texts, and backgrounds, with over seven different coloring options.
  3. Animations – person with epilepsy can stop all running animations with the click of a button. Animations controlled by the interface include videos, GIFs, and CSS flashing transitions.
  4. Content highlighting – users can choose to emphasize important elements such as links and titles. They can also choose to highlight focused or hovered elements only.
  5. Audio muting – users with hearing devices may experience headaches or other issues due to automatic audio playing. This option lets users mute the entire website instantly.
  6. Cognitive disorders – we utilize a search engine that is linked to Wikipedia and Wiktionary, allowing people with cognitive disorders to decipher meanings of phrases, initials, slang, and others.
  7. Additional functions – we provide users the option to change cursor color and size, use a printing mode, enable a virtual keyboard, and many other functions.

Browser and assistive technology compatibility

We aim to support the widest array of browsers and assistive technologies as possible, so our users can choose the best fitting tools for them, with as few limitations as possible. Therefore, we have worked very hard to be able to support all major systems that comprise over 95% of the user market share including Google Chrome, Mozilla Firefox, Apple Safari, Opera and Microsoft Edge, JAWS and NVDA (screen readers).

Notes, comments, and feedback

Despite our very best efforts to allow anybody to adjust the website to their needs. There may still be pages or sections that are not fully accessible, are in the process of becoming accessible, or are lacking an adequate technological solution to make them accessible. Still, we are continually improving our accessibility, adding, updating and improving its options and features, and developing and adopting new technologies. All this is meant to reach the optimal level of accessibility, following technological advancements. For any assistance, please reach out to