About 52pi
The latest GeeekPi display is a new product designed by the 52pi company team, located in Shenzhen China. The company is involved in designing electronics modules for Makers based on Raspberry Pi, as well as providing the largest varieties of extension modules and accessories.
Raspberry Pi Display
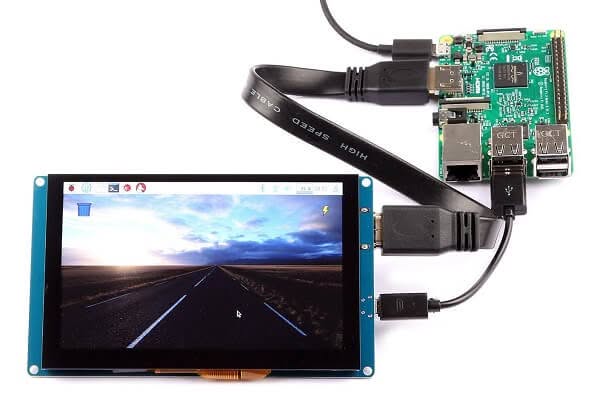
This display is a must-have accessory item for DIY hobbyists that need to cooperate a small 5-inch display in their projects. The display panel supports 10 point touch panel that can be easily connected to all Raspberry Pi boards, including other (SBC) single-board computer brands and possibly also Mini PCs. Connecting the display to a board is very simple. For that, you will need to use an HDM cable and a standard USB to Micro USB cable that draws low power (5V) using one of the SBC USB ports, making this type of connection between both devices very comfortable and portable to carry anywhere.
Raspberry Pi Plug and Play Free Driver Display
The display is driver-free and plug & play, which basically means that you don’t need to configure any extra settings to operate it. If you are planning to build a NAS Server or a type of workstation to run Linux or Windows operating systems this item can be a good and cheap solution. Having said that, you are welcome to check it out at the following link posted below:
Main Features
- 5-inch display with a resolution of up to 800 x 480 pixels
- Capacitive Touch Control – fast touch response time Support Multi-touch(maximum 10 points (only tested on Windows 10).
- Hardware Support – Raspberry Pi/BeagleBone Black/PC/ MiniPC (Intel Base).
- OS Support – Raspbian, Ubuntu Mate, NOOBS with RaspberryPi, Debian, Angstrom with BeagleBone, Windows, Ubuntu.
- Plug and Play Plug and Play – No Driver Needed! It’s easy to identify the touch screen due to the Built-in EDID.
Parameters:
- Power: 5V Power (Max Current: 400mA) via Micro USB
- Current: Max 400mA
- Display Type: 5-inch TFT LCD
- Resolution: 800×480 pixels
- Touch-points: 10 points maximum
- Interface: HDMI & USB 2.0 Full Speed
- Dimensions: 133mm x 79mm x 13mm
- Weight without packages: 130g
- Weight with package: 180g
Package Content:
- 1x 5-inch Capacitive Touch Screen
- 1x User Guide
- 1x Specs Sheet
GeeekPi Display: Unboxing
 GeeekPi Raspberry Pi Display Unboxing 1


Package Content
The package content includes a 5-inch display panel with a resolution of 800×480 pixels with two user sheets (papers). One contains the product specifications and the other comes with an explanation of how to configure environment settings to make it workable and connected to a Raspberry Pi board.
The Display (First impressions)
From a user perspective, this display is very easy to install because of its driver-free capability, meaning with a resolution of 800×480 pixels with two user sheets (papers) plug-and-play supported. The display was initially designed to work with all raspberry pi board series, but not only!. It is also designed to work with other single-board computers (SBC) including PCs, Mini PCs, and devices based on Intel SoC running Microsoft Windows operating systems.
52Pi jumped a few steps ahead with this display after launching their previous 5-inch Resistive type display. This new model offers capacitive touch gestures if the operating system supports the touch function, so you will not need to use a mouse to move the cursor on the screen just like using a tablet PC. Having said that, from my personal impression the picture quality was good and sharp enough for a relatively small 5-inch display, no complaints here.
GeeekPi Raspberry Pi Display | Full view
 GeeekPi Raspberry Pi Display 3


GeeekPi Display | White Background Photos
 GeeekPi Display P3


Operation
To connect the display unit to any SBC you will need to use a standard HDMI Cable and USB – micro USB type cable, which is commonly used for charging/data for most mobile phones. For the 5V power supply, you will need to “sacrifice” one USB port or use an external power adapter capable of providing 5V – 400mah.
If you want to place the display unit at a large distance from the board it’s highly recommended buying short cables as possible and also use a flexible flat HDMI cable that is easier to handle.
Configuration (Settings)
Raspberry Pi Boards settings
You don’t need to have advanced tech skills to operate this display with a raspberry pi board. To configure the display you will have to use a simple text editor to edit the config.txt file located in the root directory of the burned image file using the windows notepad app. You can delete all irrelevant parameters and add a few text lines as shown and explained in the user manual.
Other board Brands | Allwinner Based – Orange Pi, Banana Pi, FriendlyElec
Depending on the specific distribution image, if for example, you’re running Armbian on other Allwinner SoC-based boards you can find the uEnv.txt file which is equivalent to the config.txt file. Inside it, you can bypass default kernel parameters and adjust the resolution.
GeeekPi Display Settings
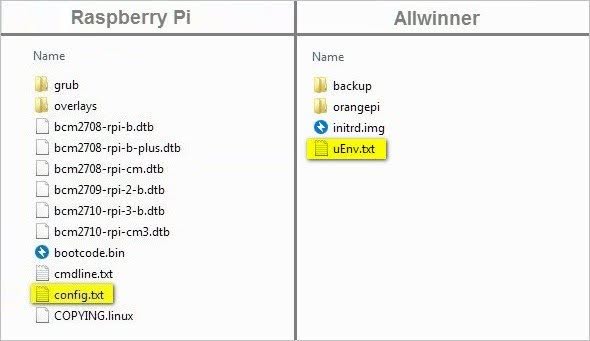
uEnv.txt file Parameters:
monitor=hdmi
edid=1
hpd=0
disp_mode=800x480
Config.txt file Parameters:
framebuffer_width=800
framebuffer_height=480
hdmi_force_hotplug=1
hdmi_group=2
hdmi_mode=87
hdmi_cvt  800  480  60  6  0  0  0
device_tree=bcm2710-rpi-3-b.dtb
dtparam=spi=on
Testing Display with other Boards
Based on my few tests, the display worked well with a Raspberry Pi 3 running Raspbian OS (Debian-based distribution), LattePanda also worked well under Windows 10 OS, and well as a MiQi board (RK3288 SoC) running Lubuntu Linux distribution. Keep in mind that this is only a partial list and there are possibly more devices that can be supported.
GeeekPi Display | Compatibility with Other Boards
 GeeekPi Display Test 3


Final Words
A very nice accessory and a must-have item for tech geeks into DIY projects that are in a need of a cheap, small, and compact 5-inch display to operate their platform. If for some reason you think this display is too small in size, there is also an option for a 7-inch edition that can be found in 52Pi official stores (Aliexpress & Amazon). Bottom line, this is a good product and I highly recommend it.