Close Menu
  • Home
  • About
  • Wearables
  • Earbuds
  • Computer Accessories
    • Routers
    • Remotes
  • Embedded
    • Single Board Computers
    • Addon Boards
    • Raspberry Pi
  • Wireless Routers
  • Contact
Facebook X (Twitter) Instagram
Trending News
  • LattePanda IOTA Review: 4 Reasons This Tiny Intel SBC Outperforms RPi 5
  • Up to 60% Off AliExpress Mega Promo Codes List | October 2025 Deals
  • Xiaomi 17 Pro Max vs iPhone 17 Pro Max: Specs, Price & Honest Review
  • Premium Budget RGB Gaming Keyboard 2025? Rii RK805 Full Review
  • Orange Pi AI Studio / Pro launched Globally, Rivaling Nvidia Jetson Orin Nano
  • Banana Pi BPI-R4 Pro: Wi-Fi 7 Router with 10G SFP+ Ports Released
  • Orange Pi 4 Pro RISC-V SBC Debuts with Allwinner SoC and WiFi 6 Support
  • Orange Pi 6 Plus 12-core ARM board Official Details & Prices released
AndroidPIMP
Facebook X (Twitter) Instagram
  • Home
  • About
  • Wearables
  • Earbuds
  • Computer Accessories
    • Routers
    • Remotes
  • Embedded
    • Single Board Computers
    • Addon Boards
    • Raspberry Pi
  • Wireless Routers
  • Contact
AndroidPIMP
Embedded Computers

FriendlyARM NanoPC T3 Single Board Computer Review

By androidpimpMarch 11, 2017Updated:November 1, 2024No Comments8 Mins Read
Facebook Twitter Pinterest LinkedIn Tumblr Email
Follow Us
Google News Flipboard
NanoPCֹ T3 M3 Review
Table of contents
  1. FriendlyARM NanoPC T3
  2. NanoPC-T3 specifications
  3. Accessories
  4. Hardware
  5. Software Support
  6. Performance & Benchmarks
  7. Network Throughput Test
  8. Final Words

FriendlyARM NanoPC T3

The NanoPC-T3 is a single-board computer designed and developed by FriendlyARM Company. It uses the Samsung Octa-Core Cortex-A53 S5P6818 SoC. Compared to the NanoPC-T2, the NanoPC-T3 is equipped with additional interfaces and ports, along with a more powerful SoC. Its dynamic frequency scales from 400MHz up to 1.4GHz. The NanoPC-T3 has an 8G eMMC on-board flash, audio jack, video input/output interfaces, built-in WiFi, Bluetooth, and a Gbps Ethernet port. In addition, the NanoPC-T3 has a power management chip, onboard porcelain antenna, and serial debug port.

Other features include two camera interfaces: a DVP camera interface and a MIPI-CSI interface, and four video interfaces: HDMI 1.4A, LVDS, parallel RGB-LCD interface, and MIPI-DSI interface. It has RTC interface pins, two USB 2.0 Host ports, and an additional two onboard via an external interface using an 8 or 9-pin header pin cable.


NanoPC_T3_single_board_computer

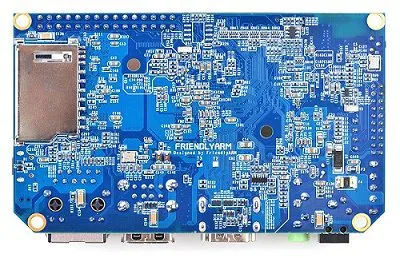
NanoPC-T3 | Rear View

NanoPC_T3_back
NanoPCֹ_T3_Full_View

NanoPC-T3 specifications

  • SoC: Samsung S5P6818 octa-core Cortex A53 processor @ up to 1.4GHz
  • GPU: Mali-400MP
  • System Memory: 1 GB 32bit DDR3 RAM
  • Storage: 8GB eMMC flash, 1x SD card slot
  • Connectivity: Gigabit Ethernet (RTL8211E) 802.11 b/g/n WiFi,  Bluetooth LE 4.0 (Ampak AP6212) with on-board chip antenna and IPX antenna connector.
  • Video Output / Display I/F: 1x HDMI 1.4a, LVDS, MIPI DSI, parallel RGB LCD
  • Audio I/O: HDMI 1.4a, 3.5 mm audio jack, on-board microphone
  • Camera interfaces: 1x DVP interface, 1x MIPI CSI
  • USB: 2x USB 2.0, 1x Micro USB 2.0 OTG port,  2x USB 2.0 host ports via 8-pin header
  • Headers: 30-pin GPIO header, 8-pin header for power signals, reset and LED 1-2
  • Debugging: 4-pin header for serial console
  • U-Boot : Boot selection button (SD card / eMMC)
  • 1x Reset button, 1x power
  • 2x user LEDs
  • RTC Battery header
  • Power Supply: DC 5V/2A
  • Dimension: 100 x 60 mm (6-layer PCB)

NanoPC-T3 Overview


Accessories

The NanoPC-T3 board is currently sold for a retail price of $60. If you need extra accessories, such as a case or WiFi Antenna, it will cost you an additional few extra bucks. If you’re planning in buying a Heatsink this board comes with two mounting holes that provide tight surface contact for efficient heat conductivity, so I personally recommend buying it.

The NanoPC-T3 case is composed of two separate parts made of transparent acrylic material, with built-in metal inserts for mounting the board and the upper case cover. to make the product more user-friendly, the company added printed on box labels with the interface descriptions.

Now, for the problems. The case design, in general, was good, but I didn’t understand why additional venting slots were not added above the Heatsink to get the heat out more quickly, opposed to the lower case part that did have venting slots. In addition, the upper cover didn’t have any slots/holes for the GPIO header, on-board USB Host, LVDS, LCD RGB-LCD, camera DVP, and MIPI-DSI cables. The power, reset and u-boot button was positioned in such a way that the user needs to remove the upper cover of the case in order to gain access to use them, where the correct design is designing housing that allows the user to operate all functions externally, without opening or removing any cover.

FirendlyARM offers an aluminum-made passive Heatsink with a pair of mounts that attaches to two holes in the PCB and provides decent cooling, but it’s highly recommended adding a 30 mm fan on top of it. The problem was with the case height, that was not enough for adding a fan and closing the case upper cover, so again, you will need to keep the case open without the upper cover. Alternatively, you can also replace the Heatsink or just build a better case.

The NanoPC-T3 Inside the Case

  • NanoPC T3 Case 00
    NanoPC T3 Case 00
  • NanoPC T3 Case 01
    NanoPC T3 Case 01
  • NanoPC T3 Case 02
    NanoPC T3 Case 02
  • NanoPC T3 Case 03
    NanoPC T3 Case 03
  • NanoPC T3 Case 04
    NanoPC T3 Case 04
  • NanoPC T3 Case 05
    NanoPC T3 Case 05

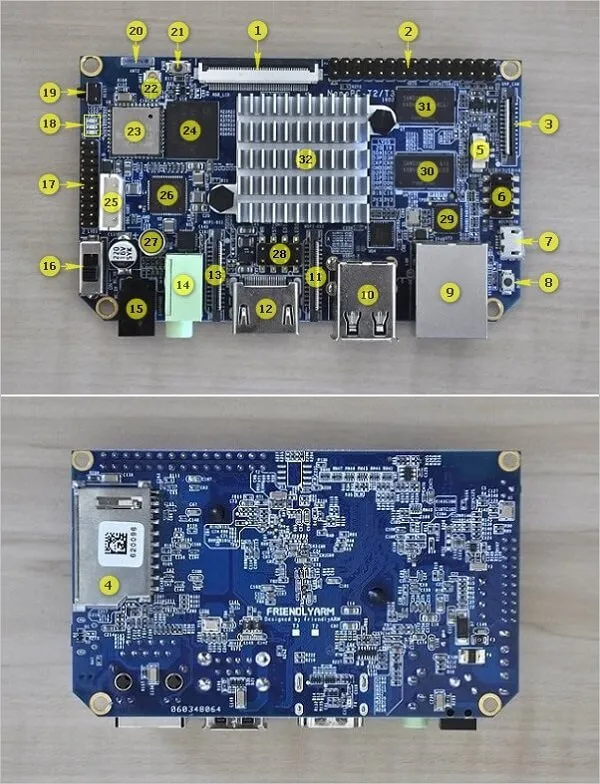
A Closer Look at the NanoPC-T3

  1. RGB LCD
  2. GPIO
  3. DVP Camera
  4. TF Card Socket (On the Back)
  5. RTC Battery Interface.
  6. USB Host x2 (Onboard Interface)
  7. Micro USB
  8. Boot selection button
  9. Ethernet LAN
  10. USB Host x2
  11. MIPI-CSI
  12. HDMI 1.4a
  13. MIPI-DSI
  14. Headphone jack
  15. Power DC Input
  16. Power Switch
  17. LVDS
  18. LED 1-2
  19. Reset Button
  20. On-board Antenna
  21. Power Button
  22. IP ANT (external antenna interface)
  23. WiFi & BT
  24. 8GB eMMC
  25. Debug UART
  26. AXP228 PMU (Power Management Unit)
  27. Microphone
  28. Reset/PWR/LED1-2 Pin-out
  29. RTL8211E
  30. 1x 512Kb RAM
  31. 1x 512Kb RAM
  32. Samsung SP56818 SoC (CPU + GPU: Mali 400MP).

FirendlyArm NanoPC T3 Board Layout 

nanopc-t3-layout

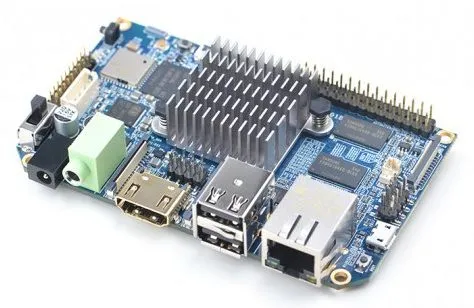
NanoPC-T 3 | Full Board View

  • NanoPC T3 ARM Board 01
    NanoPC T3 ARM Board 01
  • NanoPC T3 ARM Board 02
    NanoPC T3 ARM Board 02
  • NanoPC T3 ARM Board 03
    NanoPC T3 ARM Board 03
  • NanoPC T3 ARM Board 04
    NanoPC T3 ARM Board 04
  • NanoPC T3 ARM Board 05
    NanoPC T3 ARM Board 05
  • NanoPC T3 ARM Board 06
    NanoPC T3 ARM Board 06

Hardware

The hardware platform is based on the same S5P6818 Octa-Core Cortex-A53 Samsung 64-bit processor operating at clock frequency between 400 MHz Up to 1.4 GHz equipped with a Mali 400MP GPU which is also used in the previous NanoPi M3 board. For most computing tasks such as internet surfing, running office suite, streaming video this board provides a smooth and good experience, just don’t expect the hardware to run heavy games.

A few significant changes in this model are the additional 8GB eMMC flash, Manual power switch, boot selection button, on-board Power switch, RTC Battery connector, and the microphone. Just as with the M3 model, FriendlyArm also included an on-board external USB Host interface to be used with an 8 or 9 pins header cable which provides two additional ports by using a special 9 pin cable or PCB type USB Host adapter (Shown in the photo below).

nanopc-t3-9pin-usb-host

Software Support

Because FriendlyARM uses a relative less popular SoC for single board computer applications, made by Samsung, so image selection is pretty limiting, and includes three types: Android lollipop, Debian Jessie and Ubuntu Core. After playing with Debian Jessie and Android Images, the general impression is that the system worked well and stable.

Android 5.x Lollipop | Screenshots


  • NanoPC T3 Android 1
    NanoPC T3 Android 1
  • NanoPC T3 Android 2
    NanoPC T3 Android 2
  • NanoPC T3 Android 3
    NanoPC T3 Android 3
  • NanoPC T3 Android 4
    NanoPC T3 Android 4
  • NanoPC T3 Android 5
    NanoPC T3 Android 5

Debian Jessie | Screenshots 

  • NanoPC T3 Debian 1
    NanoPC T3 Debian | PIC 1
  • NanoPC T3 Debian 2
    NanoPC T3 Debian | PIC 2
  • NanoPC T3 Debian 3
    NanoPC T3 Debian | PIC 3
  • NanoPC T3 Debian 4
    NanoPC T3 Debian | PIC 4
  • NanoPC T3 Ubuntu 5
    NanoPC T3 Debian | PIC 5
  • NanoPC T3 Debian 6
    NanoPC T3 Debian | PIC 6
  • NanoPC T3 Debian 7
    NanoPC T3 Debian | PIC 7
  • NanoPC T3 Debian 8
    NanoPC T3 Debian | PIC 8
  • NanoPC T3 Debian 9
    NanoPC T3 Debian | PIC 9
  • NanoPC T3 Debian 5
    NanoPC T3 Debian | PIC 10

Performance & Benchmarks

The Nano PI T3 is based on the 64-bit Samsung S5P6818 Octa-Core Cortex-A53 SoC that provides an excellent performance power consumption ratio. According to system information under Debian OS (32-Bit), each core operates at frequencies ranging from 400MHz up to 1.4 GHz.

# Display system information

fa@NanoPi3:/$ lsb 
No LSB modules are available.
Distributor ID: Debian
Description: Debian GNU/Linux 8.7 (jessie)
Release: 8.7
Codename: jessie


# Display CPU information

fa@NanoPi3:/$ lscpu
Architecture: armv7l
Byte Order: Little Endian
CPU(s): 8
On-line CPU(s) list: 0-7
Thread(s) per core: 1
Core(s) per socket: 4
Socket(s): 2
CPU max MHz: 1400.0000
CPU min MHz: 400.0000


# Displaying interfaces

fa@NanoPi3:~$ lsmod
Module Size Used by
rfcomm 31894 4
nx_vpu 351787 0
vr 147271 0
bnep 11277 2
hci_uart 14824 1
btbcm 5132 1 hci_uart
bluetooth 385978 25 bnep,btbcm,hci_uart,rfcomm
bcmdhd 604191 0
cfg80211 460198 1 bcmdhd
compat 24079 6 bnep,cfg80211,bcmdhd,hci_uart,rfcomm,bluetooth

Operation: Burning Images

The process of loading images from the Micro SD card is very simple. You have two main tools ‘SDFormatter’ and ‘Win32Disk Imager’ for formatting the media card and writing images. If you want to write the images to the 8GB eMMC you will need to use the ‘eflasher’ Tool which is similar to the Raspberry Pi NOOBS operating system installer, that does it almost automatically through a GUI. There you select the preferred OS and the installation wizard does the rest of the job, without any special how to technical knowledge or skills on the user side.

e-flasher | Screenshots 

  • NanoPC T3 eflasher
    NanoPC T3 eflasher
  • NanoPC T3 eflasher Ubuntu 1
    NanoPC T3 eflasher Ubuntu 1
  • NanoPC T3 eflasher Ubuntu 2
    NanoPC T3 eflasher Ubuntu 2
  • NanoPC T3 eflasher Debian 2
    NanoPC T3 eflasher Debian 2
  • NanoPC T3 eflasher Debian 1
    NanoPC T3 eflasher Debian 1
  • NanoPC T3 Eflasher Android 2
  • NanoPC T3 eflasher Android 1
    NanoPC T3 eflasher Android 1

Network Throughput Test

In this test, one system must act as a server, while the other acts as a client. In this case, I ran iperf-3.1.3 (win64) as a server on a Windows 7 workstation and the NanoPi T3 was the client.

Step 1 – Finding out the Windows workstation &  NanoPi T3 IP Address

  1. CMD For Windows: ipconfig
  2. CMD For Linux: # ifconfig

Step 2 – Running ssh service on the NanoPi T3

sudo service ssh start

Step 3 – Installing PUTTY ssh client and connecting to the NanoPi T3

Step 4 – Downloading the latest ipref3 (Windows OS):

Download Link: https://iperf.fr/iperf-download.php

Step 5 – Setting the Windows Workstation in Server mode (port: 45678)

From Windows Command line running: iperf3 -s -p 45678

Step 7 – Installing ipref3 package on the NanoPi T3

sudo apt-get install iperf

Step 8 – Running Tests from the NanoPi T3 on target IP (Windows Station):

Test #1: Testing a single TCP connection between two nodes

- Parameters:  TCP port 45678 , test duration time=60 sec 


fa@NanoPi3:~$ iperf -c 192.168.0.103 -p 45678 -fM -t 60
------------------------------------------------------------
Client connecting to 192.168.0.103, TCP port 45678
TCP window size: 0.02 MByte (default)
------------------------------------------------------------
[  3] local 192.168.0.101 port 59833 connected with 192.168.0.103 port 45678
[ ID] Interval       Transfer     Bandwidth
[  3]  0.0-60.0 sec  9826414590 MBytes  163759286 MBytes/s


Test #2: Testing a single UDP connection between two nodes

- Parameters:  UDP port 45678 , test duration time=60 sec

fa@NanoPi3:~$ iperf -c 192.168.0.103 -fM -t 60 -u -p 45678
------------------------------------------------------------
Client connecting to 192.168.0.103, UDP port 45678
Sending 1470 byte datagrams
UDP buffer size: 0.16 MByte (default)
------------------------------------------------------------
[  3] local 192.168.0.101 port 54813 connected with 192.168.0.103 port 45678
[ ID] Interval       Transfer     Bandwidth
[  3]  0.0-60.0 sec  7.50 MBytes  0.12 MBytes/sec
[  3] Sent 5351 datagrams
[  3] WARNING: did not receive ack of last datagram after 10 tries.


Final Words

In terms of hardware, the NanoPC-T3 is definitely a good high-performanceboard, that can be used also as a workstation / Mini PC to run Android and Debian Linux. As for software support, the user is limited only to three types of OS. FriendlyARM could have done a better job and provided more OS images.


Pros / Cons:

Pros

  • High performance (Octa-Core Processor)
  • A wide selection of onboard interfaces

Cons

  • 1GB RAM
  • Limited software support (Linux, Ubuntu Core, Android).

Company Links:

  • Company Page: https://www.friendlyelec.com/
  • Forum: http://www.friendlyarm.com/Forum/
  • Facebook: https://www.facebook.com/FriendlyARM.Community/
Share. Facebook Twitter Pinterest LinkedIn Tumblr Email
Previous ArticleNanoPi S2 Single Board Computer Powered with Samsung S5P4418
Next Article Single Board Computer Asus Thinker Board Killer | Firefly RK3399 Plus
androidpimp
  • Website

Related Posts

LattePanda IOTA X86 SBC (Front View)

LattePanda IOTA Review: 4 Reasons This Tiny Intel SBC Outperforms RPi 5

October 7, 2025
Orange Pi AI Studio Mini PC

Orange Pi AI Studio / Pro launched Globally, Rivaling Nvidia Jetson Orin Nano

October 3, 2025
Banana-bpi-R4-Pro-Board

Banana Pi BPI-R4 Pro: Wi-Fi 7 Router with 10G SFP+ Ports Released

October 1, 2025
0 0 votes
Article Rating
Subscribe
Notify of
0 Comments
Oldest
Newest Most Voted
Inline Feedbacks
View all comments
Categories
PureVPN
PureVPN Ad Banner
VyprVPN – No. 1 in Anonymity
Vyprvpn 350x260
PrivadoVPN – No. 1 in Parental Control
PrivadoVPN 350x437
Recent Posts
  • LattePanda IOTA Review: 4 Reasons This Tiny Intel SBC Outperforms RPi 5
  • Up to 60% Off AliExpress Mega Promo Codes List | October 2025 Deals
  • Xiaomi 17 Pro Max vs iPhone 17 Pro Max: Specs, Price & Honest Review
  • Premium Budget RGB Gaming Keyboard 2025? Rii RK805 Full Review
  • Orange Pi AI Studio / Pro launched Globally, Rivaling Nvidia Jetson Orin Nano
  • Banana Pi BPI-R4 Pro: Wi-Fi 7 Router with 10G SFP+ Ports Released
  • Orange Pi 4 Pro RISC-V SBC Debuts with Allwinner SoC and WiFi 6 Support
  • Orange Pi 6 Plus 12-core ARM board Official Details & Prices released
  • POCO F8 Ultra: First Leaks Reveal Flagship-Beating Specs, Design & Expected 2025 Launch
  • Redmi Pad 2 Review (2025): The Best Budget Tablet Value? Full Review
  • Orange Pi 600 specs revealed: A compact Intel PC built into a keyboard, featuring an Intel N150 processor
  • Xiaomi 17 series debuts: Aiming to rival the iPhone 17?
  • Orange Pi Mini PC featuring Cixin P1 SoC is gearing up for launch.
  • Poco X8 Ultra & Poco X8 Pro Release date Just Around the Corner Following EEC Certification
  • Orange Pi X debuts with Intel N100/N150 processor, offering an affordable x86 SBC.
  • Orange Pi AI Ultra SBC with Qualcomm QC8550 is coming soon
  • ELEBAO B10 Intel Powered NAS Mini PC features X4 NVMe slots with Dual 2.5GbE
  • Banana Pi BPI-R4 Lite: An Affordable R4 Router Board Variant is now available!
  • PrivadoVPN Review 2025: Is It Good for Streaming & Privacy?
RSS Recent RSS Feed
  • LattePanda IOTA Review: 4 Reasons This Tiny Intel SBC Outperforms RPi 5 October 7, 2025
  • Up to 60% Off AliExpress Mega Promo Codes List | October 2025 Deals October 6, 2025
  • Xiaomi 17 Pro Max vs iPhone 17 Pro Max: Specs, Price & Honest Review October 5, 2025
  • Premium Budget RGB Gaming Keyboard 2025? Rii RK805 Full Review October 3, 2025
  • Orange Pi AI Studio / Pro launched Globally, Rivaling Nvidia Jetson Orin Nano October 2, 2025
Facebook X (Twitter) Instagram Pinterest
@2025 - All Right Reserved. Designed by AndroidPIMP

Type above and press Enter to search. Press Esc to cancel.

Accessibility
Accessibility modes
Epilepsy Safe Mode
Dampens color and removes blinks
This mode enables people with epilepsy to use the website safely by eliminating the risk of seizures that result from flashing or blinking animations and risky color combinations.
Visually Impaired Mode
Improves website's visuals
This mode adjusts the website for the convenience of users with visual impairments such as Degrading Eyesight, Tunnel Vision, Cataract, Glaucoma, and others.
Cognitive Disability Mode
Helps to focus on specific content
This mode provides different assistive options to help users with cognitive impairments such as Dyslexia, Autism, CVA, and others, to focus on the essential elements of the website more easily.
ADHD Friendly Mode
Reduces distractions and improve focus
This mode helps users with ADHD and Neurodevelopmental disorders to read, browse, and focus on the main website elements more easily while significantly reducing distractions.
Blindness Mode
Allows using the site with your screen-reader
This mode configures the website to be compatible with screen-readers such as JAWS, NVDA, VoiceOver, and TalkBack. A screen-reader is software for blind users that is installed on a computer and smartphone, and websites must be compatible with it.
Readable Experience
Content Scaling
Default
Text Magnifier
Readable Font
Dyslexia Friendly
Highlight Titles
Highlight Links
Font Sizing
Default
Letter Spacing
Default
Left Aligned
Center Aligned
Right Aligned
Visually Pleasing Experience
Dark Contrast
Light Contrast
Monochrome
High Contrast
High Saturation
Low Saturation
Adjust Text Colors
Adjust Title Colors
Adjust Background Colors
Easy Orientation
Mute Sounds
Hide Images
Hide Emoji
Reading Guide
Stop Animations
Reading Mask
Highlight Hover
Highlight Focus
Big Dark Cursor
Big Light Cursor
Cognitive Reading
Virtual Keyboard
Navigation Keys
Voice Navigation

AndroidPIMP

Accessibility Statement

  • www.androidpimp.com
  • October 7, 2025

Compliance status

We firmly believe that the internet should be available and accessible to anyone, and are committed to providing a website that is accessible to the widest possible audience, regardless of circumstance and ability.

To fulfill this, we aim to adhere as strictly as possible to the World Wide Web Consortium’s (W3C) Web Content Accessibility Guidelines 2.1 (WCAG 2.1) at the AA level. These guidelines explain how to make web content accessible to people with a wide array of disabilities. Complying with those guidelines helps us ensure that the website is accessible to all people: blind people, people with motor impairments, visual impairment, cognitive disabilities, and more.

This website utilizes various technologies that are meant to make it as accessible as possible at all times. We utilize an accessibility interface that allows persons with specific disabilities to adjust the website’s UI (user interface) and design it to their personal needs.

Additionally, the website utilizes an AI-based application that runs in the background and optimizes its accessibility level constantly. This application remediates the website’s HTML, adapts Its functionality and behavior for screen-readers used by the blind users, and for keyboard functions used by individuals with motor impairments.

If you’ve found a malfunction or have ideas for improvement, we’ll be happy to hear from you. You can reach out to the website’s operators by using the following email

Screen-reader and keyboard navigation

Our website implements the ARIA attributes (Accessible Rich Internet Applications) technique, alongside various different behavioral changes, to ensure blind users visiting with screen-readers are able to read, comprehend, and enjoy the website’s functions. As soon as a user with a screen-reader enters your site, they immediately receive a prompt to enter the Screen-Reader Profile so they can browse and operate your site effectively. Here’s how our website covers some of the most important screen-reader requirements, alongside console screenshots of code examples:

  1. Screen-reader optimization: we run a background process that learns the website’s components from top to bottom, to ensure ongoing compliance even when updating the website. In this process, we provide screen-readers with meaningful data using the ARIA set of attributes. For example, we provide accurate form labels; descriptions for actionable icons (social media icons, search icons, cart icons, etc.); validation guidance for form inputs; element roles such as buttons, menus, modal dialogues (popups), and others. Additionally, the background process scans all the website’s images and provides an accurate and meaningful image-object-recognition-based description as an ALT (alternate text) tag for images that are not described. It will also extract texts that are embedded within the image, using an OCR (optical character recognition) technology. To turn on screen-reader adjustments at any time, users need only to press the Alt+1 keyboard combination. Screen-reader users also get automatic announcements to turn the Screen-reader mode on as soon as they enter the website.

    These adjustments are compatible with all popular screen readers, including JAWS and NVDA.

  2. Keyboard navigation optimization: The background process also adjusts the website’s HTML, and adds various behaviors using JavaScript code to make the website operable by the keyboard. This includes the ability to navigate the website using the Tab and Shift+Tab keys, operate dropdowns with the arrow keys, close them with Esc, trigger buttons and links using the Enter key, navigate between radio and checkbox elements using the arrow keys, and fill them in with the Spacebar or Enter key.Additionally, keyboard users will find quick-navigation and content-skip menus, available at any time by clicking Alt+1, or as the first elements of the site while navigating with the keyboard. The background process also handles triggered popups by moving the keyboard focus towards them as soon as they appear, and not allow the focus drift outside it.

    Users can also use shortcuts such as “M” (menus), “H” (headings), “F” (forms), “B” (buttons), and “G” (graphics) to jump to specific elements.

Disability profiles supported in our website

  • Epilepsy Safe Mode: this profile enables people with epilepsy to use the website safely by eliminating the risk of seizures that result from flashing or blinking animations and risky color combinations.
  • Visually Impaired Mode: this mode adjusts the website for the convenience of users with visual impairments such as Degrading Eyesight, Tunnel Vision, Cataract, Glaucoma, and others.
  • Cognitive Disability Mode: this mode provides different assistive options to help users with cognitive impairments such as Dyslexia, Autism, CVA, and others, to focus on the essential elements of the website more easily.
  • ADHD Friendly Mode: this mode helps users with ADHD and Neurodevelopmental disorders to read, browse, and focus on the main website elements more easily while significantly reducing distractions.
  • Blindness Mode: this mode configures the website to be compatible with screen-readers such as JAWS, NVDA, VoiceOver, and TalkBack. A screen-reader is software for blind users that is installed on a computer and smartphone, and websites must be compatible with it.
  • Keyboard Navigation Profile (Motor-Impaired): this profile enables motor-impaired persons to operate the website using the keyboard Tab, Shift+Tab, and the Enter keys. Users can also use shortcuts such as “M” (menus), “H” (headings), “F” (forms), “B” (buttons), and “G” (graphics) to jump to specific elements.

Additional UI, design, and readability adjustments

  1. Font adjustments – users, can increase and decrease its size, change its family (type), adjust the spacing, alignment, line height, and more.
  2. Color adjustments – users can select various color contrast profiles such as light, dark, inverted, and monochrome. Additionally, users can swap color schemes of titles, texts, and backgrounds, with over seven different coloring options.
  3. Animations – person with epilepsy can stop all running animations with the click of a button. Animations controlled by the interface include videos, GIFs, and CSS flashing transitions.
  4. Content highlighting – users can choose to emphasize important elements such as links and titles. They can also choose to highlight focused or hovered elements only.
  5. Audio muting – users with hearing devices may experience headaches or other issues due to automatic audio playing. This option lets users mute the entire website instantly.
  6. Cognitive disorders – we utilize a search engine that is linked to Wikipedia and Wiktionary, allowing people with cognitive disorders to decipher meanings of phrases, initials, slang, and others.
  7. Additional functions – we provide users the option to change cursor color and size, use a printing mode, enable a virtual keyboard, and many other functions.

Browser and assistive technology compatibility

We aim to support the widest array of browsers and assistive technologies as possible, so our users can choose the best fitting tools for them, with as few limitations as possible. Therefore, we have worked very hard to be able to support all major systems that comprise over 95% of the user market share including Google Chrome, Mozilla Firefox, Apple Safari, Opera and Microsoft Edge, JAWS and NVDA (screen readers).

Notes, comments, and feedback

Despite our very best efforts to allow anybody to adjust the website to their needs. There may still be pages or sections that are not fully accessible, are in the process of becoming accessible, or are lacking an adequate technological solution to make them accessible. Still, we are continually improving our accessibility, adding, updating and improving its options and features, and developing and adopting new technologies. All this is meant to reach the optimal level of accessibility, following technological advancements. For any assistance, please reach out to

wpDiscuz