
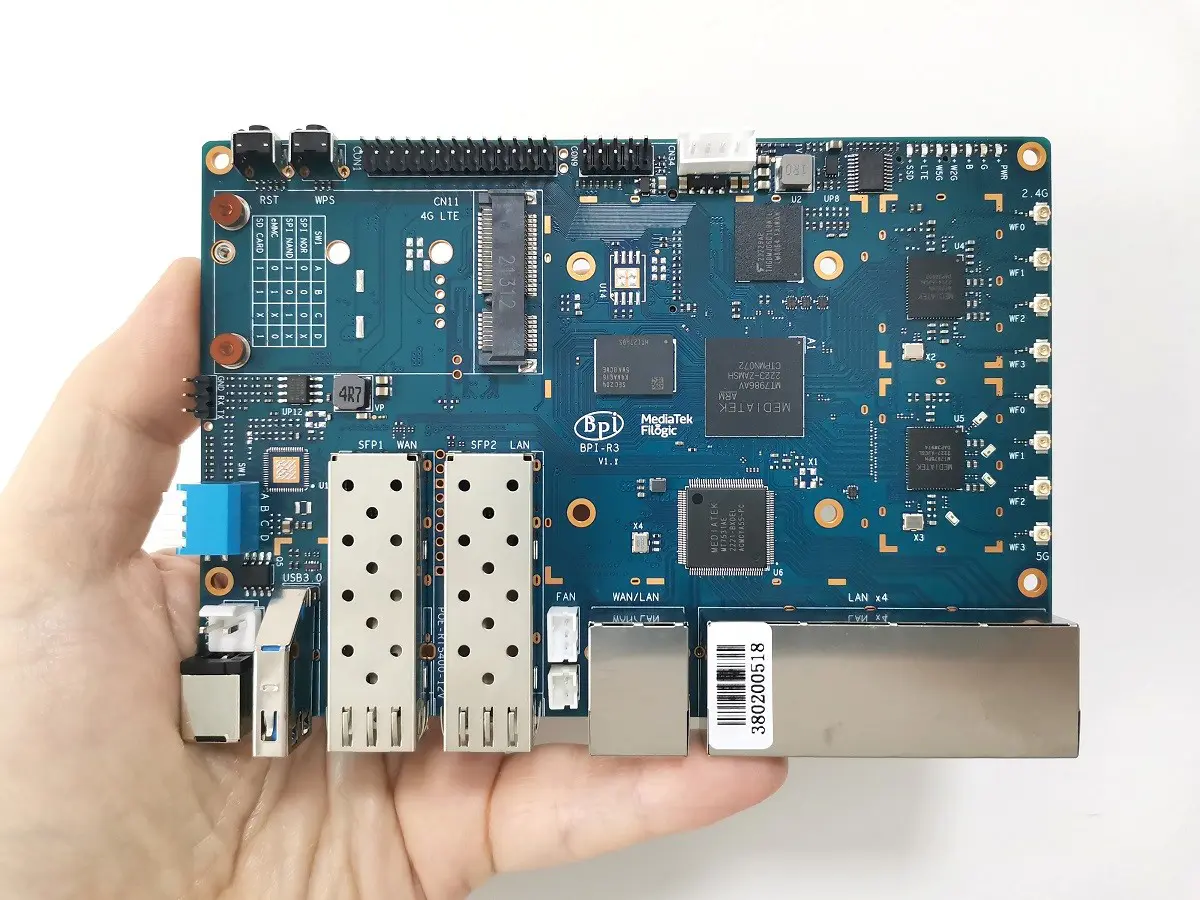
- Banana Pi BPI-R3 board
- Banana Pi BPI-R3
- Specifications
- Key Features
- Real-World Applications
- Improved Cooling
- A Quick Product Demo
- Banana Pi BPI-R3 Board Layout
- Hardware
- Storage Interfaces
- Connectivity
- Wi-Fi 6 Ready
- Misc & Other Interfaces
- Part 1: Package Contents, Unboxing, and Hardware
- Package Contents:
- Unboxing All Items
- The Banana Pi R3 Board
- Unboxing the Banana Pi R3 Case – 1 of 2
- Unboxing the Banana Pi R3 Case – 2 of 2
- Power Supply
- Antennas
- Part 2: Case Design
- Great Design but not flawless
- Part 3: Operation
- Downloading OpenWrt image file
- Flashing and Booting From eMMC
- Bootstrap switch
- Flashing OS files via USB Serial Module
- How to Install an M.2 NVMe SSD
- Installing an SSD Card With a Heatsink
- NVMe Performance Testing
- (Read/Write) SSD Performance Test
- Part 4: Installing a Fan-Cooled Heat Sink
- FAN Wiring Configurations (Options)
- Configuration Option No. 1 (Passive Cooling)
- Cooled FAN Heatsink
- Preparing Conductive Silicone Thermal Pad
- Configuration Option No. 2
- Connecting 4 Pins Cooled Heatsink wires w/ the XH2.54 4 PIN wires
- Final Step (Powering/Operating the FAN)
- How to Automatically load the script
- Configuration Option No. 3
- Connecting 4 Pins Cooled Heatsink wires w/ the VH3.96-2PIN wires
- Configuration Option No. 3 (With Support for PWM)
- Configuration Option No. 4 (Without PWM Support)
- Adjusting these trip points
- Controlling the fan rotation speeds:
- Part 5: Checking Temperatures
- Testing another Cooling Configuration.
- Part 6: WiFi Antennas Installation (Best Practices)
- Antennas Arrangement & Installation
- Installation tips!
- Installing a Wi-Fi 6E Expansion Network Card
- Part 7: Adding a 2.5G Network Card (Optional Configuration)
- Part 8: Setting up a NAS Server (Optional Configuration)
- How to set up a NAS device (Optional Configuration, DIY Style)
- Part 9: Connectivity
- Network Throughput Testing using iPerf
- What WIFI throughput speeds should you expect?
- iPerf Test: 2.5 SFP RJ45 LAN Speed Test
- Banana Pi R3 (Back view)
- iPerf Test: Wireless (WiFi) Speed Test
- Tweaking Network Performance
- Final Thoughts
- Should You Buy it?
- Price and Availability
Part 3: Operation
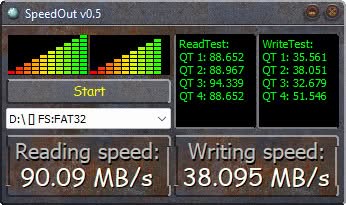
To Banana Pi R3 offers Ubuntu Core, including OpenWrt Linux distributions, but the device’s primary function will be most likely to function as a home router device. You can install the bootable OS files on the Micro SD Card, NOR, NAND, or the 8GB eMMC chip. The most straightforward method is to get a decent Micro SD Card with good read and write speeds. Before using a Micro SD media, we recommend testing its performance using the SpeedOut benchmarking app. Any branded card with a minimum read and write rate of at least 30 MB/s should be fine and not cause performance bottlenecks. The faster the card, the better!
SpeedOut Benchmarking/Testing Tool
Downloading OpenWrt image file
The Banana Pi R3 SD Card image file can be found under MediaTek/filogic image repository located on the official openwrt.org website under the name bananapi_bpi-r3-sdcard.img.gz.
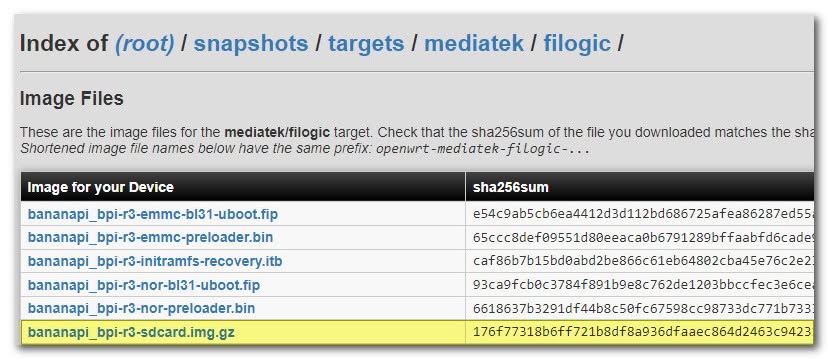
After grabbing and downloading the latest Snapshot file, to burn (flash) it, you will need to extract the image from the GZ Archive and burn (flash) it using a software tool such as Win32 Disk Image or Etcher.
And lastly, after successfully booting the R3 board, you will need to consider that this image doesn’t come pre-installed with the LuCI web interface, so you must install it via the command line. To connect to the board, you can use PuTTy SSH and telnet client and SSH to the board gateway IP address: 192.168.1.1 and log into the shell environment with the user root (Without a password). Once logged in, we recommend installing Luci, including other popular packages (listed below).
- opkg update
- opkg install luci
- opkg install kmod-nvme
- opkg install luci-app-statistics
- opkg install block-mount
- opkg install hdparm
Now you can access the LuCI web interface by entering the IP 192.168.1.1 and accessing all the OpenWrt options. On a first-time login to the web interface, you are asked to assign a new password that will also be valid for ssh access.
Compatibility issues
One of the drawbacks of working with a Snapshot (Development image) is that newly updated kernel Images are constantly updated daily and weekly, which might cause compatibility issues between previously installed packages/ libraries requiring a newer kernel. The best solution is to use Banana Pi R3 company’s official images (Links available on the company wiki page).
Banana Pi R3
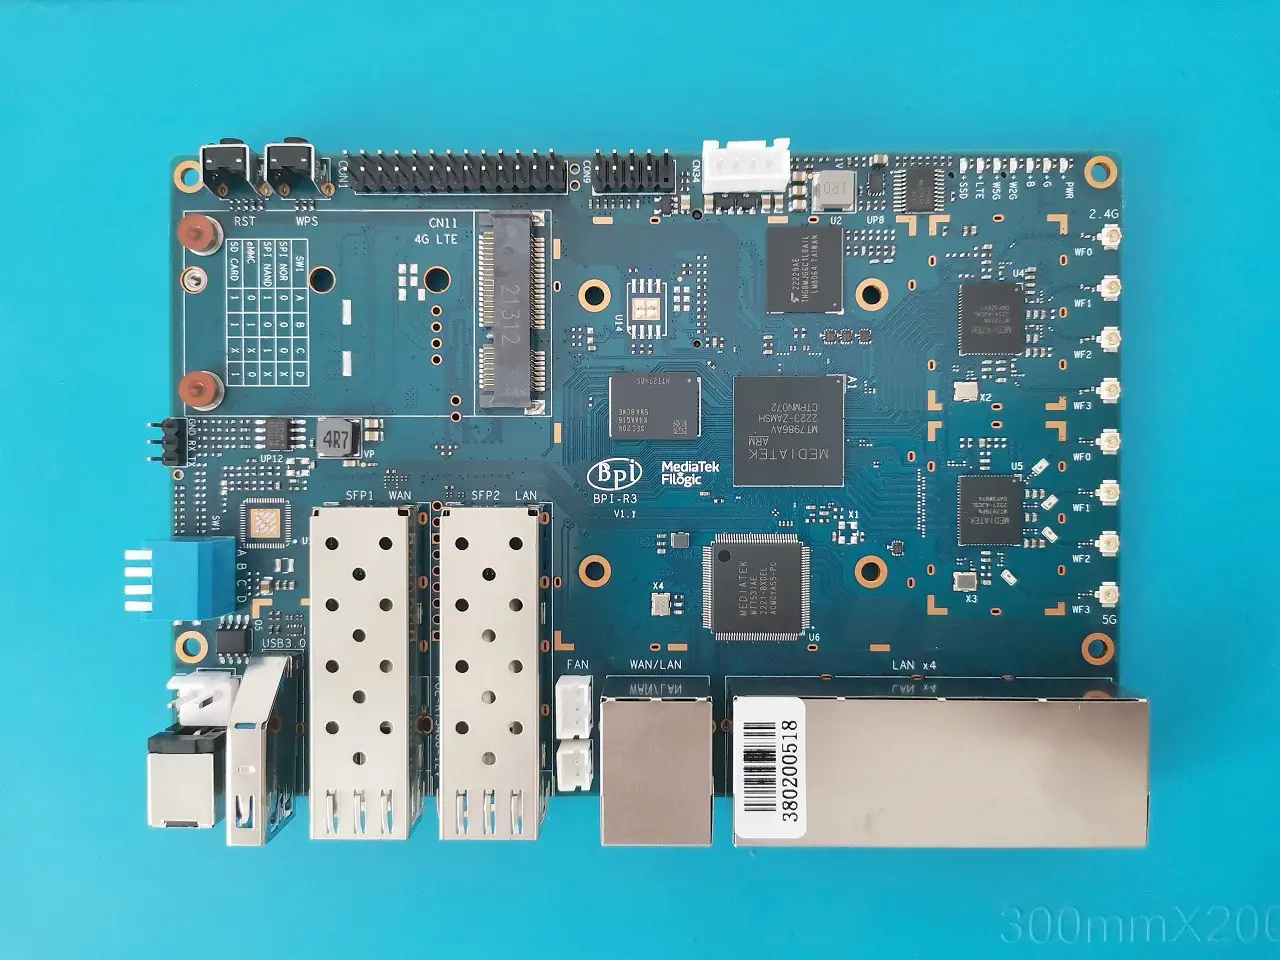
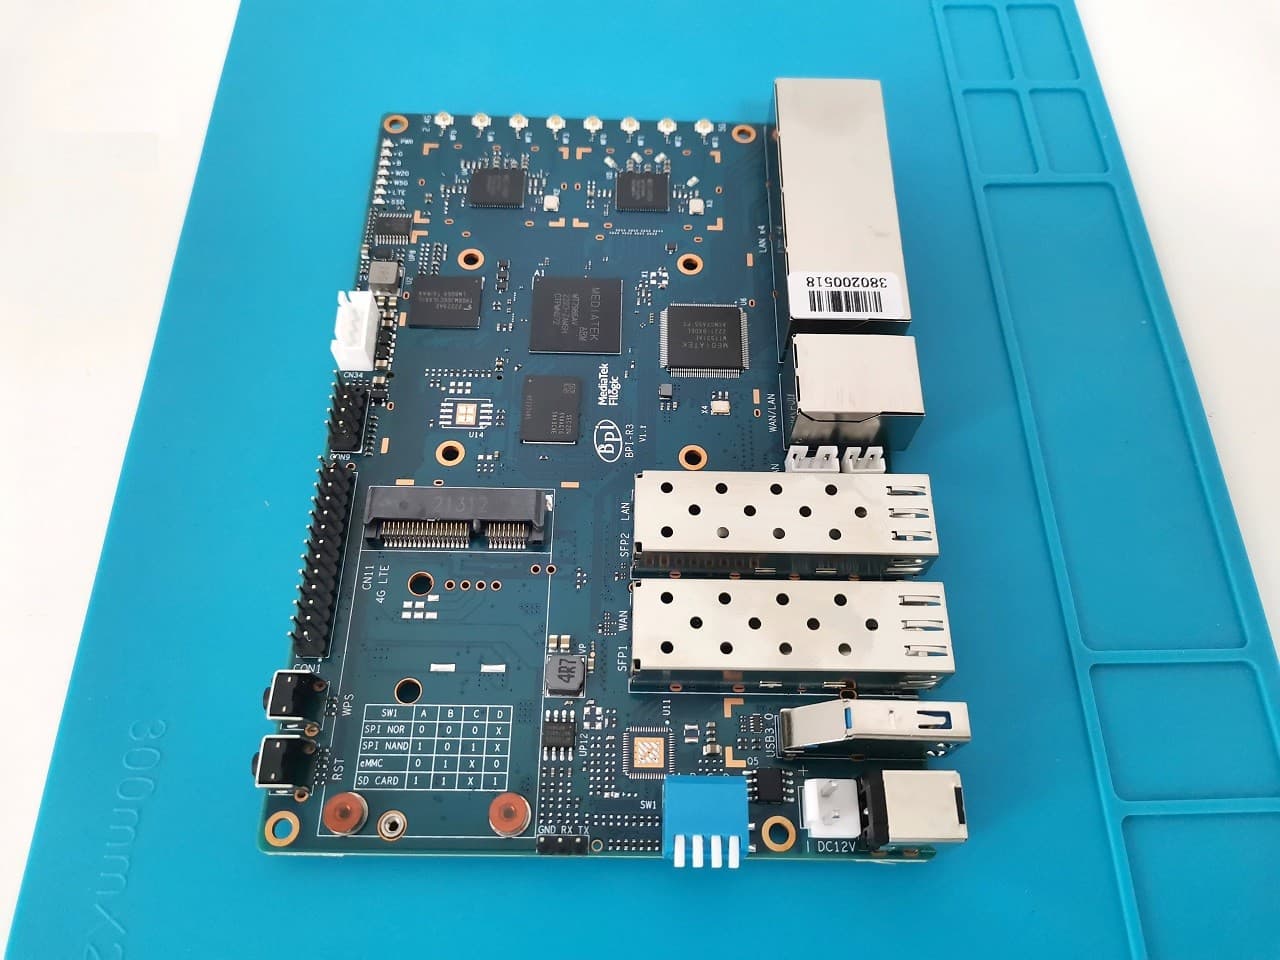
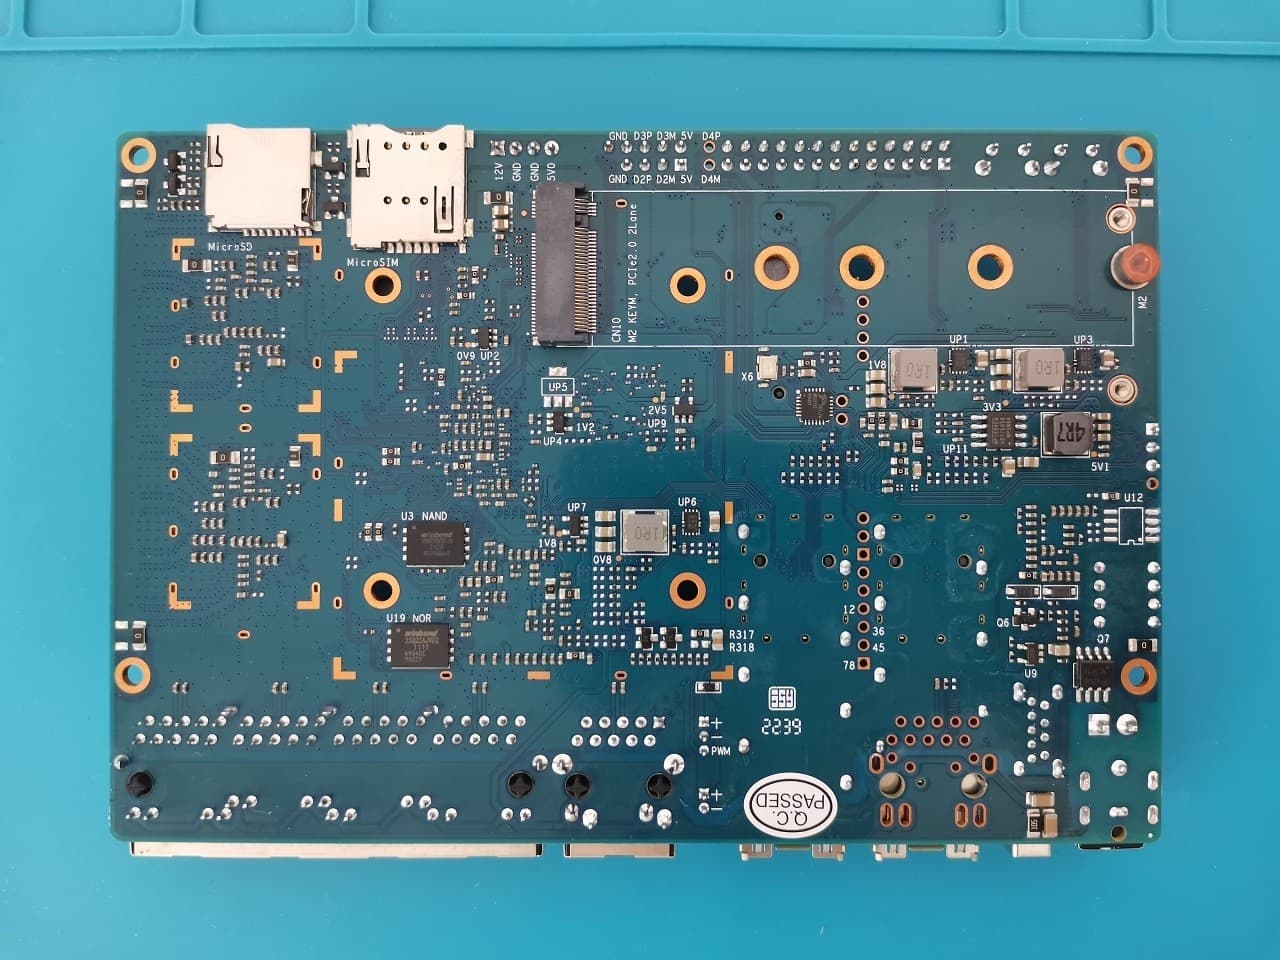
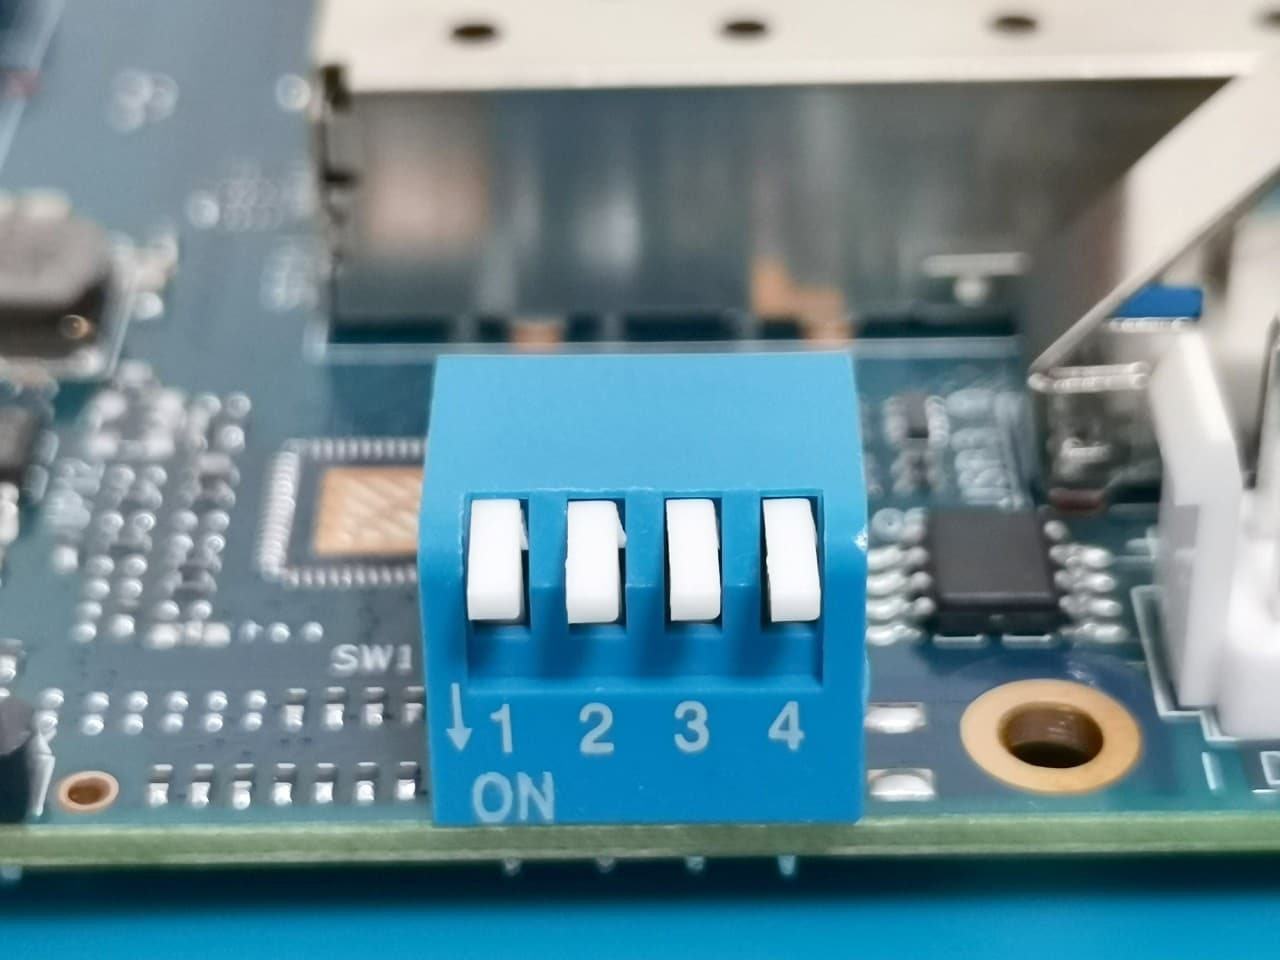
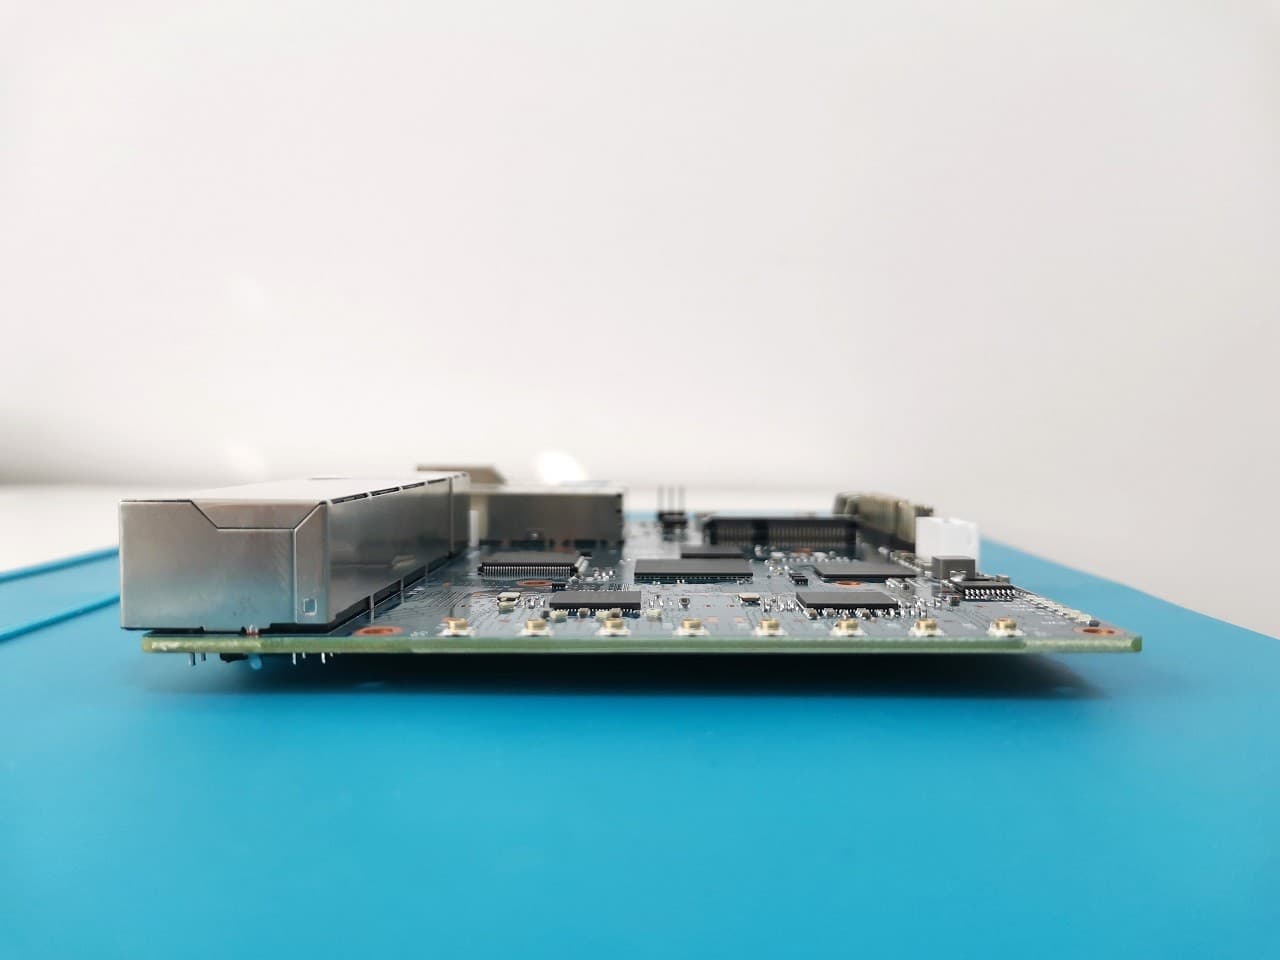
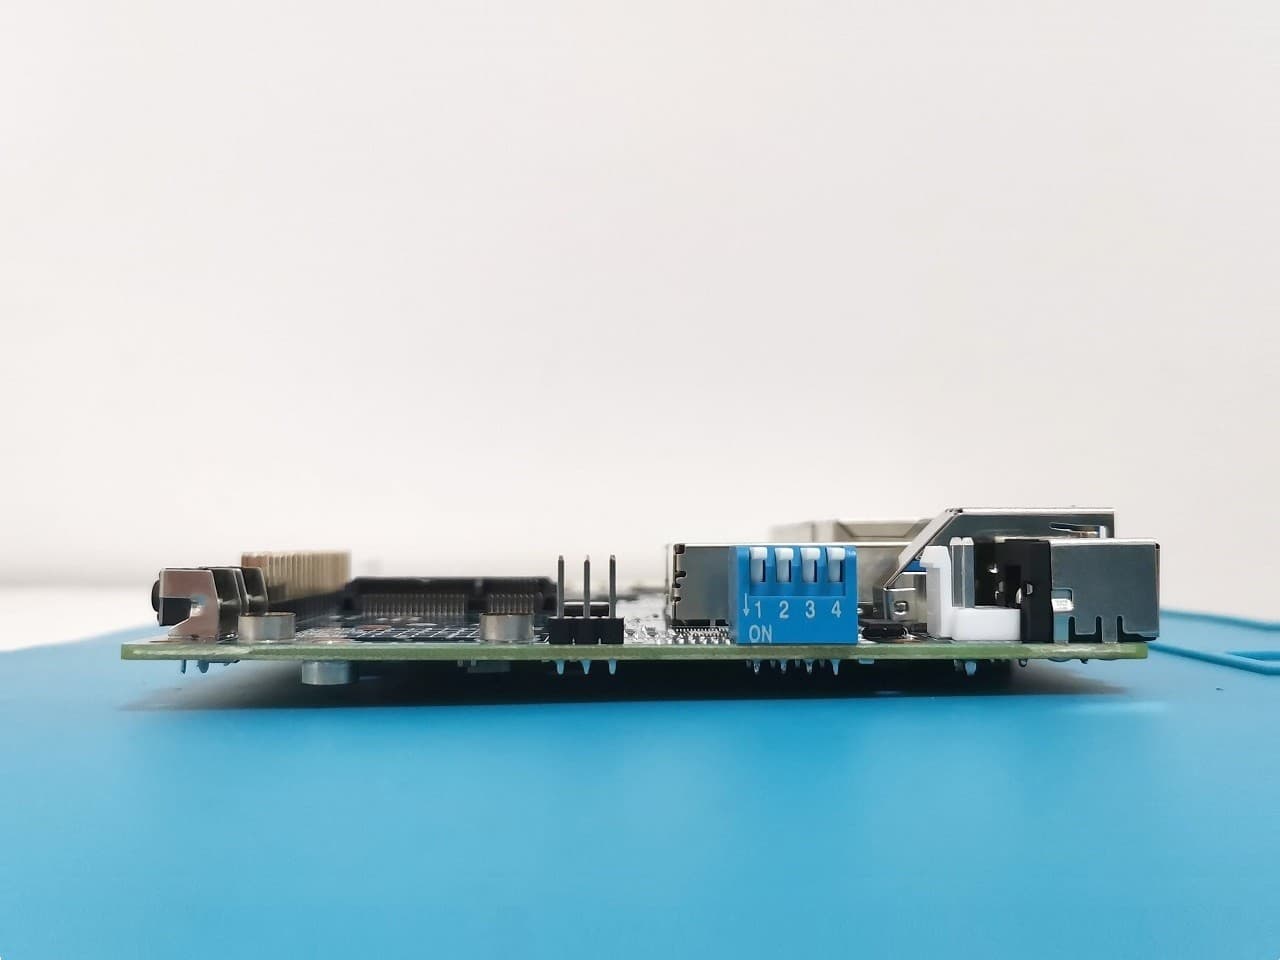
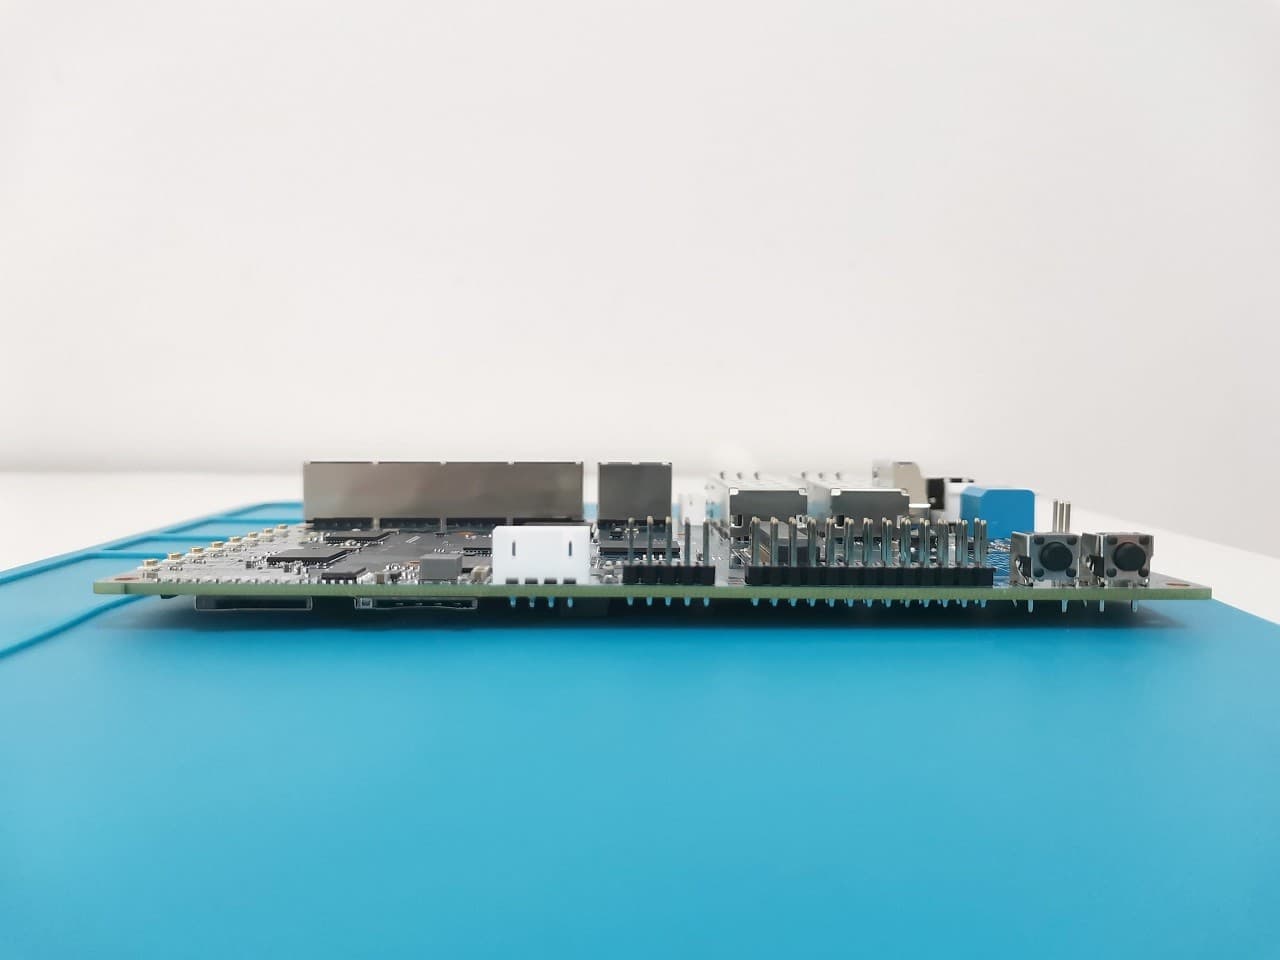
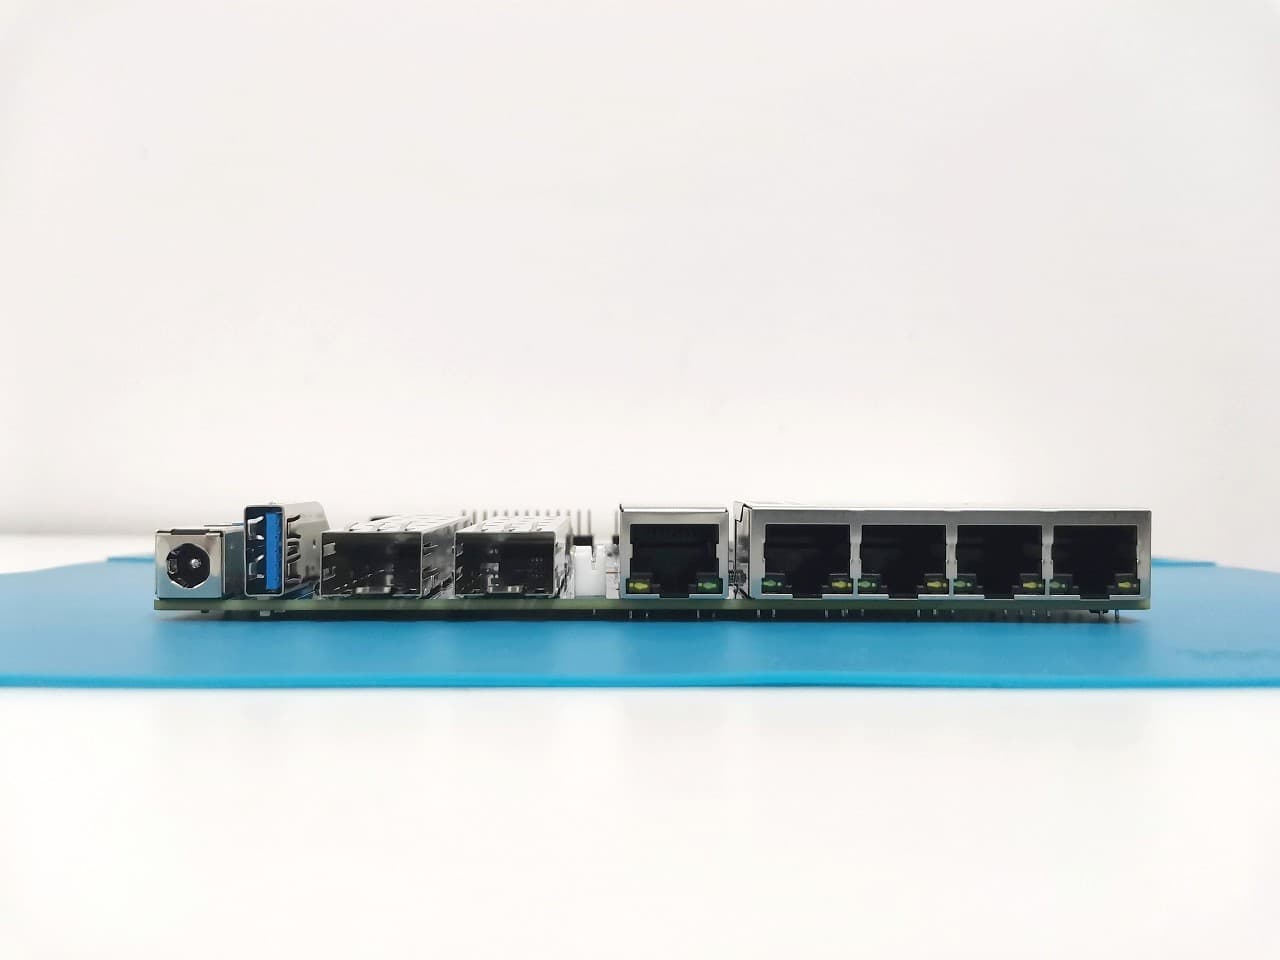
Onboard Bootstrap switch
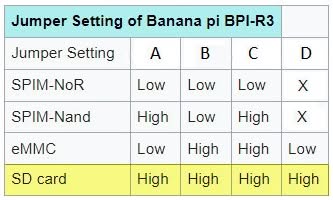
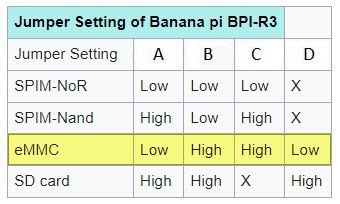
The Banana Pi R3 Bootstrap switch allows you to select Jumper settings according to different operation modes. The company also added a small rectangle-shaped cut in the Case, enabling easy access to the jumpers without a need to open the cover, making it very convenient for users.
Flashing and Booting From eMMC
The R3 board offers a wide selection of boot storage configurations. You have options to burn (flash) the image files to different media such as eMMC, NAND, NOR, SD Card including boot recovery if needed.
The installation process
The SD card and eMMC device share the same SoC interface, so you will need to flash one SD image, boot from the SD card, flash a Nand image into Nand, and then flash an eMMC image into eMMC after changing the bootstrap to boot from Nand. Lastly, you need to change the bootstrap switch to boot from eMMC.
Bootstrap switch
The user can flash the OS files and choose the preferred storage media from which the system files will be loaded.

Flashing OS files via USB Serial Module
By using the Banana Pi R3 UART 3 Pin serial port you can access all of these options and here is how to do it, step by step.
Step #1
Purchasing a USB to TTL Serial Adapter. For the best driver compatibility under Windows 11, we strongly recommend using one based on F232BL chip by FTDI.
Product Photo | Product description | Purchasing link |
 Model: CH340 | USB to UART Converter Module | |
This site contains affiliate links to products. We may receive a commission for purchases made through these links. | ||
Step #2
Set up your serial adapter according to the following wire arrangement on the R3 board and the serial adapter. Each wire should connect to the opposite pole. The R3’s TX is attached to the serial adapter’s RX, for example. Please note that connecting the 5V and 3V pins is not necessary.
| R3 Board Pin | Serial adapter wires |
| RX >>> | TX |
| TX >>> | RX |
| GND >>> | GND |
Step #3
After connecting the three wires to the R3 board use Win32 Disk Imager or Etcher software to burn the MicroSD card. Just download it from the OpenWrt snapshot repository (Click here), unzip and burn it.
Step #4
Insert the Micro SD card and set Bootstrap Jumpers to High.
Step #5
Install Putty client and configure the following settings:
- Connection type to: serial
- Speed: 115200
Serial line: Select the correct COM port recognized by windows device driver, for Ex. COM3
And finally select Open.
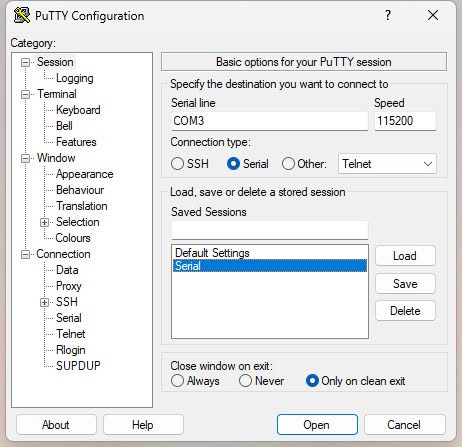
Step #6
The R3 board should be plugged into the terminal window while the terminal window is open and displaying a blank terminal screen.
Step #7
At this point, you should get a boot menu as shown in the screenshot below:
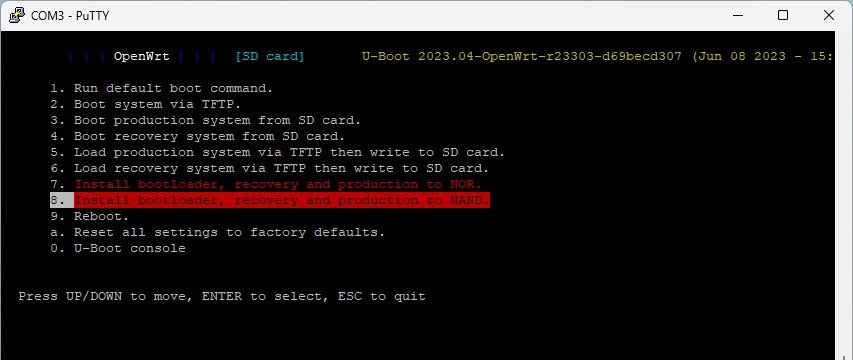
Step #8
In the boot menu select Option 8. “Install bootloader, recovery and production to NAND“.
Step #9
Disconnect the R3 board power cord. Set Bootstrap Jumpers to High, Low, High, Low to boot from NAND.
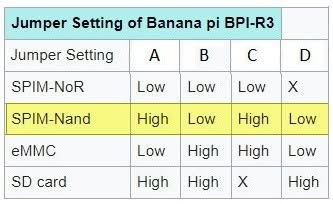
Step #10
Reconnect the R3 board power cord. Now it boots from NAND and select Option 9.
“Install bootloader, recovery and production to eMMC.”
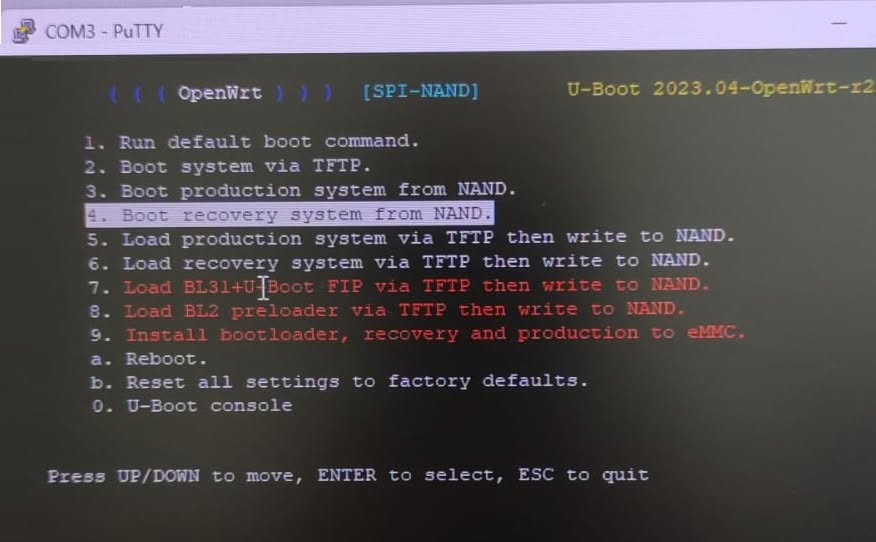
Step #11
Disconnect the R3 board power cord. Set Bootstrap Jumpers to Low, High,High,Low and unplug your Micro SD Card. Now you should be able to boot from eMMC. Once you boot successfully and have SSH access, you will probably want to install the LuCI web interface package and unplug the USB to TTL Serial Adapter.
How to Install an M.2 NVMe SSD
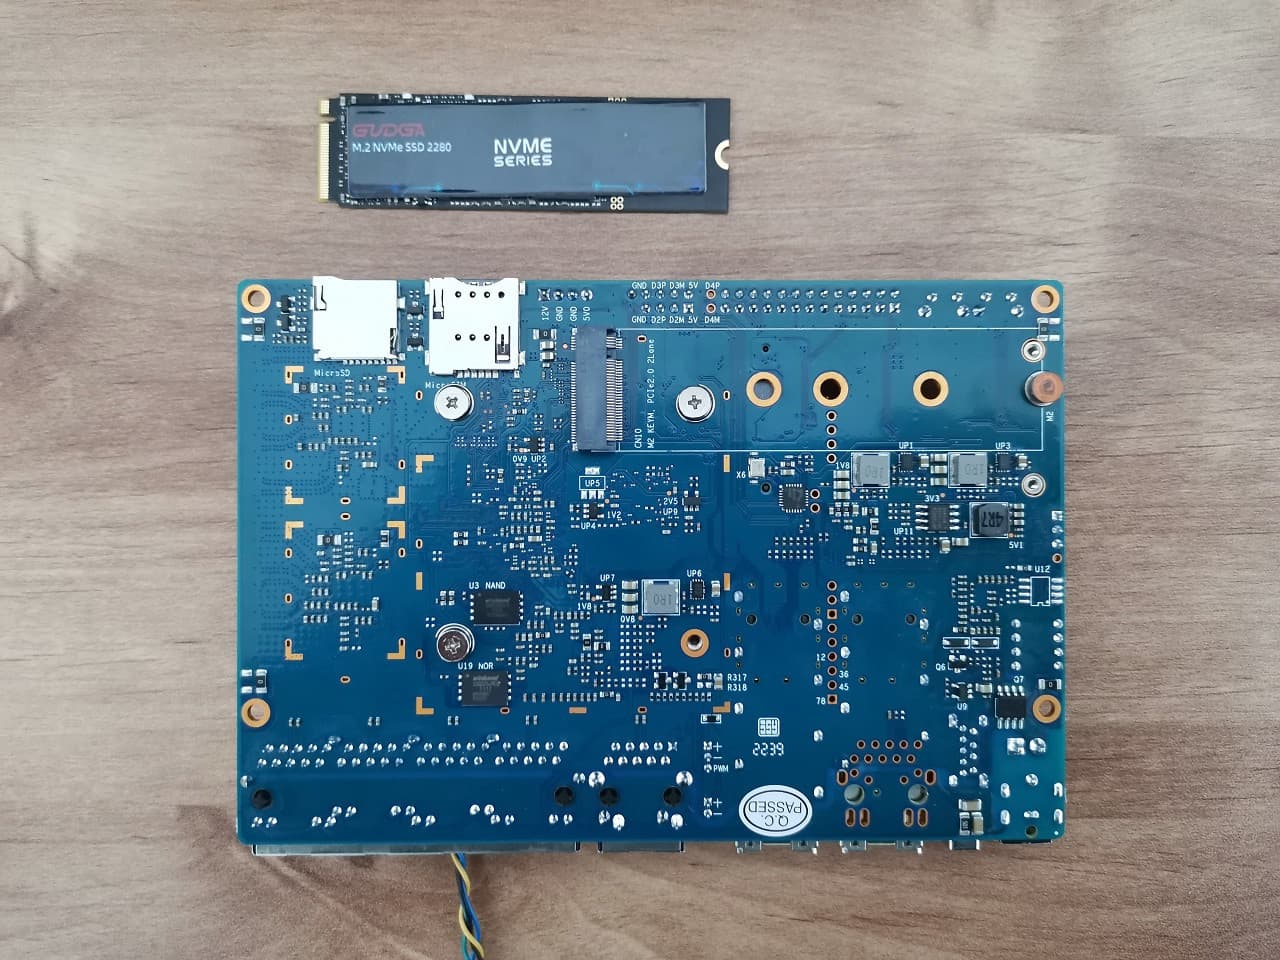
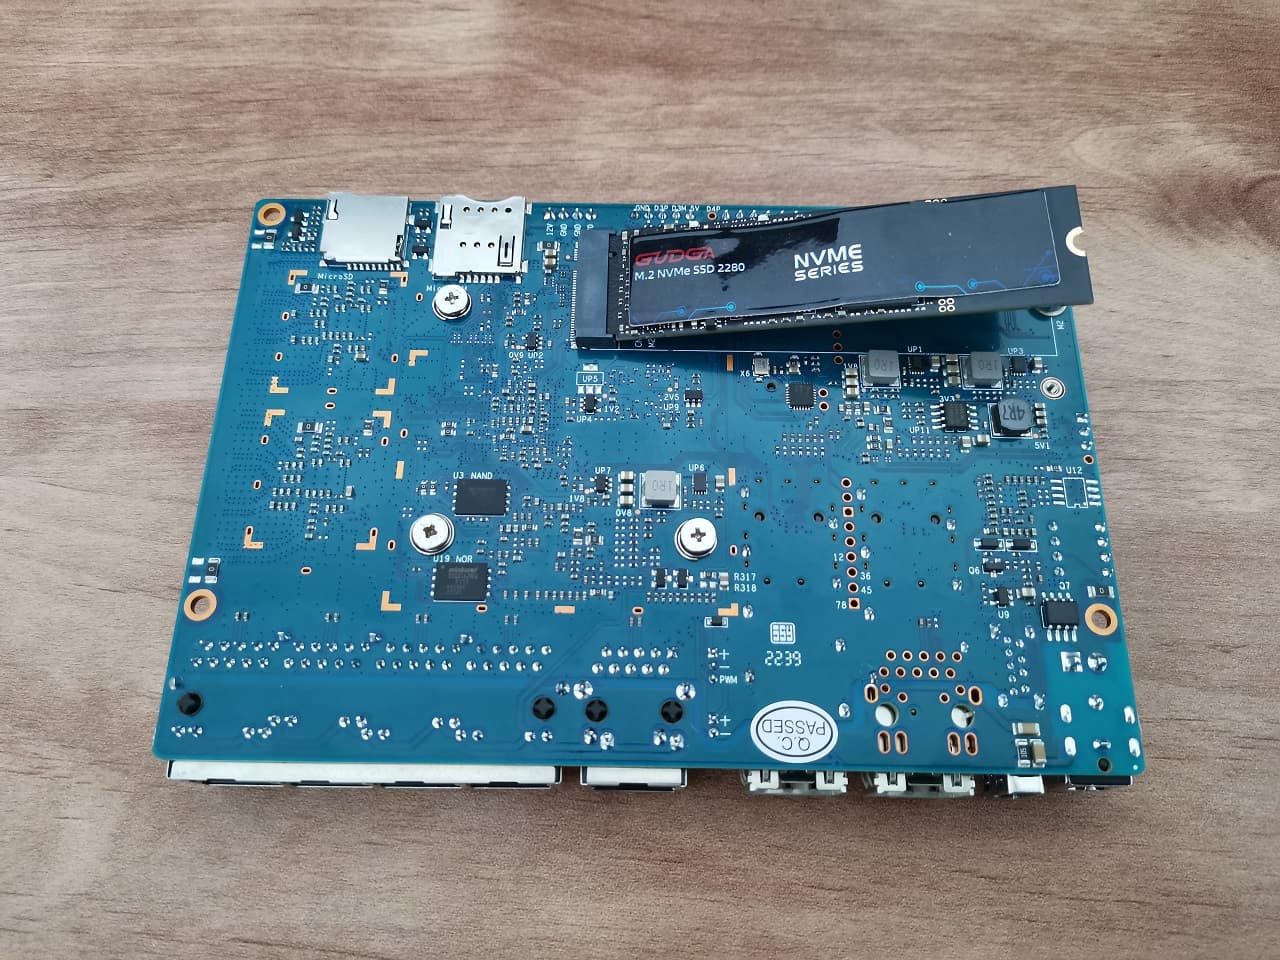
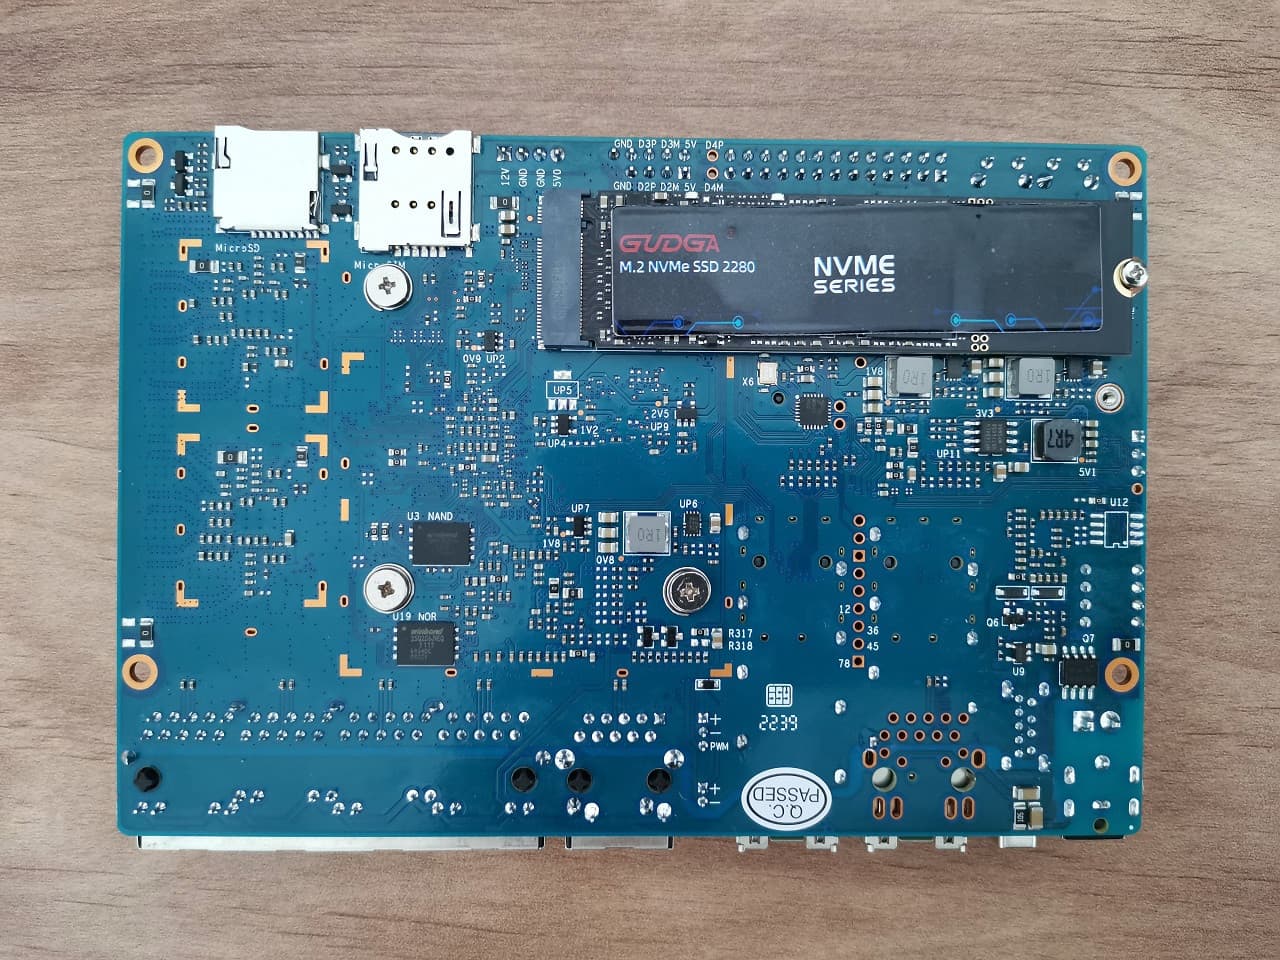
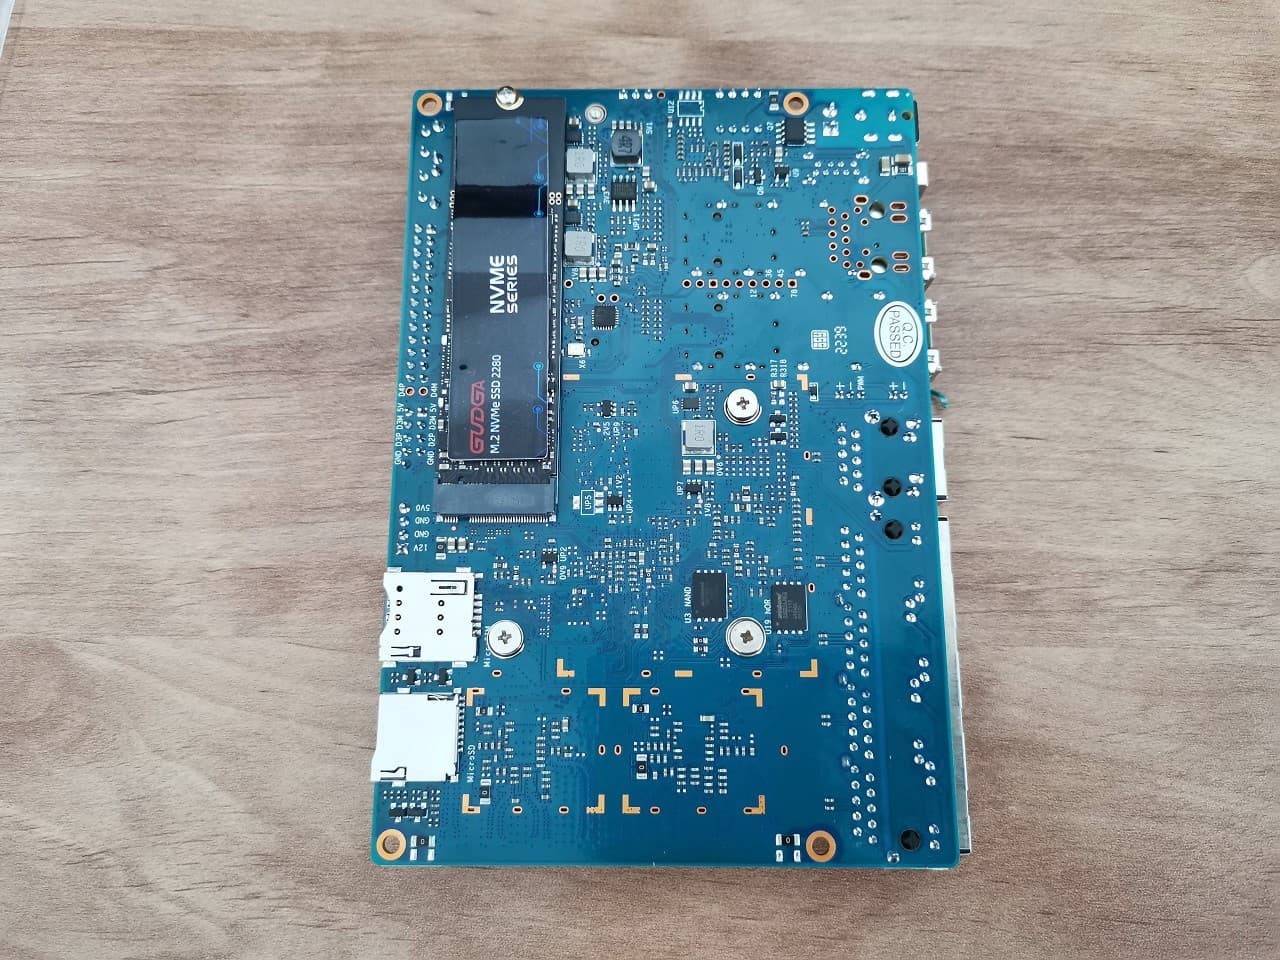
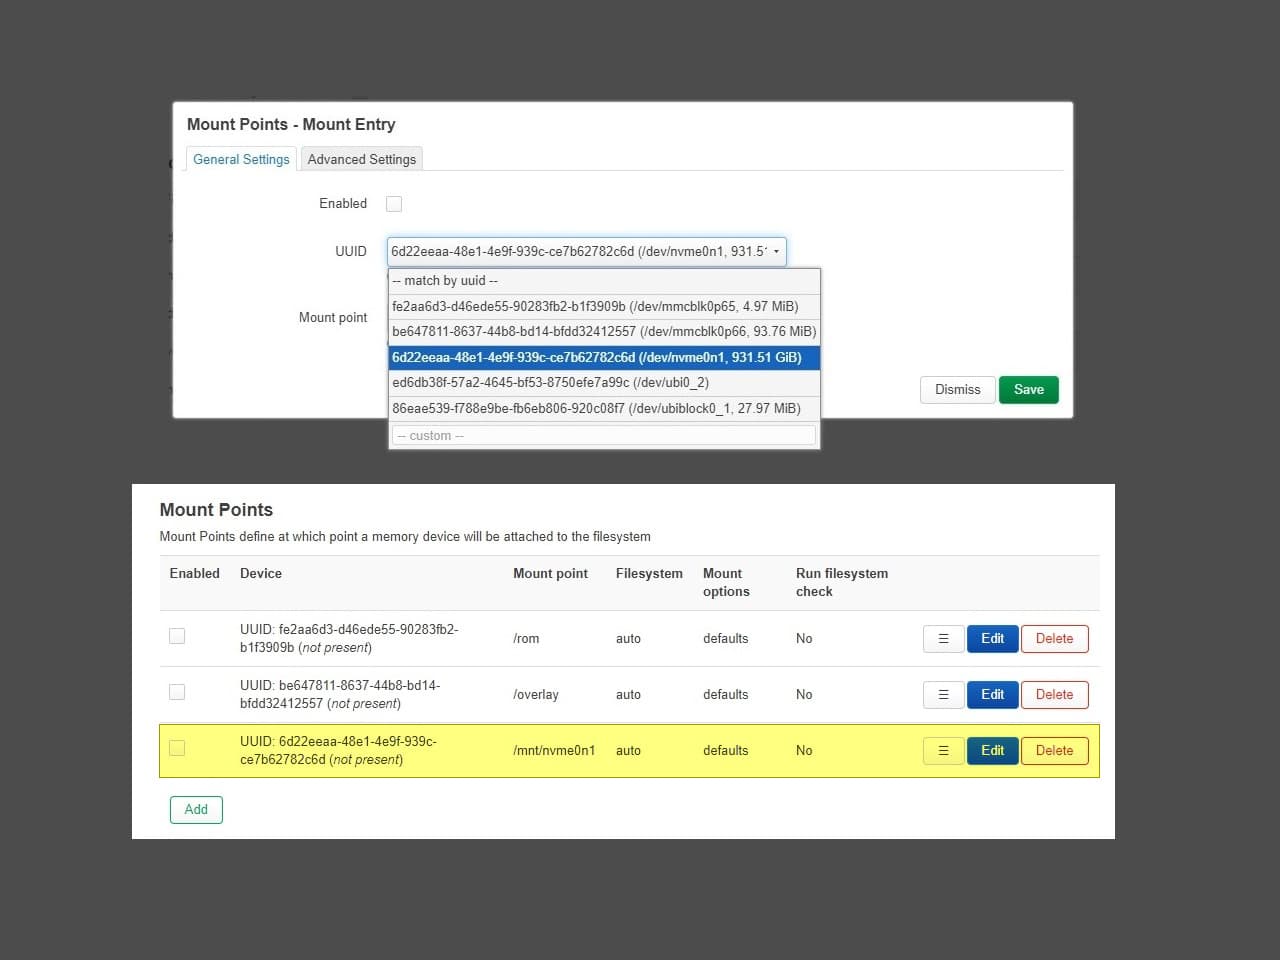
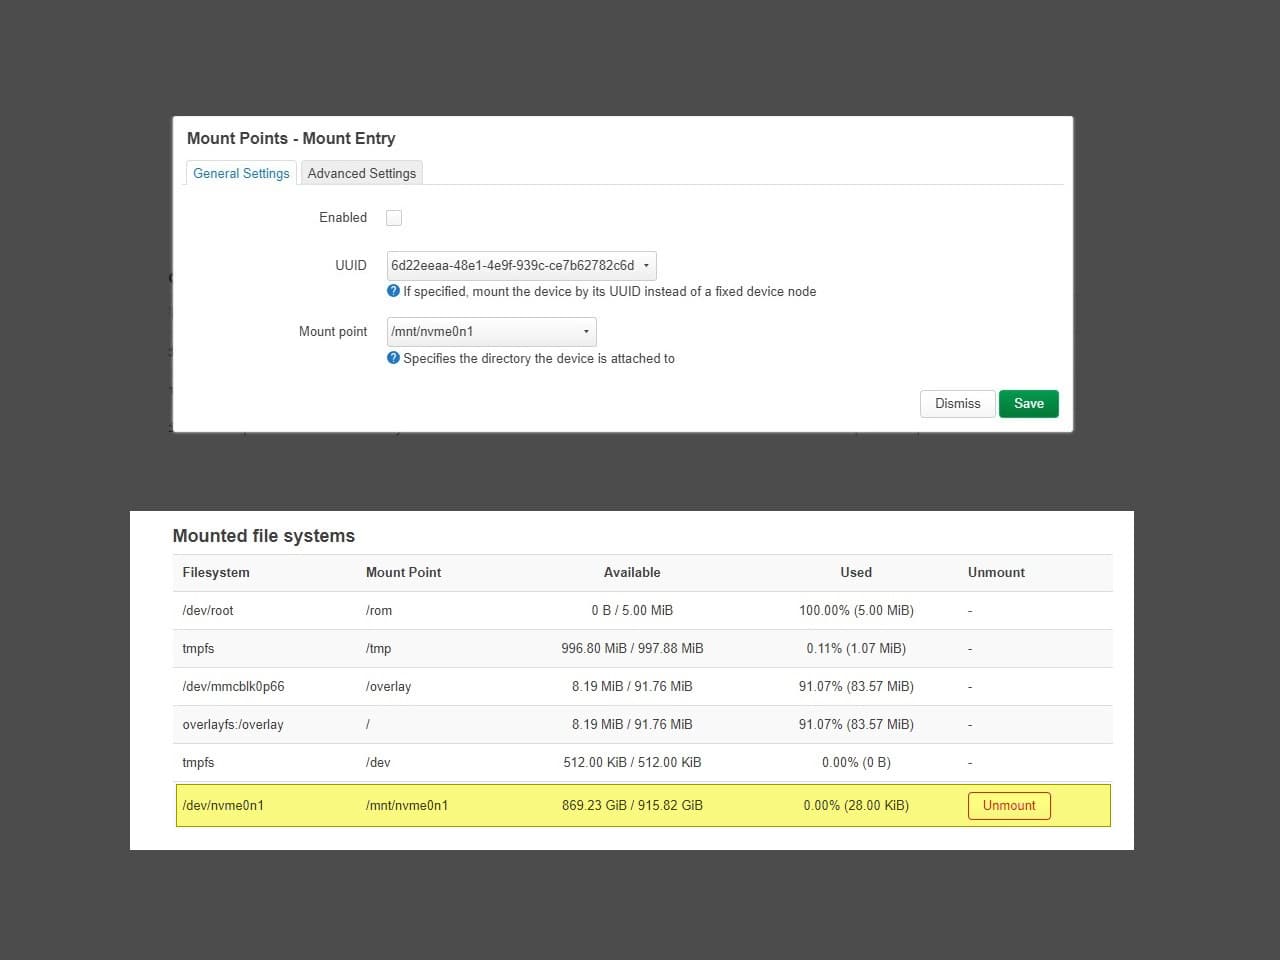
The Banana Pi R3 has an M.2 socket that can add a supported Wi-Fi 6E card or an NVMe SSD Card. Our installation was smooth and straightforward. to recognize the SSD as a storage device under OpenWrt; you must install two essential packages: kmod-nvme and block-mount. Afterward, select the device name shown on the mount points screen. It will be recognized as /dev/nvme0n1 or a similar name. After choosing a preferred file system, you can mount it.


Installing an SSD Card With a Heatsink
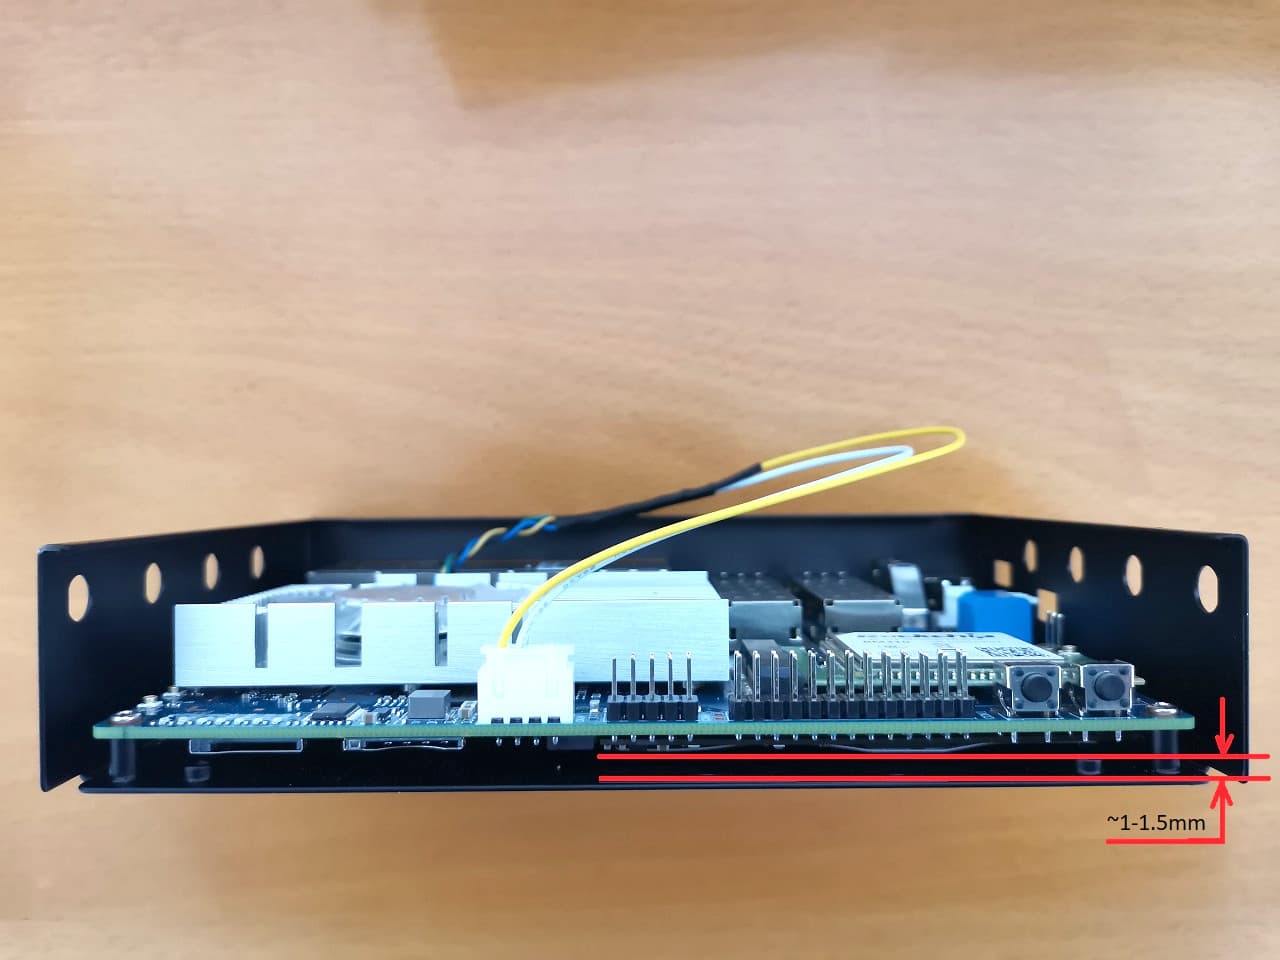
Because there is a +1 mm gap between the SSD card and the Case, which is pretty limiting if you want to add an SSD with a built-in Heatsink, It’s possible to install a 1 mm copper plate and mount it on top of the SSD using a thermal past with adhesive property. This will significantly help in reducing the chip’s temperature and extend the SSD card lifespan.
NVMe Performance Testing
Listing all available storage devices:
root@OpenWrt:/mnt/nvme0n1# fdisk -l
Disk /dev/mtdblock0: 122.5 MiB, 128450560 bytes, 250880 sectors
Units: sectors of 1 * 512 = 512 bytes
Sector size (logical/physical): 512 bytes / 512 bytes
I/O size (minimum/optimal): 512 bytes / 512 bytes

Disk /dev/mtdblock1: 2 MiB, 2097152 bytes, 4096 sectors
Units: sectors of 1 * 512 = 512 bytes
Sector size (logical/physical): 512 bytes / 512 bytes
I/O size (minimum/optimal): 512 bytes / 512 bytes

Disk /dev/mtdblock2: 3 MiB, 3145728 bytes, 6144 sectors
Units: sectors of 1 * 512 = 512 bytes
Sector size (logical/physical): 512 bytes / 512 bytes
I/O size (minimum/optimal): 512 bytes / 512 bytes

Disk /dev/mtdblock3: 512 KiB, 524288 bytes, 1024 sectors
Units: sectors of 1 * 512 = 512 bytes
Sector size (logical/physical): 512 bytes / 512 bytes
I/O size (minimum/optimal): 512 bytes / 512 bytes
The backup GPT table is corrupt, but the primary appears OK, so that will be used.
The backup GPT table is not on the end of the device.

Disk /dev/mmcblk0: 59.48 GiB, 63864569856 bytes, 124735488 sectors
Units: sectors of 1 * 512 = 512 bytes
Sector size (logical/physical): 512 bytes / 512 bytes
I/O size (minimum/optimal): 512 bytes / 512 bytes
Disklabel type: gpt
Disk identifier: 5452574F-2211-4433-5566-778899AABB00

Device          Start    End Sectors  Size Type
/dev/mmcblk0p1     34   8191    8158    4M Linux filesystem
/dev/mmcblk0p2   8192   9215    1024  512K Linux filesystem
/dev/mmcblk0p3   9216  13311    4096    2M Linux filesystem
/dev/mmcblk0p4  13312  21503    8192    4M EFI System
/dev/mmcblk0p5  24576  90111   65536   32M EFI System
/dev/mmcblk0p6  90112 131071   40960   20M EFI System
/dev/mmcblk0p7 131072 344063  212992  104M unknown

Disk /dev/ubiblock0_1: 27.97 MiB, 29331456 bytes, 57288 sectors
Units: sectors of 1 * 512 = 512 bytes
Sector size (logical/physical): 512 bytes / 512 bytes
I/O size (minimum/optimal): 512 bytes / 512 bytes

Disk /dev/nvme0n1: 931.51 GiB, 1000204886016 bytes, 1953525168 sectors
Disk model: GVR1TB
Units: sectors of 1 * 512 = 512 bytes
Sector size (logical/physical): 512 bytes / 512 bytes
I/O size (minimum/optimal): 512 bytes / 512 bytes
root@OpenWrt:/mnt/nvme0n1# sudo hdparm -t --direct /dev/nvme0n1
-ash: sudo: not found
root@OpenWrt:/mnt/nvme0n1# hdparm -t --direct /dev/nvme0n1
(Read/Write) SSD Performance Test
Read transfer rate test: bypassing the hard drive’s buffer cache memory
root@OpenWrt:/mnt/nvme0n1# hdparm -t --direct /dev/nvme0n1

/dev/nvme0n1:
 Timing O_DIRECT disk reads: 1922 MB in  3.00 seconds = 640.06 MB/sec


When you do recommend installing a passive (or active) heat sink to this setup? Passive cooling is I think a no brainer, it’s cheap and silent. Strange they don’t add passive heat sink to their package product, as part of the package.
“Strange they don’t add passive heat sink to their package product, as part of the package”.
They had some supply problems because of COVID.
If you have a large heatsink that will fit and cover all chips, it might be worth trying the passive cooling option. Just use a lower in height so you have the option to add a fan.
I just noticed that the “complete kit” also comes with heat sinks. Seperate heatsinks for each chip. If you buy a large heatsink, that will work as well, BUT keep in mind that the chips have different heights, meaning you should use different heat pads (1.5 mm and 0.5 mm) to have a good coverage of the heat sink on the different chips. I did read about performance issues on forum.banana-pi.org forum, when you don’t cool the chips enough. Especially with passive cooling, it might still be a good idea to add additional vent holes manually in the casing. Since… Read more »
So use 1.5-2 mm thermal pads. Nothing will happen. They are elastic, so it does not matter if you are using the highest type for all chips. It’s not rocket science. I agree about the vent holes. You can drill a few holes.. or you can also glue a small fan to the bottom of the case. And maybe use the GPIO header pins as a power source. Just to get the hot air out of the case.
Actually there is a fan header connnector on the R3 board. Which can do PWM.
Kindly Try it, and let me know if it works well.
you can email me with the info. Thanks
Ps. also add a link to the package deal of the Banana Pi BPI-R3? https://www.aliexpress.com/item/1005004886608696.html.
Since you mentioned the single board computer only on your last page.
Thanks. I added the link for the complete kit.
Which version of PCIe does the board support?
According to MediaTek website >> M.2 M-Key PCIe interface (2-lane PCIe 2.0)
Is there any nas software or docker image that will handle those multiple hdds ? Exampme if i want to raid, zfs or btrfs
1) OpenWrt has NAS support.
2) You can also try CasaOS.
3) OpenMediaVault should run on Debian.
I don’t get what is about the ONTi SFP. It is suposed to be a GPON ONT? In aliexpress I see that it comes in pairs (Tx 1310 and Rx 1550 the first one and other with Tx 1550 and 1310), like a pair which is meant to be connected together.
https://es.aliexpress.com/item/4000265957277.html?spm=a2g0o.productlist.main.17.5893oPf4oPf4kf&algo_pvid=54d3e4cb-00c6-4269-8acb-3ae1e2c40f54&algo_exp_id=54d3e4cb-00c6-4269-8acb-3ae1e2c40f54-8&pdp_npi=4%40dis%21ARS%217735.49%213867.74%21%21%2122.10%21%21%402132a26216964772264216569ed485%2110000001076765699%21sea%21AR%214647643211%21AB&curPageLogUid=VmCG7Kwqm2TR
This module is not compatible with GPON technology.
If the module information / specifications do not indicate it’s a GPON compliance, then it is safe to say that it is not GPON compliant.
Did you use anything to glue the copper-made sheet plates on chips?
I used a thermal silicone adhesive plaster.
This website doesn’t work. Whenever you click on a topic or try to love to Next page it refreshes the page and stays on page 1
Thank u. The problem was fixed.
Hello, I can’t read other 9 pages from 10 in the Banana Pi BPI-R3: Everything you need to know article. Now content is unavaible. Please to fix, it’s great portion of knowledge. Best regards
Hi, please check now.
Thanks
It’s working now, great, thank You:)
Above you mention that the XH2.54 4PIN SATA power connector can be used with a 12v fan. Would I lose PWM capacity?
It should work, but I didn’t try it with a 12V Fan. In a worst-case scenario, you can always buy a 5V separately from AliExpress and assemble it with screws on top of your existing heatsink.
If you choose to connect to the 3-pins FAN socket using Banana Pi original heatsink, PWM is also enabled by default or at least the option to
set a tipping temp point when the fan will stop or start working.