
Setting up an endpoint device using TTN.
During this step, you will register an end device, specifically our LoRaWAN ESP32-S3 board. First, you need to find the board’s MAC address. The Arduino IDE contains numerous sketch examples designed to assist you in this endeavor.
Getting the board DevEUI (Example):
- If your MAC address is AC:DE:48:12:34:56.
- You need to place FF:FE in the center, resulting in the EUI format: AC:DE:48:FF:FE:12:34:56
Step #2: Add the LoRaWAN ESP32-S3 DevEUI key AE:DE:48:FF:FE:12:34:56 to your TTN end device settings to create the AppKey.
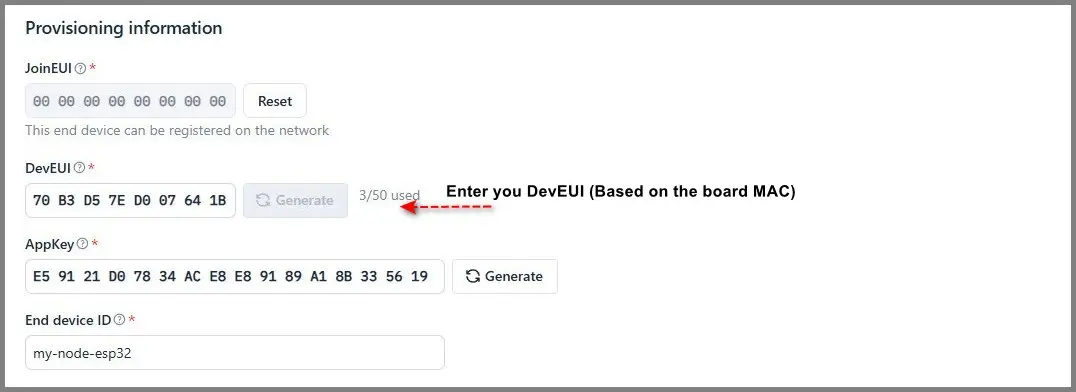
Step #1: Begin the process of generating the necessary keys from The Things Network (TTN). Under DevEUI field you can insert 00:00:00:00:00:00:00:00.
What TTN requires when adding a device?
TTN needs three identifiers:
- DevEUI → required
- JoinEUI → required, but can be all zeros
- AppKey → generated by TTN
Here’s what it looks like after you manually input your ESP32 board’s DevEUI.
| Field | Where it comes from |
|---|---|
| DevEUI | Derived from your ESP32‑S3 MAC |
| JoinEUI | You can use 0000000000000000 |
| AppKey | TTN generates it automatically when you add the device. |
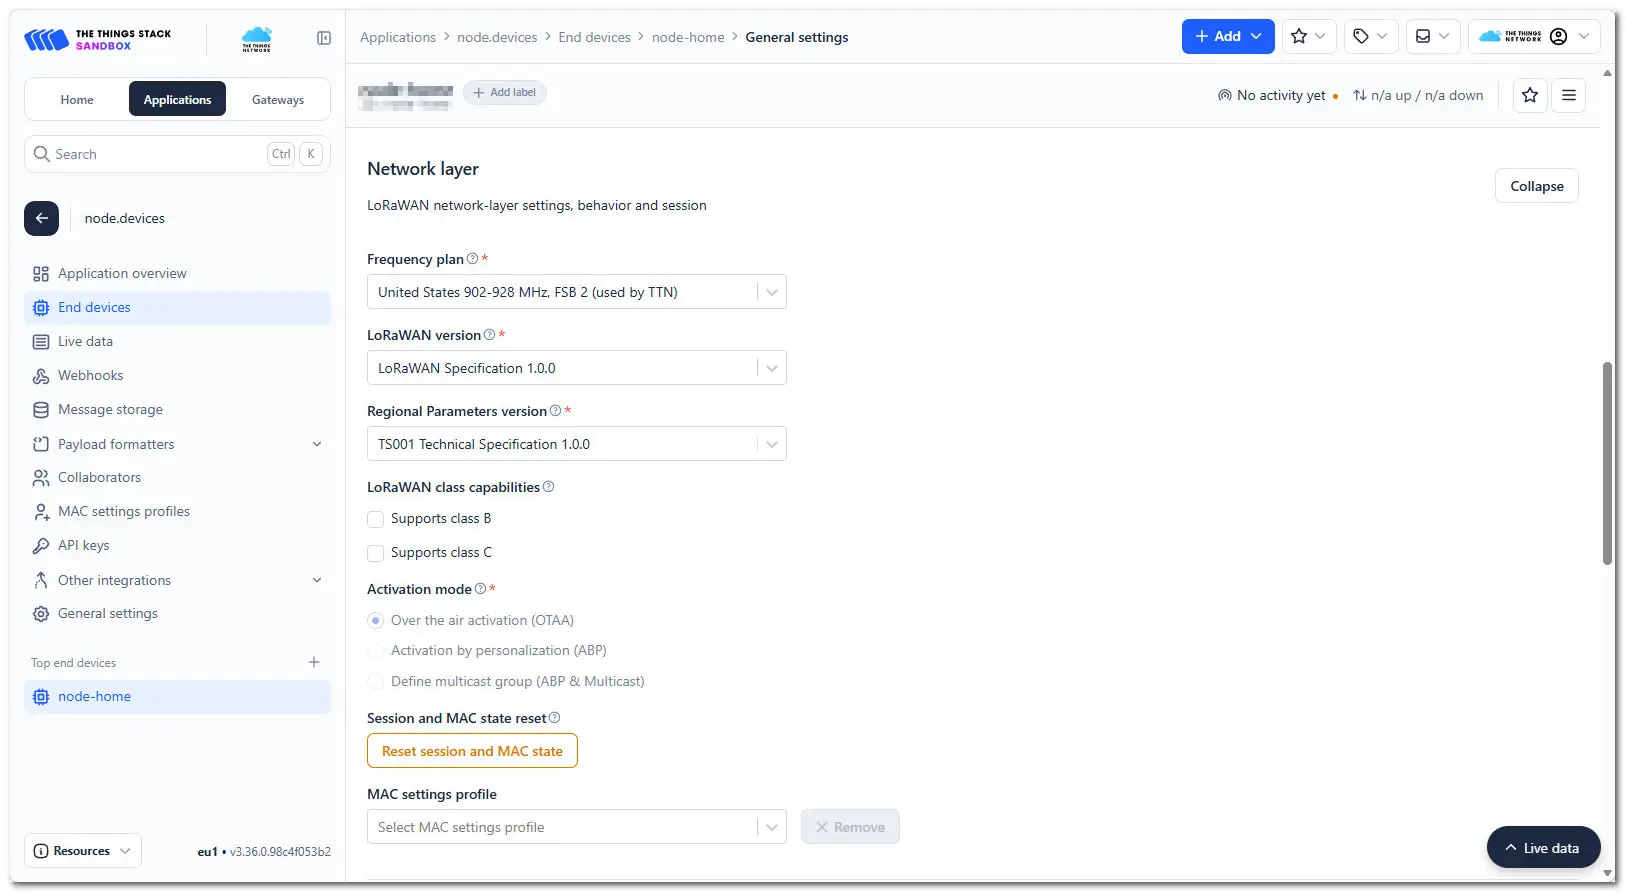
More settings are also required.
| End device | Selected settings on TNN |
|---|---|
| End device ID | For example: my-node-esp32 |
| Frequency plan | United States 902-928 MHz, FSB 2 (used by TTN) (This should match your Gateway’s supported bands) |
| LoRaWAN version | LoRaWAN Specification 1.0.3 |
Setting up our LoRaWAN ESP32-S3 board in The Things Network
Setting LoRaWAN ESP32-S3 OTAA (Over‑The‑Air Activation)
In this final step you will need to upload your TTN (The Things Network) keys into your ESP32‑S3 LoRaWAN board. That’s exactly how LoRaWAN devices work. Every LoRaWAN node must store its DevEUI, AppEUI, and AppKey inside our ESP32 board firmware so it can authenticate and join the TTN network.
Example Configuration:
Getting the Device Identifiers values from our TTN you should add them in this code section:
// ------------------------------------------------------
// REPLACE THESE WITH YOUR VALUES FROM THE GATEWAY
// ------------------------------------------------------
const uint8_t DevEUI[8] = {0x12, 0x20, 0xBA, 0xFF, 0xFD, 0x12, 0x01, 0x28};
const uint8_t AppEUI[8] = {0x00, 0x00, 0x00, 0x00, 0x00, 0x00, 0x00, 0x00};
const uint8_t AppKey[16] = {
    0x01, 0x2B, 0xA8, 0xE9, 0xDF, 0x4B, 0x6B, 0xC3,
    0xC6, 0x54, 0x96, 0x75, 0x42, 0xF2, 0x15, 0x09};
loading the Sketch
- Select the board: Tools → Board → DFRobot LoRaWAN ESP32-S3
- Identify the correct COM port, which in our case is COM10.
- Tools → Serial Monitor Set baud rate to 115200.
- Click Upload
This example code provided is derived from the following configuration:
- Frequency plan: United States 902-928 MHz, FSB 2 (used by TTN)
- LoRaWAN version: LoRaWAN Specification 1.0.3
- The US915 Gateway Band Settings must be aligned and configured to FSB2 (FSB2, channel8~15,65).
#include "DFRobot_LoRaWAN.h"
// Data packet transmission interval
#define APP_INTERVAL_MS 10000
const uint8_t DevEUI[8] = {0x12, 0x20, 0xBA, 0xFF, 0xFD, 0x12, 0x01, 0x28};
const uint8_t AppEUI[8] = {0x00, 0x00, 0x00, 0x00, 0x00, 0x00, 0x00, 0x00};
const uint8_t AppKey[16] = {
0x01, 0x2B, 0xA8, 0xE9, 0xDF, 0x4B, 0x6B, 0xC3,
0xC6, 0x54, 0x96, 0x75, 0x42, 0xF2, 0x15, 0x09};
uint8_t port = 2;
uint8_t buffer[255];
LoRaWAN_Node node(DevEUI, AppEUI, AppKey, CLASS_A);
TimerEvent_t appTimer;
void joinCb(bool isOk, int16_t rssi, int8_t snr)
{
if(isOk){
printf("JOIN SUCCESS\n");
TimerSetValue(&appTimer, APP_INTERVAL_MS);
TimerStart(&appTimer);
}else{
printf("OTAA connection error. Restart the connection request packet after 5 seconds.\n");
delay(5000);
node.join(joinCb); // Rejoin the LoRaWAN network
}
}
void userSendUnConfirmedPacket(void)
{
TimerSetValue(&appTimer, APP_INTERVAL_MS);
TimerStart(&appTimer);
const char * data = "DFRobot";
uint32_t datalen = strlen(data);
memcpy(buffer, data, datalen);
node.sendUnconfirmedPacket(port, buffer, /*size=*/datalen);
printf("Sending Unconfirmed Packet...\n");
}
// Receive data callback function
void rxCb(void *buffer, uint16_t size, uint8_t port, int16_t rssi, int8_t snr, bool ackReceived, uint16_t uplinkCounter, uint16_t downlinkCounter)
{
if(size != 0){
printf("data:%s\n", (uint8_t*)buffer);
}
}
void setup()
{
Serial.begin(115200);
delay(5000); // Open the serial port within 5 seconds after uploading to view full print output
if(!(node.init(/*dataRate=*/DR_4, /*txEirp=*/16))){ // Initialize the LoRaWAN node, set the data rate and Tx Eirp
printf("LoRaWAN Init Failed!\nPlease Check: DR or Region\n");
while(1);
}
TimerInit(&appTimer, userSendUnConfirmedPacket); // Initialize timer event
node.setRxCB(rxCb); // Set the callback function for receiving data
node.join(joinCb); // Join the LoRaWAN network
printf("Join Request Packet\n");
}
void loop()
{
delay(1000);
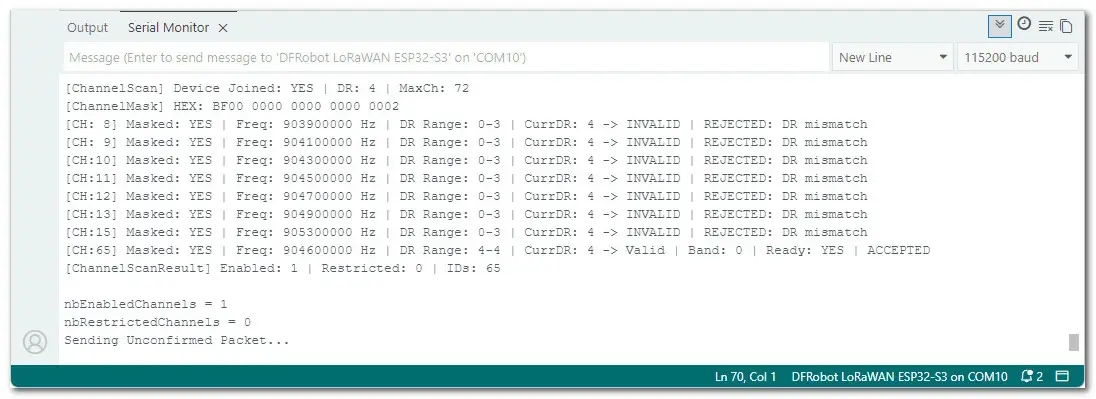
}Once it completes, you will see something similar to this under the Serial Monitor windows:
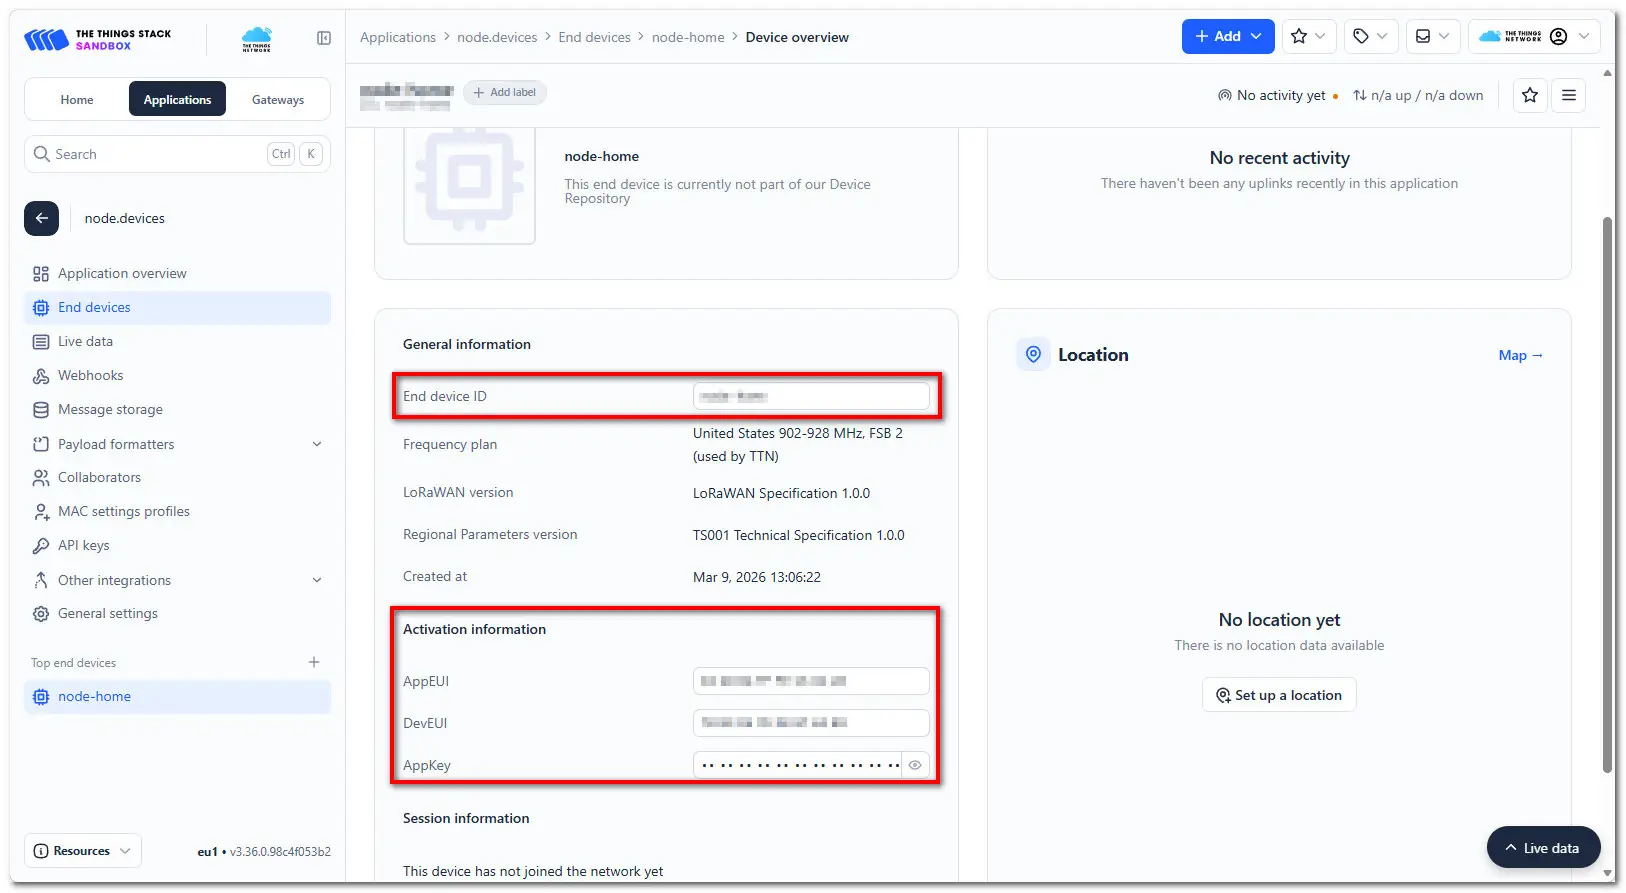
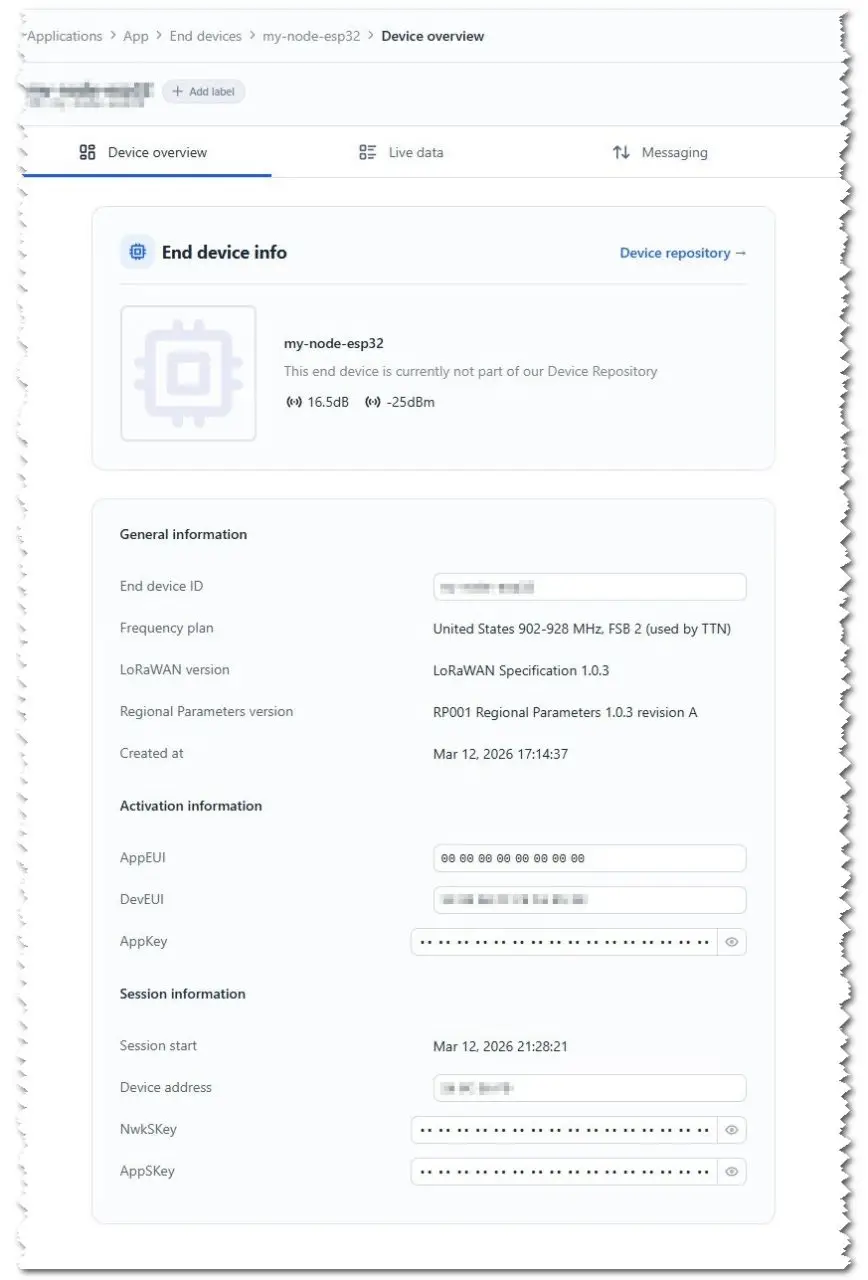
Once everything is properly set up and configured, you should be able to view the End Device information in the TTN console.
The final outcome after successfully configuring everything with TTN.
: OpenWrt Setup & Optimal WiFi Power Guide")

